21 Important Things to Do with a New Laptop (Ultimate Setup Guide)
Last Updated:
So, you’ve just unboxed your shiny new laptop. Congrats!
But hold up, don’t dive in just yet.
Trust me, I’ve been there, and I’ve learned the hard way.
There are a few crucial steps you should always take with a new laptop to ensure it’s running at its best.
These steps will save you some serious headaches down the road.
Assess the Laptop Physically
First things first: let’s make sure your laptop arrived in perfect condition.
Closely inspect the box and laptop for any signs of damage that could have occurred during shipping, like:
- Dents, cracks or deep scratches on the lid, bottom, or sides
- Bent hinges that prevent the screen from opening/closing smoothly
- Gaps or poorly fitting seams where parts don’t align properly
- Damaged ports (USB, HDMI, etc.) or a loose power jack
- Stuck or mushy keys on the keyboard
- Dead or stuck pixels on the screen (colored dots that don’t change)
It’s rare, but manufacturing defects and shipping damage can happen, so take a few minutes for a thorough inspection.
If anything seems off, snap some photos and contact the seller or manufacturer pronto to discuss a replacement or repair.
You don’t want to find a nasty surprise after the return period ends!
Customize Look & Feel
Time to make this laptop feel like YOURS.
I always switch to dark mode immediately.
Not only does it look sleek, but research has shown that darker themes put significantly less strain on your eyes.
Here’s how:
- Open Settings
- Go to Personalization
- Select Colors
- Choose Dark under “Choose your mode”
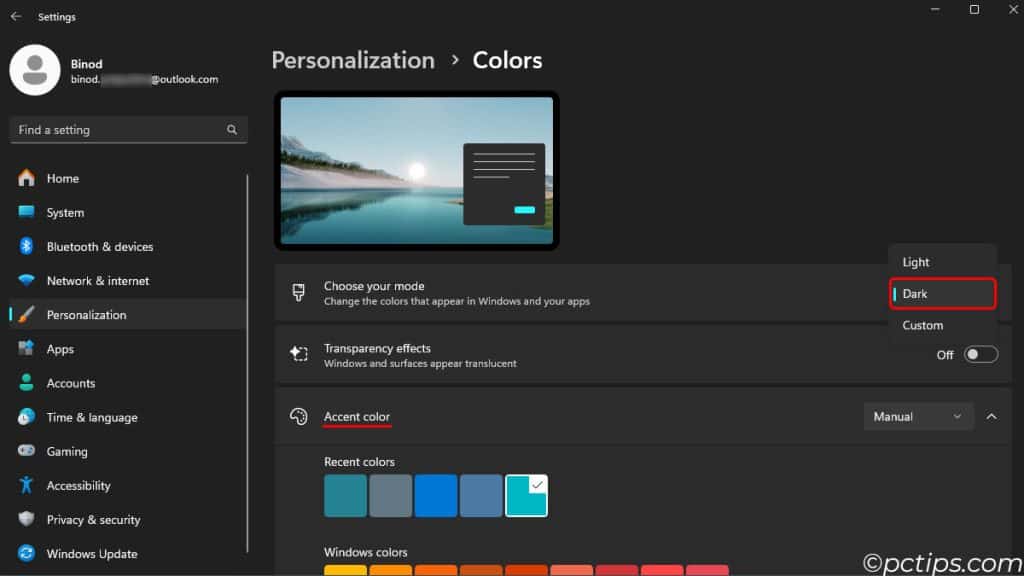
While you’re at it, choose an accent color you like (I’m partial to green myself) and set a custom wallpaper that speaks to you.
If dark mode isn’t your jam, no worries! Stick with the default theme or explore the other options. The goal is to personalize your experience.
For more tips on tricking out your desktop’s look, check out our Customizing Desktop Guide.
Set Up Your Desktop Icons
Even if you prefer a minimalist look (I sure do), it’s handy to have a few key icons on your desktop for quick access.
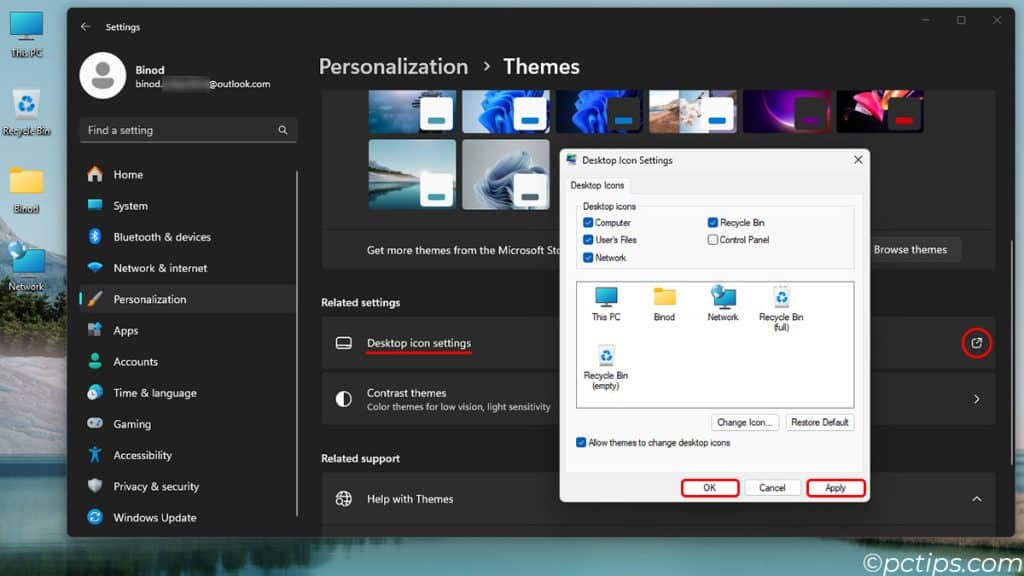
I usually enable This PC, User folder, Network and Recycle Bin.
Here’s how to set up your desktop icons:
- Right-click the desktop and select Personalize
- Scroll down and click on Themes
- Click Desktop icon settings
- Check the icons you want to see
- Click Apply and OK to save
But, I’m a stickler about keeping my desktop tidy.
If you’re prone to icon clutter, check out my guide on 10 Clever Ways to Organize Your Desktop Icons.
Optimize Display Settings
Most laptops these days have high-resolution displays, which is awesome…but it comes with a quirk.
Out of the box, the text and icons can look teeny-tiny.
Here’s how to change it:
Windows 10: Settings > System > Display Scale and layout
Windows 11: Settings > System > Display
Use the dropdown under “Scale” to adjust the size of text and icons
For 1080p displays, I’ve found that scaling to 100% gives you the most screen real estate while still keeping things readable.
4K laptops are a different story.
You’ll likely need to experiment with higher scaling percentages to strike the right balance.
125% or 150% are common sweet spots.
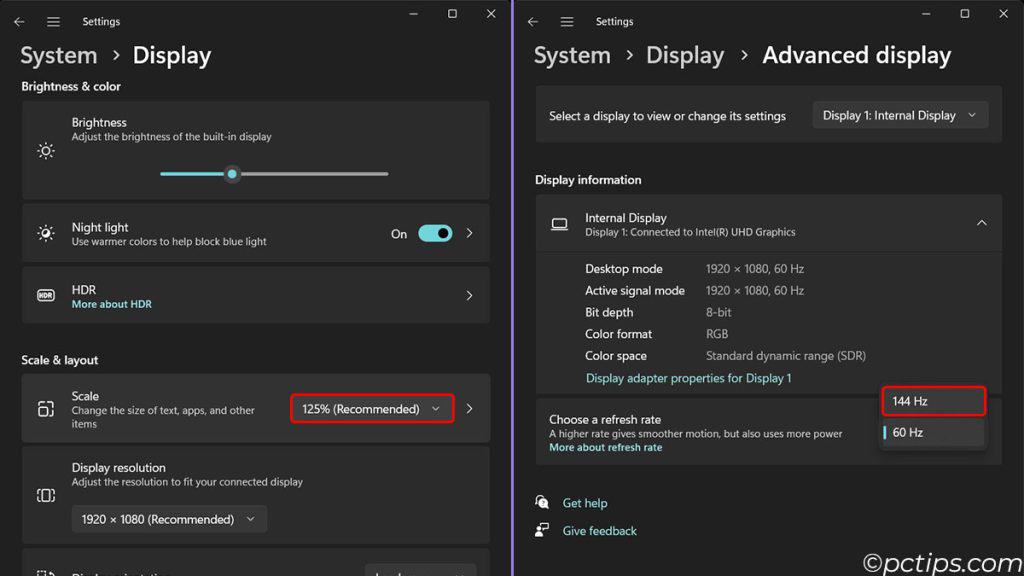
Another key factor? Refresh rate.
Some newer laptops default to 60Hz even if they support buttery-smooth 144Hz.
Make sure you’re getting the most out of that high-end display.
Banish the Bloatware
Manufacturers just love to stuff your shiny laptop full of trial software, crapware, toolbars, and other junk you’ll never use.
Not only does this crud clutter up your menus, it can also slow your machine down by hogging resources and even compromising security.
Time for a bloatware purge:
- Press Win+R to open the Run dialog
- Type in
appwiz.cpland hit Enter to bring up the Programs and Features list - Sort the list by the “Installed On” column so you can see all the most recent junk
- Systematically remove anything you’re sure you don’t need. Common culprits include:
- Norton or McAfee trial versions
- WildTangent Games
- In-house manufacturer tools you’ll never use
- “Value-added” apps from shady partners
- Microsoft bloat like OneDrive or Teams (unless you actually use them)
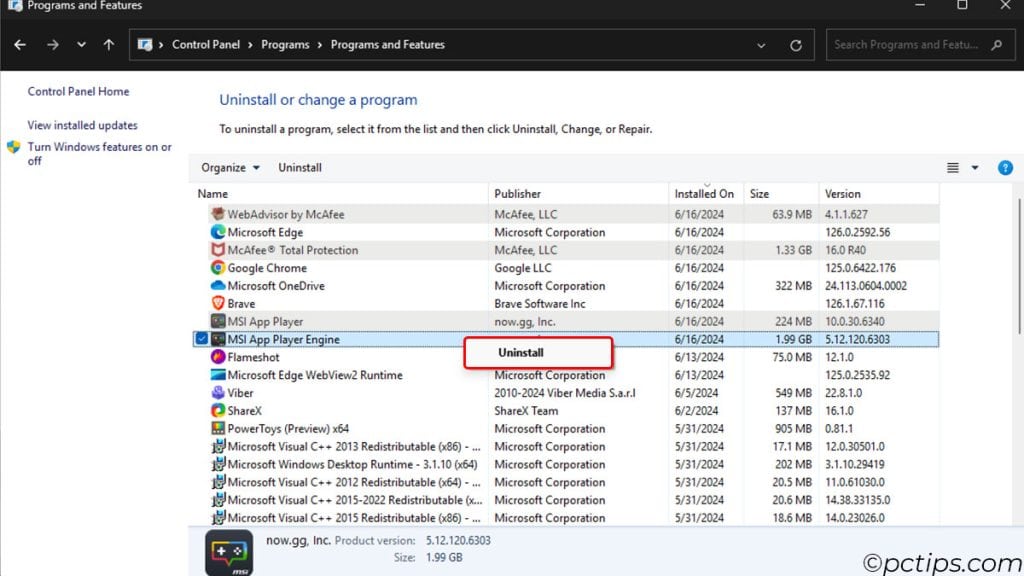
Some pre-installed software may actually be useful, like hardware drivers or support apps. If you’re unsure about an item, Google it before nuking it.
Want more handy Run commands like appwiz.cpl up your sleeve? Check out 100 Most Useful Run Commands.
Run All Windows Updates Until There Are No More
Fresh out of the box, your Windows install is almost guaranteed to be a few versions behind.
That means you’re missing out on the latest features, performance tweaks, and most critically – security patches.
You know what that means – time to play the update waiting game:
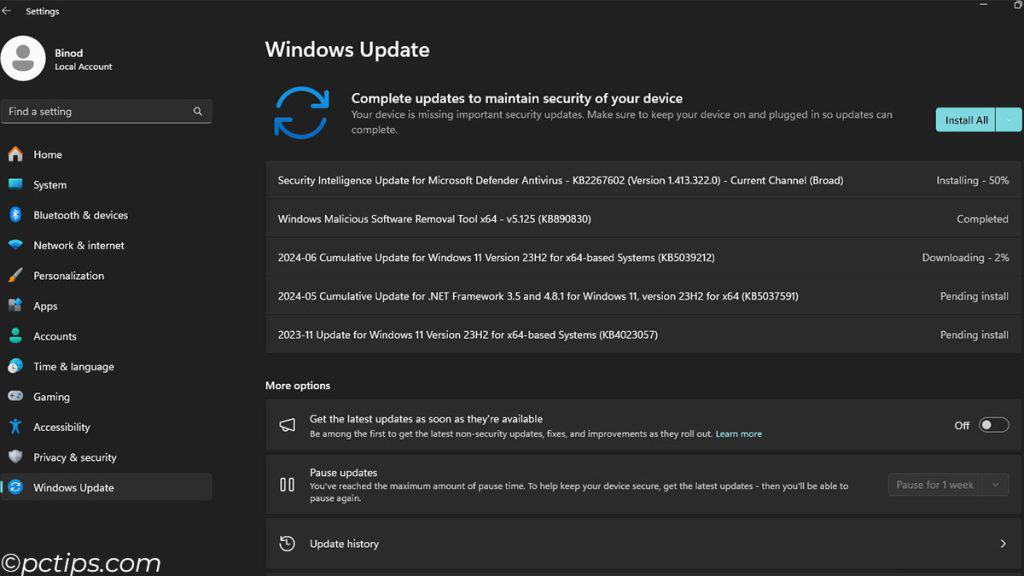
- Open Windows Update via Settings > Update & Security > Windows Update. Or just type “update” in the Start menu search.
- Click Check for Updates and let ’em rip. Now’s a good time to grab a coffee/beverage of choice.
- Your system will likely need to restart multiple times during this process. Don’t fight it. Embrace the reboot cycle.
- Once you’re on a shiny new Windows build, check for updates AGAIN. I know, it’s like Groundhog Day. But trust the process.
- Eventually, you’ll get the glorious “You’re up to date!” message.
Update Device Drivers
While Windows Update will update most drivers, these will be optimized for compatibility rather than performance.
For the best results, get the latest drivers directly from the manufacturer’s website.
In my testing, after updating OEM drivers, I’ve seen over 20% FPS gain in both NVIDIA and AMD GPUs.
Here’s how to update your drivers:
- Go to your laptop manufacturer’s support page
- Look for a driver manager app or a section to download drivers
- If there’s a driver manager, run that and let it update everything
- If you need to download drivers manually, grab the latest versions of all the essentials:
- Chipset
- Graphics
- Audio
- Network
- Touchpad
- etc.
- Restart your laptop to allow the new drivers to take effect
Trust me, it’s worth the extra effort.
Change Folder Options for Better Visibility
By default, Windows hides a lot of important files and extensions from you.
This is one of the first things I do on every Windows machine.
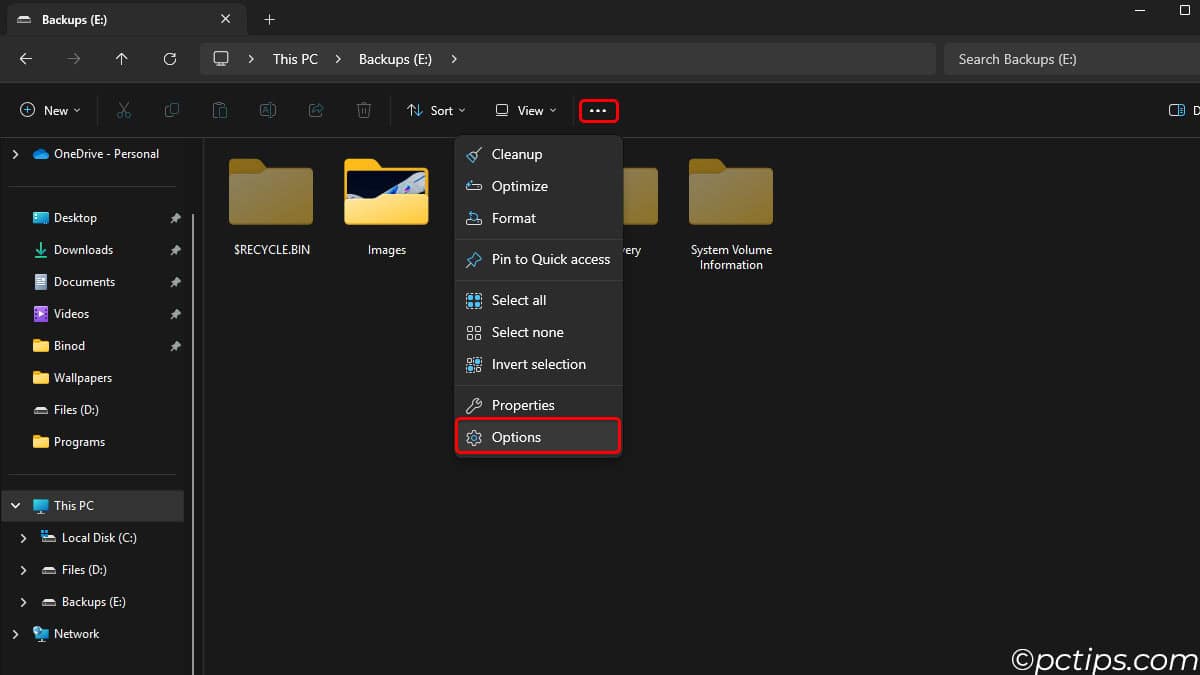
- Open File Explorer
- Click the “…” menu in the top right
- Choose “Options“
- Under the “General” tab:
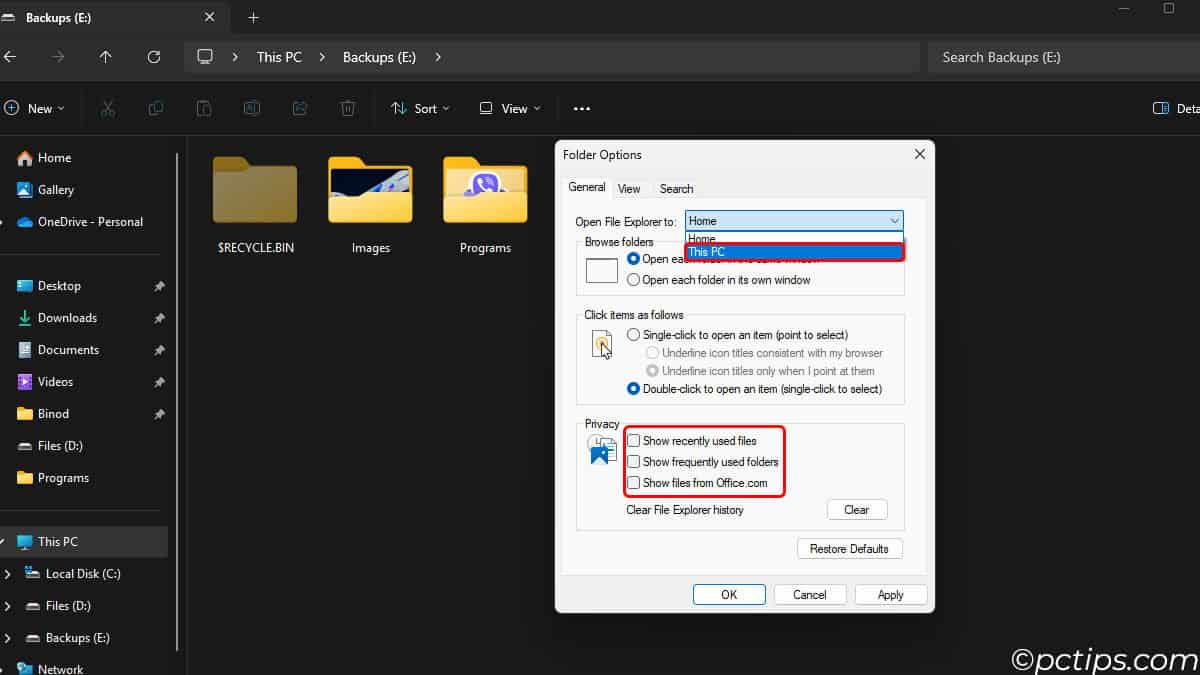
- Change “Open File Explorer to” to “This PC“
- Uncheck all the Privacy options
- Under the “View” tab:
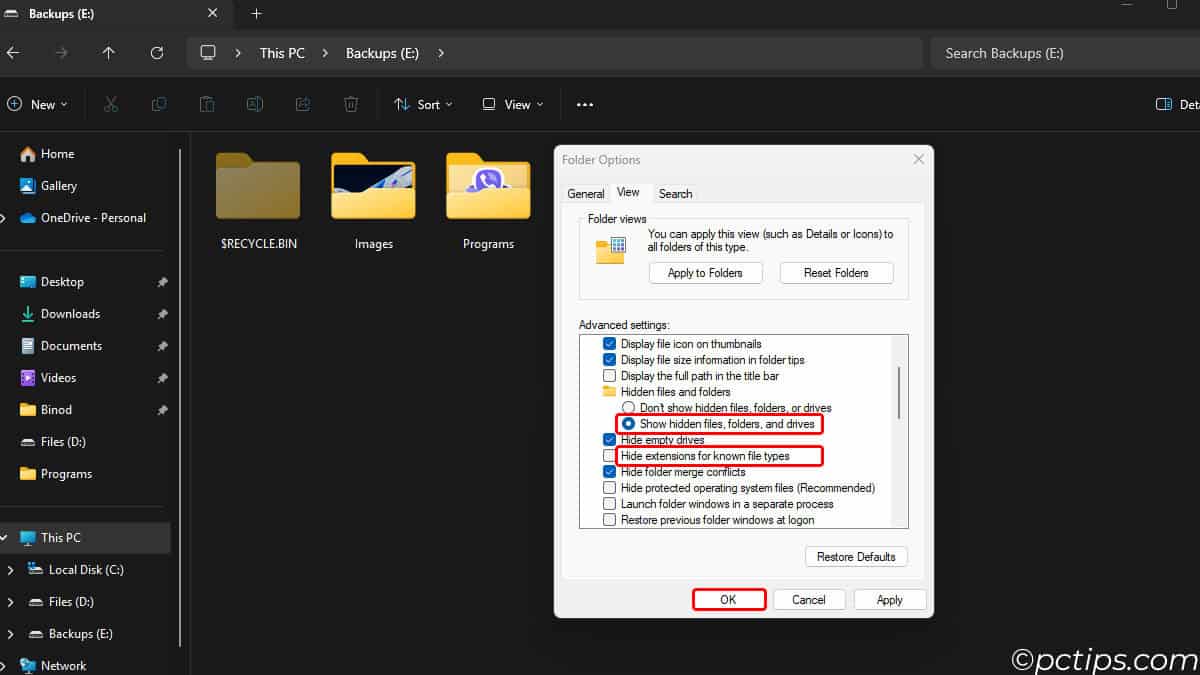
- Check “Show hidden files, folders, and drives“
- Uncheck “Hide extensions for known file types“
Now you’ll always see all your drives and files, complete with extensions.
Why is this important? Well, file extensions are a common way malware tries to trick you.
You think you’re opening “NotVirus.txt” but it’s actually “NotVirus.txt.exe“. Yikes.
For more on this, see my article on The 7 Most Dangerous File Types You Should Never Open.
Oh and while we’re tweaking Windows, you’ve got to read 18 Windows Settings You Should Change Now. So many good gems in there.
Customize the Start Menu & Taskbar
Windows 11 introduced some major changes to the Taskbar and Start Menu.
Some love it, some hate it.
But regardless of your stance, you can tweak it to work better for you.
Let’s start with the Start menu:
- Open the Start menu and click the Settings icon (the little gear)
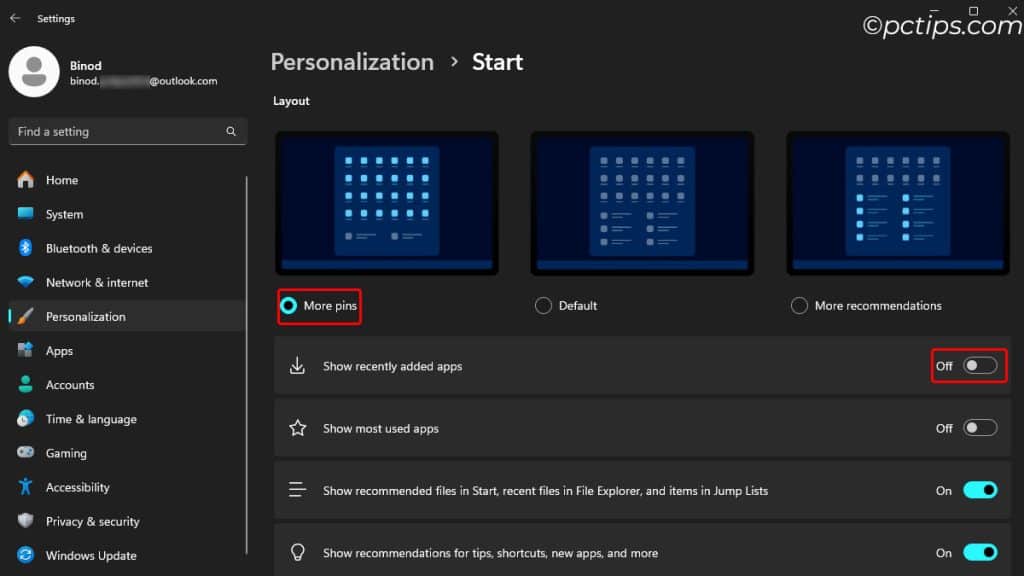
- Go to Personalization > Start
- Under Start menu layout, you can choose whether you want more pinned tiles (the default) or more recommendations. Personally, I prefer the More pins layout for quick access to my frequently used apps.
- While you’re here, consider turning off Show recently added apps. This will keep your start menu looking clean and uncluttered.
Now for the taskbar:
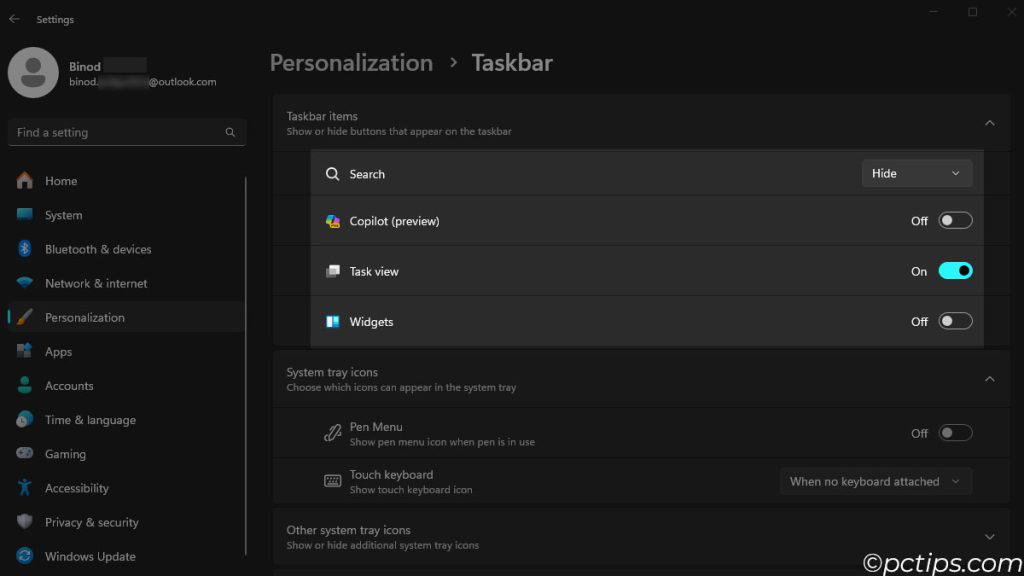
- Right-click on an empty space in the taskbar and select Taskbar settings
- If you don’t use the search box, you can hide it to free up some space. Just toggle off Search.
- Not a fan of the new AI-powered Widgets? No problem – turn it off too.
Also Read: 18 Clever Ways to Customize Your Windows Taskbar
Install YOUR Preferred Apps
Now it’s time to make this machine truly yours by loading up all your favorite software.
Here are some of my personal must-haves:
- Firefox: My browser of choice for its speed and privacy features.
- Visual Studio Code: Hands-down the best code editor out there, IMHO.
- Flameshot: For all my screenshot needs.
- VLC: Plays any video file you throw at it, no codec hunting required.
- Notepad++: A souped-up text editor that’s great for quick notes and code snippets.
- PowerToys: For some extra Windows superpowers.
Your list will likely look different, and that’s okay!
The point is to create an environment that works for you.
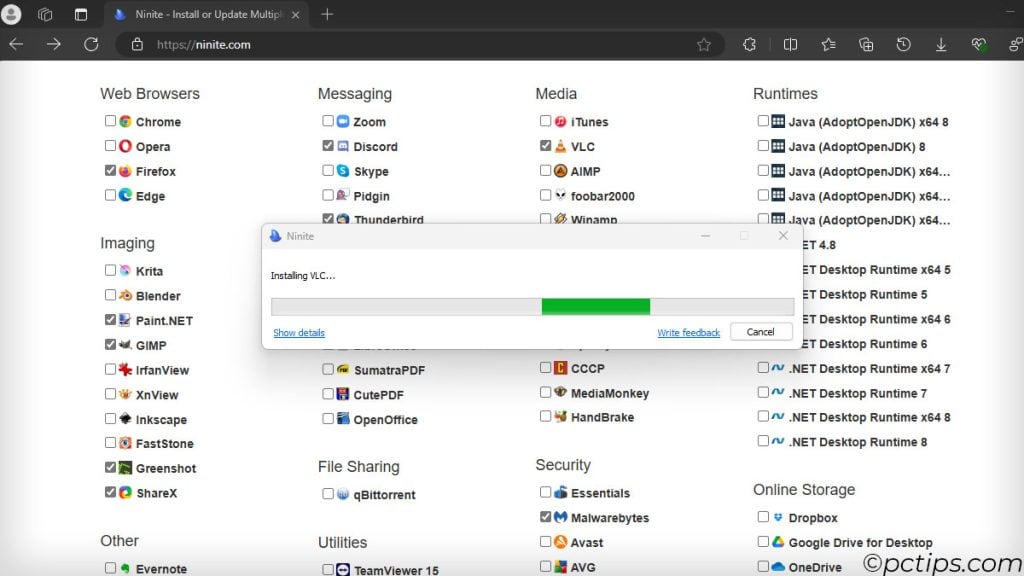
Psst… want to install a bunch of apps all at once? Check out Ninite. It’s a real time-saver.
Don’t forget to grab any GPU-related apps like Nvidia GeForce Experience or AMD Adrenalin Software.
Optimize Startup Apps
Over time, as you install more software, you might notice your laptop taking longer to boot up.
That’s often due to too many programs set to launch at startup.
To fix this,
- Launch Task Manager with Ctrl + Shift + Esc.
- Click the Startup tab.
- Disable any apps you don’t need running right away
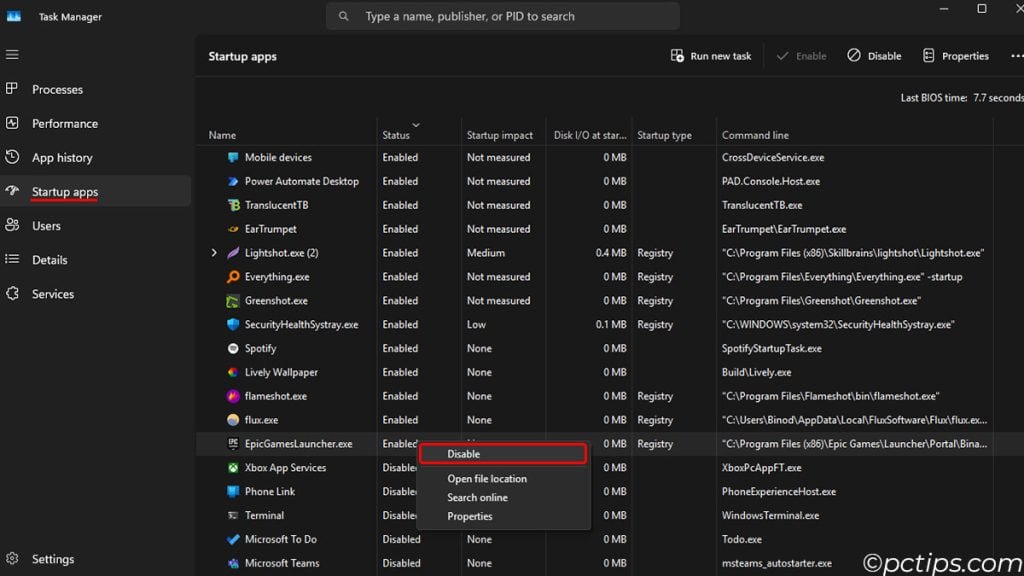
This can significantly speed up your boot time.
Fun fact: Task Manager has some hidden features! Check out my article on Task Manager’s best-kept secrets.
Set Up Virtual Desktops
One of Windows’ most underrated features is virtual desktops.
They allow you to create separate “spaces” for different tasks, helping you stay organized and focused.
Here’s how to use them:
- Click the Task view button on your Taskbar (or press Win + Tab)
- Click New desktop at the top
- Open apps on any desktop and switch between them from the Task view
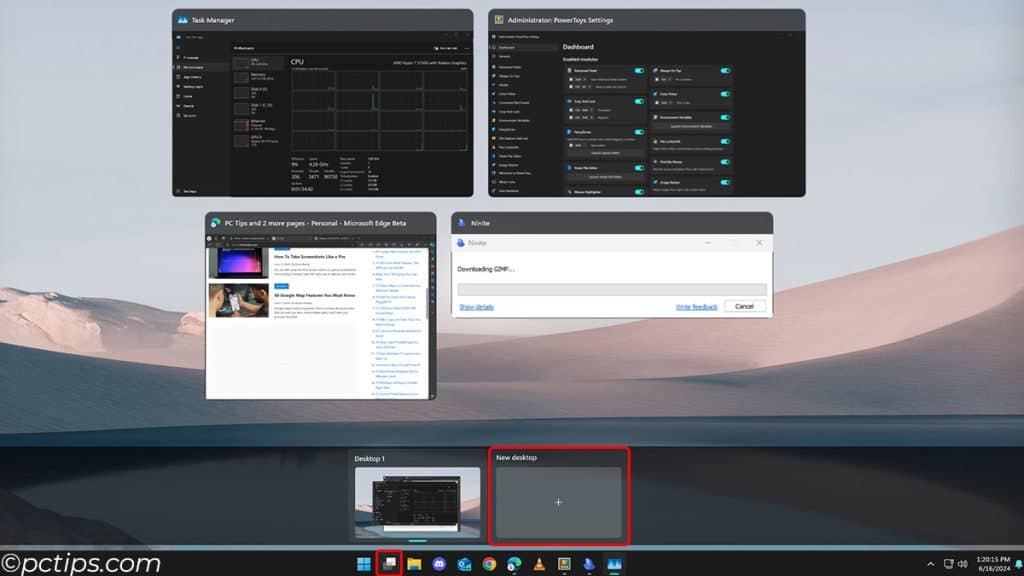
I like to set up desktops for:
- Main work tasks
- Communication (email, chat, etc.)
- Research and reading
- Personal stuff
Give it a try – it might just change how you work!
Enable the “Mux Switch” (For Dual GPU Laptops)
If your laptop has both integrated graphics AND a dedicated GPU, it likely uses a “mux switch” to swap between the two.
This tells your laptop to use the powerful discrete GPU directly, rather than routing everything through the integrated one first.
The exact process varies by manufacturer:
- Lenovo Legion: Open Lenovo Vantage and enable Hybrid Mode
- Razer Blade: Use Razer Synapse to switch to Discrete Graphics
- Alienware: Reboot and press F2 to enter the BIOS. Navigate to Video and enable Discrete Graphics
- ASUS: Use Armoury Crate and set the GPU Mode to Optimized or Ultimate
Poke around in your laptop’s primary utility software and see if you spot a mux switch option.
Enabling it can give you a nice frames-per-second bump in games, though it may slightly reduce battery life.
Keep Your Battery Healthy
Laptop batteries are happiest when you keep ’em charged between 50-80%.
Constantly running down to zero or charging to 100% can slowly diminish capacity over time.
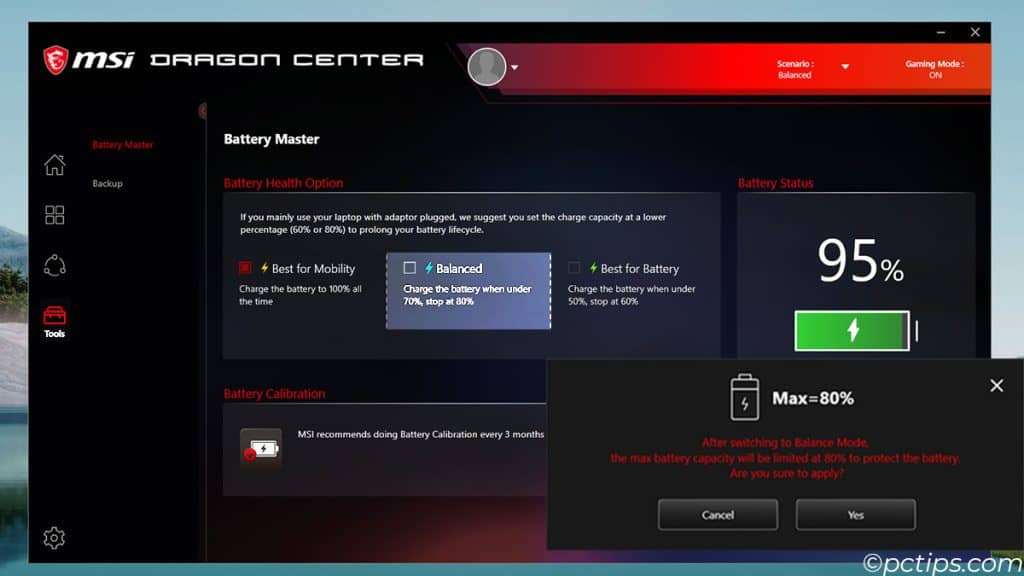
Thankfully, most modern laptops have built-in “smart charging” tech to help:
- Lenovo Vantage’s “Conservation Mode”
- ASUS Battery Health Charging
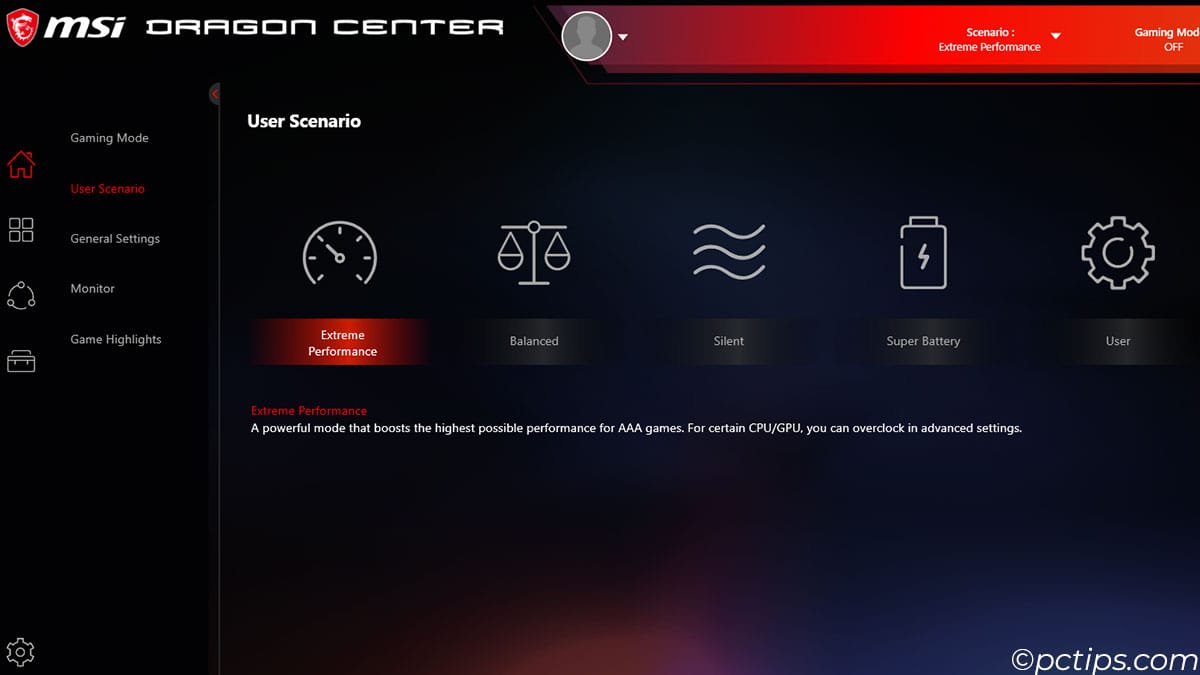
- MSI Center’s “Battery Master”
- The “Battery Limit Mode” setting in Surface devices
Adjust Your Power Settings
While you’re at it, take a few minutes to optimize your laptop’s power settings.
Here’s how:
- Open the Run dialog (Win+R) and type
powercfg.cpl. Select the “Power saving” or “Balanced” plan for everyday use, and “High performance” when you need extra oomph.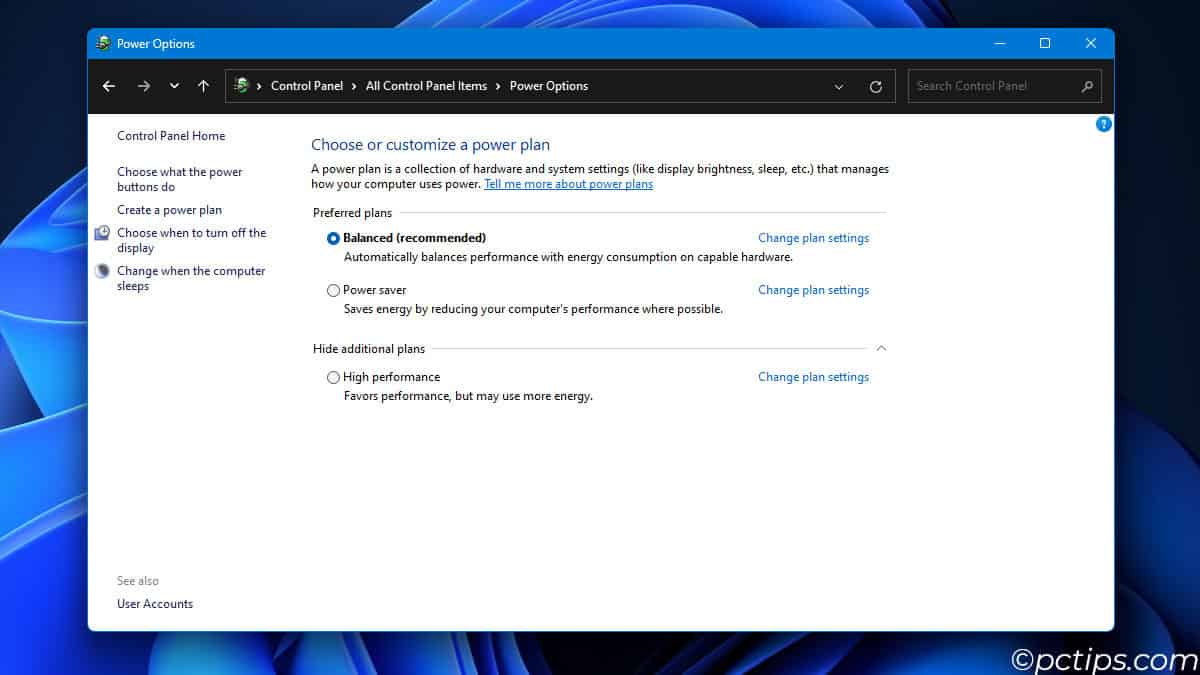
- Open the Run dialog again and type
systempropertiesadvanced. Click on “Performance settings” and adjust for best appearance or performance as needed.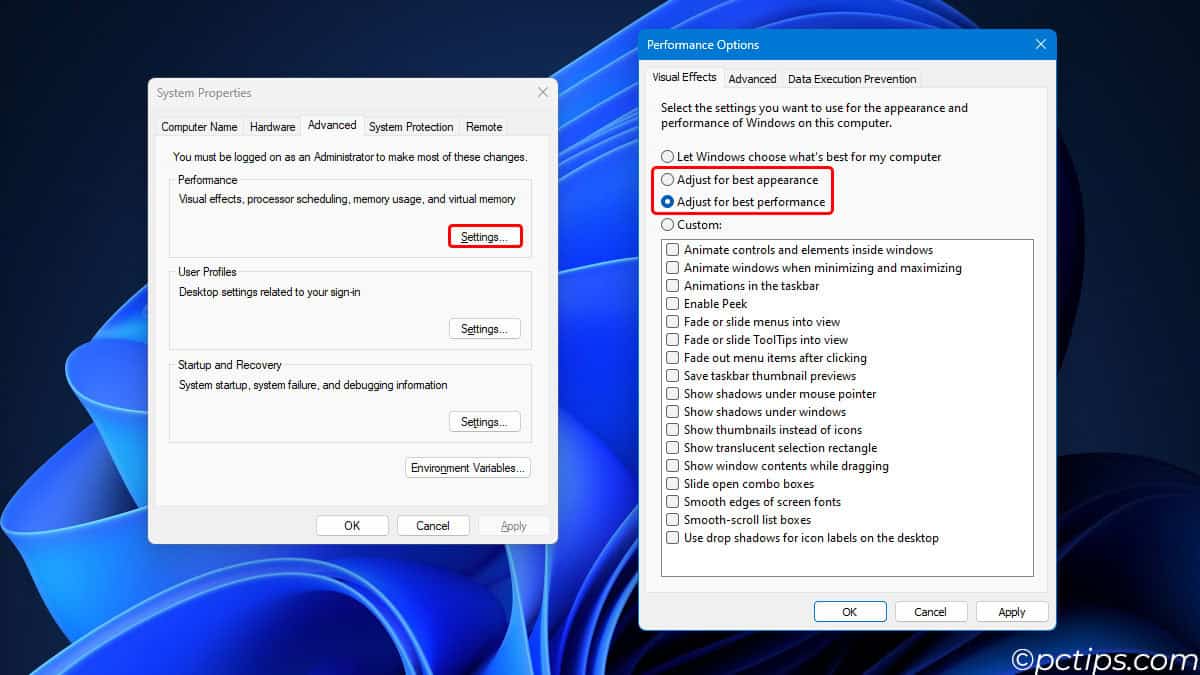
- Check for manufacturer-specific power management software in your app list. These often provide even more granular control over power usage.
Enable “Night Light”
Staring at a blindingly bright screen in the dark can be rough on the eyes, not to mention disruptive to sleep.
That’s where Night Light comes in!
This handy Windows feature warms up your display’s color temperature at night to cut down on eye strain and help you wind down.
To turn it on:
- Open the Start Menu and click the gear icon to open Settings
- Go to System > Display
- Toggle on Night Light and click Night Light Settings to adjust the strength and schedule
Also Read: Make Your Computer Easier to See (and Use!)
Partition the SSD
If your laptop has a single large SSD, I highly recommend splitting it into at least two partitions (drives).
- System drive (C:) for Windows and programs
- Data drive (D:) for all your personal files and media
That way, if you ever need to reset Windows or replace the drive, your documents, photos, music, etc are safely quarantined on their own partition.
To partition an existing drive:
- Open the Disk Management console (press Win+X and click Disk Management)
- Right-click your C: drive and choose “Shrink Volume“
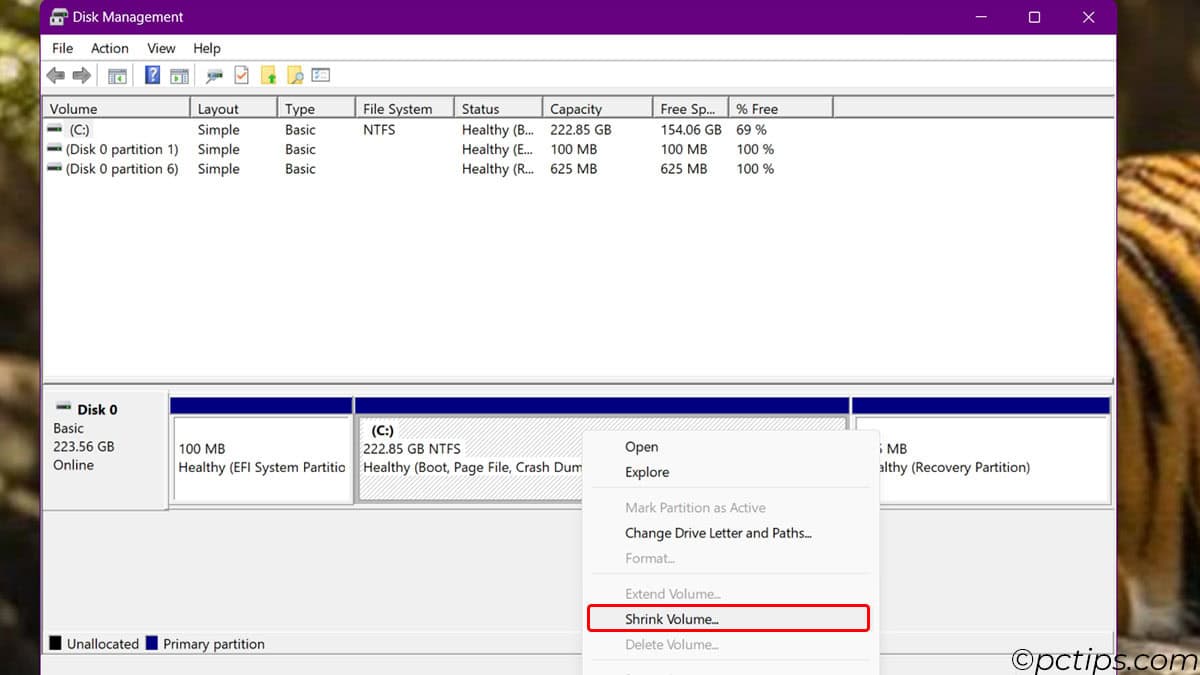
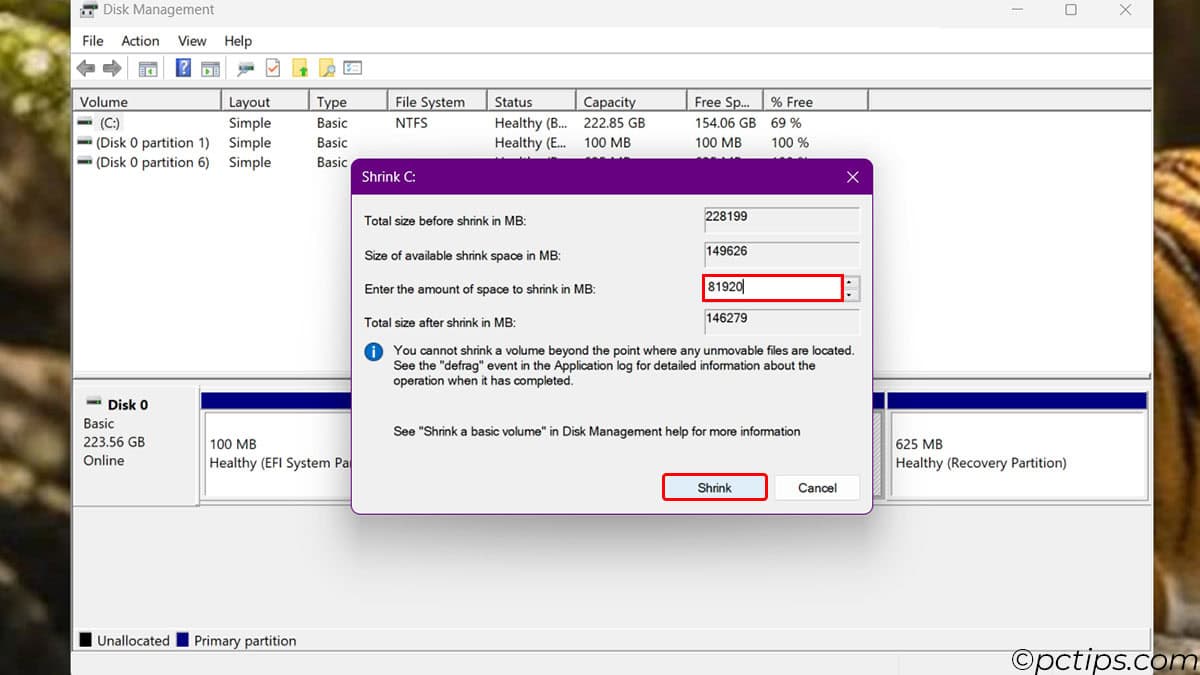
- Choose how much space to shrink (leave at least 60-100 GB for Windows)
- Right-click the new “Unallocated” space and choose “New Simple Volume“
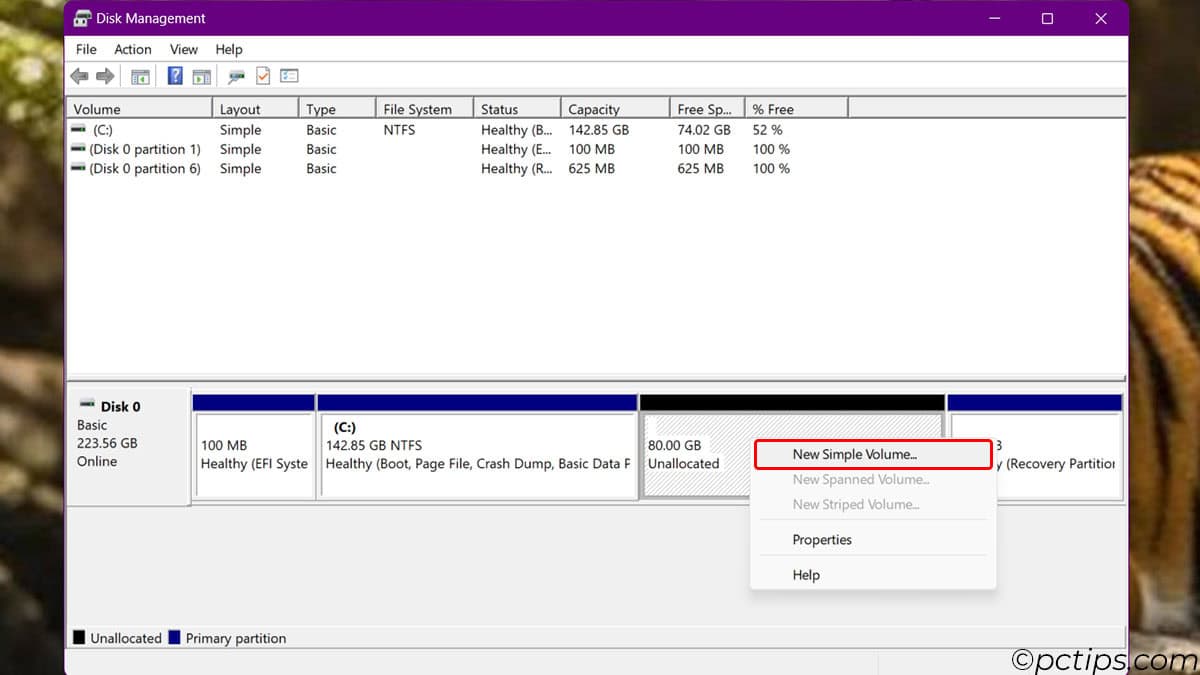
- Assign it a drive letter (like “D”), label it “Data”, and quick-format it
- Start saving all your new personal files to the D: drive!
If you ever need to wipe your C: drive, you can do so without affecting the D: drive at all.
Set Up a Backup System
Let me hit you with some scary stats:
- 2% of brand-new hard drives fail within the first year. (Source: Backblaze)
- 54% of people have suffered data loss at some point. (Source: Backblaze)
Yikes!
That’s why setting up a solid backup strategy is an absolute must.
I recommend a multi-pronged approach:
- Use a portable SSD or external hard drive for local backups
- Set up a NAS (network-attached storage) device for your home network
- Subscribe to a reliable cloud backup service.
- Take advantage of built-in Windows features like File History and System Restore
Create a Recovery Drive
No matter how reliable your laptop is, someday, somehow, your Windows installation will get hosed.
Maybe an update gone wrong, maybe a nasty virus, maybe some other fluke.
In any case, you’ll be incredibly grateful to have a recovery drive handy to quickly get back up and running.
Creating a recovery drive is easy:
- Plug a USB drive into your laptop (8GB+ recommended)
- Open the Control Panel (Win+R > control)
- Go to System and Security > Security and Maintenance > Recovery
- Under “Advanced recovery tools,” click “Create a recovery drive”
- Follow the prompts to create the drive (this will format the USB drive!)
Warning: Some laptops don’t include recovery media, so this USB drive will be your only way to reinstall Windows if needed.
Don’t Let Microsoft Snoop Around
By default, Windows will collect a ton of data on your usage habits, location, contacts, typing history, search queries, and more.
If you’re not cool with Microsoft snooping around your system, now’s the time to lock things down.
To get started:
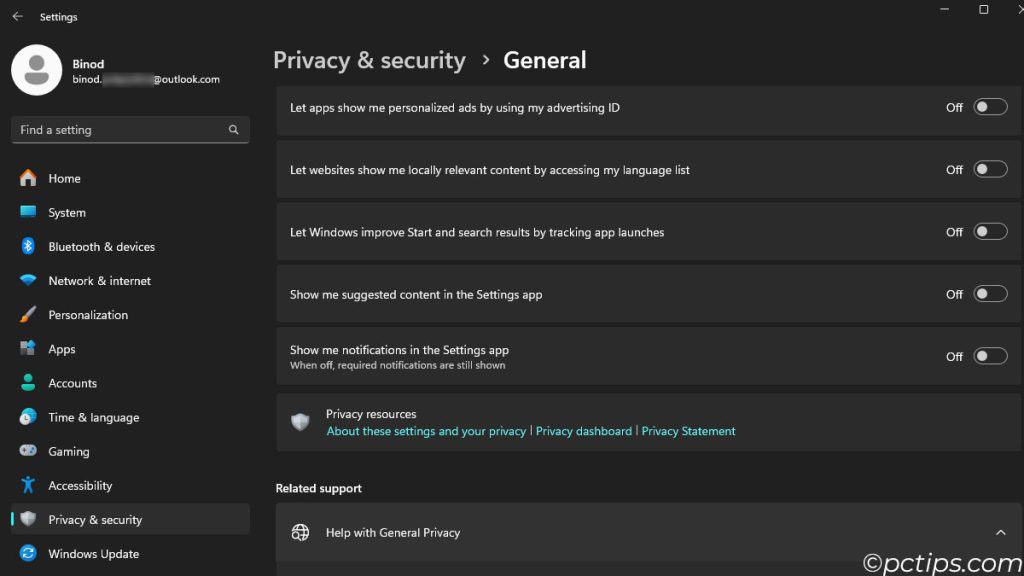
- Open Settings
- Go to Privacy & security > General
- Under “Change privacy options,” disable everything (let apps use advertising ID, website access language list, etc.)
- Navigate through the other Privacy & security tabs, disabling anything you’re not comfortable with:
- Speech, inking & typing
- Diagnostics & feedback (set to Basic)
- Activity history
- Location (set to Off)
- Camera, Microphone, Voice activation, etc.
The options are quite buried, but it’s worth combing through to ensure your privacy is protected.
If you really want to go all-out, check out these 30 Windows Settings to Disable Right Now.
Check for BIOS Updates
Okay, this one’s a bit more advanced, but it’s important nonetheless.
Your laptop’s BIOS (Basic Input/Output System) is like its central nervous system.
Manufacturers sometimes release BIOS updates to fix bugs, improve performance, or add new features.
However, I only recommend updating the BIOS if you’re experiencing issues that a BIOS update specifically addresses.
Flashing the wrong BIOS or interrupting the process can totally brick your machine!
It’s not for the faint of heart.
If you do decide to update, first check your current BIOS version using the msinfo32 command.
Then go to the manufacturer’s website and see if there’s a newer version available for your exact laptop model.
Follow the instructions to a T and make sure your laptop is plugged in throughout the process.
You’re Ready to Roll
And there you have it! Your new laptop is now fully optimized, secured, and personalized. Nice work!
With all these steps completed, you can enjoy maximum performance, reliability, and privacy for years to come.
If you found this guide helpful, I’d really appreciate you sharing it so more people can benefit. Even a quick post or tweet makes a big difference.