16 Proven Tips to Make Your Slow Computer Run Faster
Last Updated:
The first step to fixing a slow computer is zeroing in on the root cause. In my experience, these are the most frequent culprits:
- Using a traditional hard disk drive (HDD) instead of a solid state drive (SSD)
- Not enough RAM
- Too many background processes running
- Malware or virus infection
- Overheating from dust buildup or a failing cooling system
- Outdated operating system, drivers, or software
- Older computer struggling with demands of modern software
- Hardware bottlenecks/not utilizing the right motherboard slots
I like to start by checking the PC’s specifications to get a baseline understanding of its capabilities.
Press Windows key + R, type “dxdiag“, and hit Enter
If you see less than 8GB RAM or a mechanical hard drive as a system drive, then it means it’s time for hardware upgrade.
Upgrading your RAM or switching to an SSD can provide the biggest performance improvement.
However before you throw in the towel and invest in new hardware, try these step-by-step optimization tips to fix slow computers.
Identify What’s Slowing Down Your PC
Open Task Manager (Ctrl+Shift+Esc) and focus on the Processes tab.
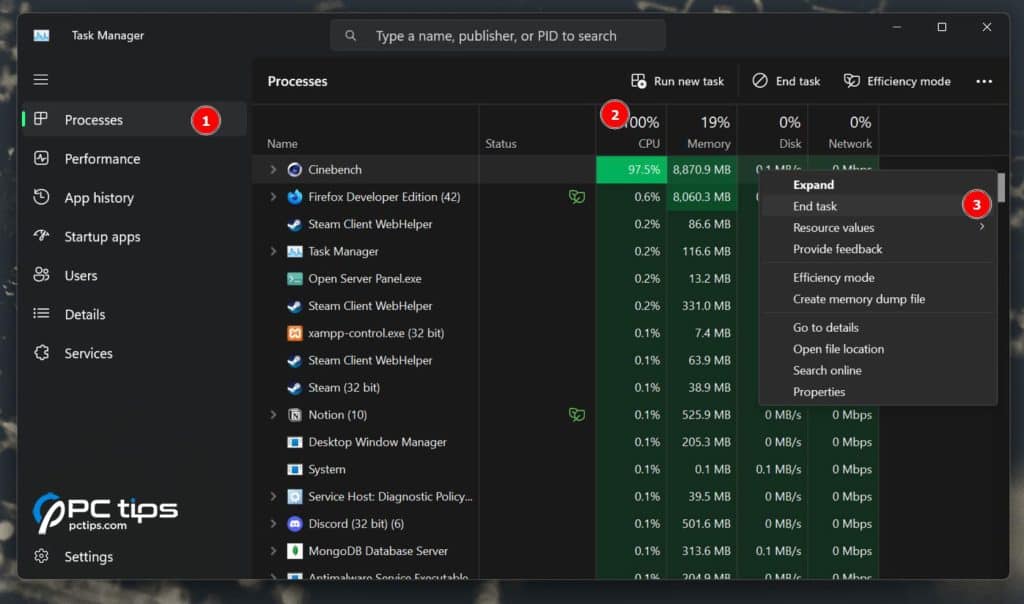
I like sorting by CPU or Memory usage to easily find processes that are consistently using a high percentage of my CPU or RAM.
Once you’ve identified the resource-hungry tasks, select them and click “End Task“.
Just be careful when ending tasks, as some processes are needed for your system to run properly. If you’re unsure about a process, right-click on it and select “Search online.”
Disable Startup Programs
Switch to the Startup apps tab
Many programs are designed to automatically start when your computer boots up, which can significantly slow down your startup time and overall performance.
To disable unnecessary startup programs
- Go through the list here. Select any app that shouldn’t auto-launch at startup and click on Disable.
- Next, press
Win + Rand entermsconfig. - Switch to the Services tab and enable the Hide all Microsoft services checkbox.
- Uncheck any third-party services that you feel are unnecessary.
For instance, I’ve disabled Razer, Steam, and VirtualBox services from auto-starting as I rarely use those apps.
Uninstall Unused Programs
It’s time to get rid of programs you no longer use. Unused programs don’t just waste disk space, they can also slow your system.
Press Windows key + R, type “appwiz.cpl“, and hit Enter.
Take a moment to carefully review the list of installed programs. Look for any applications you rarely use or don’t need anymore and uninstall them.
I find it helpful to sort the list of programs by “Installed On” date. This can help you identify programs that you might have forgotten about. You can also sort by “Size” to see which programs are taking up the most space on your hard drive.
Clean Up Junk Files
Over time, temporary files, logs, and leftovers from uninstalled programs pile up and waste storage. Let’s use the Windows’ built-in Disk Cleanup tool to purge this junk:
- Win+R, type “
cleanmgr“, Enter - Select target drive (usually C:)
- Check boxes for file types to remove
- Click OK to proceed
Next clear out your %temp% folder ( Be careful not to delete files you might need.)
- Win+R, type “
%temp%“, Enter - Ctrl+A to select all files
- Shift+Delete to permanently delete
It’s also a good idea to enable Storage Sense. This automatically deletes the temporary files for you.
- Win + R, type
ms-settings:storagesense, press Enter. - Toggle the storage sense switch to on.
Free Up Hard Drive Space
If your main drive is nearly full, it can slow down your entire system. I suggest keeping at least 10-20% of your main drive free depending on your drive size.
This ensures that there is sufficient space available for essential system files, temporary files, cache files and virtual memory.
In addition to the methods mentioned earlier, you can free up space by:
- Moving large files (like videos and photos) to an external drive or cloud storage
- Deleting old backups and system restore points
- Compressing large files or folders you rarely access
- Removing duplicate files
- Disable Hibernation
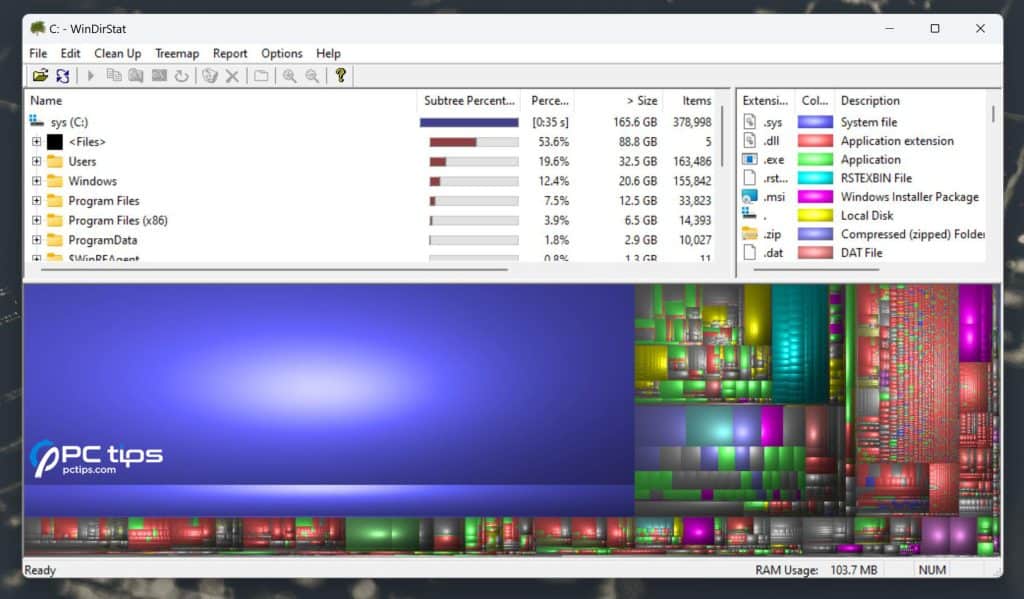
If you’re unsure what’s taking up space, use WinDirStat. It provides a visual breakdown of which files and folders are using the most space.
Scan for Malware and Viruses
Malicious programs can sap resources, steal info, and damage files. I recommend using the free Malwarebytes scanner for detection and removal.
For active protection, enable Windows Defender – most people don’t need paid antivirus which can itself slow your system.
But no security software can fully protect if you’re not careful online. Always be cautious about the links you click and the files you download.
Optimize Your Web Browser
As a tab hoarder myself, I’ve seen how browsers, especially with many extensions, become memory monsters.
Each open tab and add-on needs RAM and CPU cycles, rapidly adding up on resource-limited machines.
To optimize your browser:
- Remove unnecessary extensions
- Close inactive tabs
- Regularly clear cache (but not cookies)
- Try a lighter, faster browser
Update Everything
Out-of-date software, drivers, and Windows itself can cause performance and security issues. Regularly check for updates:
- Windows: Settings > Update & Security
- Drivers: PC vendor’s support site
- Apps: Each program’s settings/site
- BIOS: Motherboard manufacturer’s site
Reset Your Computer
If all optimizations fail, resetting Windows to factory state gives a clean slate to resolve persistent issues.
Win + R, type systemreset, and press Enter.
This erases personal files and all programs! Make sure to Back up data and make a list of installed apps (with license keys) to reinstall after.
Check for Hardware Issues
If your computer is still having issues, there may be a hardware problem, like failing RAM or a dying hard drive.
- Run the Windows Memory Diagnostic tool to check for RAM issues
- Use CrystalDiskInfo to check your hard drive’s health
- Monitor Temperatures and Prevent Overheating
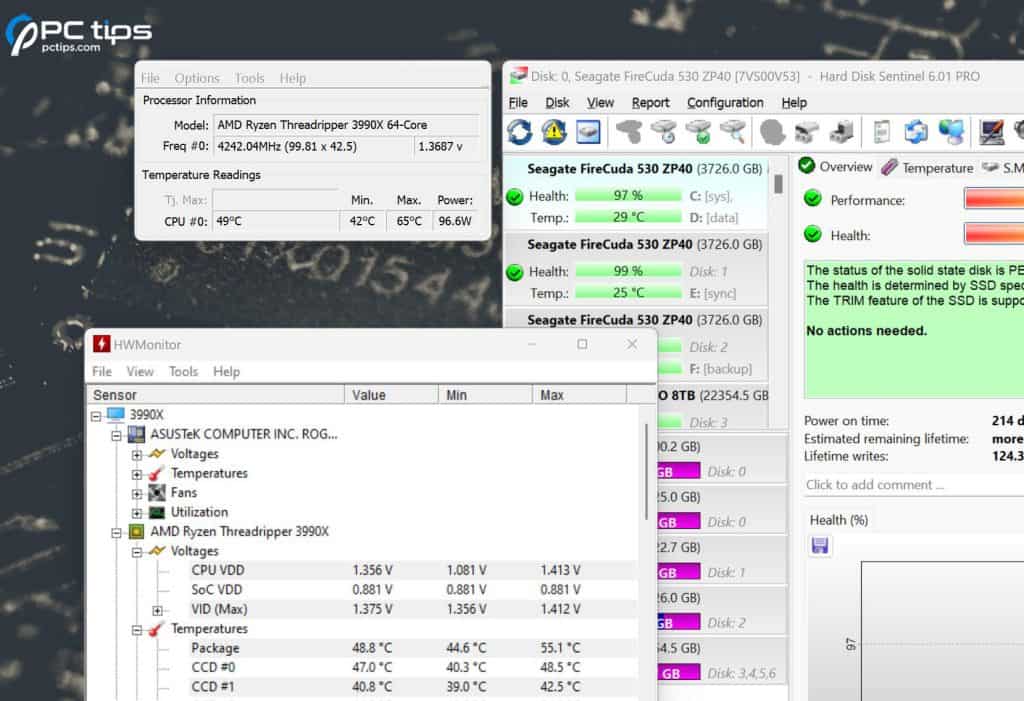
Monitor Temperatures and Prevent Overheating
Overheating can cause serious performance issues and risks hardware damage. Keep an eye on the thermals with free a free tool like Core Temp or HWMonitor.
Look for any components that run consistently hot (above 80°C for CPUs and 90°C for GPUs). If you notice high temperatures, take steps to improve your system’s cooling.
Here are some tips for preventing overheating:
- Clean your computer regularly and keep it dust free
- Ensure proper airflow
- Use a cooling pad (for laptops)
- Replace thermal paste
- Adjust fan speeds
Optimize BOOT Time
Your PC performs the Power-On Self-Test (POST) when you turn it on. Some of the hardware checks in this test are optional and you can disable them to reduce the boot time.
To do this, go to the BIOS and enable the Fast Boot option
Some boards even support an Ultra Fast Boot option. This feature allows you skip even more checks and further reduce the boot time.
Well, in theory, anyway. I’ve had mixed results in my own testing.
In a test I conducted with my Gigabyte B450 Aorus Elite motherboard, the Ultra Fast Boot option was faster as expected. But on the MSI Pro B760M board, the results were the opposite: the average normal Fast Boot time was 11 seconds, whereas the Ultra Fast Boot time was 13 seconds.
The same goes for the Fast Startup feature in Windows. It improved the boot time on some systems, and worsened it on others.
So, use the normal Fast Boot option in the BIOS.
If you want to try the other two, Note down and compare the boot times to ensure they’re actually useful.
Upgrade the Boot Drive
Fortunately, SSDs have become increasingly affordable over the years.
According to PCPartPicker price trends, A 256GB NVMe SSDs have trended under $50 for a few years now, making them accessible to most people.
Even if you have a tight budget, investing in an SSD can cut down your boot time by 3x or improve app/game load times.
This will also improve data transfer rates and overall system responsiveness.
Add More RAM
If your computer has less than 8GB of RAM and you regularly multitask or use memory-intensive programs, adding more RAM can provide a noticeable speed boost.
Upgrading from 4GB to 8GB, or 8GB to 16GB, can allow you to smoothly run more applications simultaneously.
I’d say 16GB is currently the sweet spot for most users.
Utilize the Right Motherboard Slots/Ports
Ensuring your components are plugged into the optimal motherboard slots and ports can improve performance.
For example, installing RAM in matched pairs in the correct dual-channel slots allows them to operate faster.
Similarly, connecting your SSD or graphics card to the fastest available PCIe slot/M.2 port can enhance their speed.
Consult your motherboard manual to verify you’re using the ideal configuration for your setup.
Overclock the Parts
Your PC components don’t run at their max speeds by default. The stock values typically look like this:
- CPU: 70-80% of max frequency
- GPU: 90% of max frequency
- RAM: 50-65% of max frequency
I tested multiple systems equipped with the Ryzen 5700Gs in my lab, Although they’re all same model, their max speeds are slightly different.
At 1.35V, some of these CPUs starts crashing when I overclock it to above 4.4 GHz. Most were stable up to 4.6 GHz at the same voltage. Some of them were even able to go as high as 4.8 GHz.
In my experience, the silicon lottery plays a significant role in overclocking potential.
To do this, go to the BIOS and enable an XMP profile. These are pre-tested overclocking profiles for your RAM modules.
Enable auto-overclocking for your CPU as well. These settings will provide an easy performance boost. But for the highest possible speeds, auto-overclocking won’t cut it.
You’ll need to manually find the best balance of clock speed, voltage, and temperature through trial and error.
Additional Windows Optimizations Tips
Here are a few more Windows settings you can try to tweak for better performance:
- Set up RAID to improve disk performance and fault tolerance
- Use a high-speed USB 3.2 or USB-C port/drive for faster data transfer speeds.
- Turn off Search Indexing
- Defrag HDDs (not SSDs!) to optimize file organization and improve access times.
- Adjust your power settings to optimize performance (e.g., set to “High Performance”).
- Disable visual effects and transparency
- Adjust virtual memory settings
- Enable hardware acceleration in your browser for faster web browsing and video playback.
- Adjust your processor scheduling settings to prioritize foreground applications.
Did you find this guide helpful? Which steps made the biggest difference for you? Do you have any additional tips or tools to recommend?
Please share your feedback in the comments below.
I need some help about PDF I currently use ADOBE ACROBAT I just downloaded PDFGear. I have veen trying to find info on how to transfer my files from adobe to pdfgear. Itis confusing with the answers I get can you tell me in easy terms how to do it.... thank you
Ì have a very important question. I have been using a old copy of a audio editing software since the late 80's and when I tried to use it it p my Windows 10 computer it deleted my key generator. Where does the info it deleted go? Is it gone for good? I appreciate your time . Thanks.
Hey Gary, that missing key generator might not be gone for good. File deletion just marks the data as overwritable until it's replaced. Try using Recuva to scan for the file before it's overwritten. Searching online is an option but risky - lots of sites offering free software or cracks are loaded with malware. If you go that route, be super careful and only trust reputable sites. Always scan downloads before running them. Safest bet is to go legit if you can - check for trials or free alternatives like Audacity. Tons of great low-cost audio tools out there these days. Hope this helps! Let me know if you have any other questions.