How To Check PC Specs
Last Updated:
After I install a new piece of hardware or upgrade an existing one, my first instinct is to check the specs.
This ensures that my system correctly recognizes the new component and gives me peace of mind.
Let me show you how to easily check your PC specs.
I’ll even share my personal favorite trick for getting the exact info you need quickly.
Finding Basic System Info
The quickest way to access basic system info is through the About section in Windows Settings:
Follow these steps:
- Open Settings (Start menu > gear icon).
- Click “System,” then “About.”
- Find your specs under “Device specifications.”
Quick Tip: You can quickly access the About section by pressing the Windows key and typing “About”. Click the top result and it will take you directly to the Device specifications page in Settings.

Here you’ll find essential details like your processor type, installed RAM, system type (32-bit or 64-bit), and Windows version.
While not as detailed as the next method, the About page conveniently displays the most commonly needed specs.
Getting Detailed Specs
The System Information tool is the easiest way to check detailed specs in Windows.
Press Win + R and enter msinfo32 to launch it.

I find this tool particularly useful because it provides a comprehensive snapshot of your PC’s configuration, including processor details, installed memory (RAM), device drivers, and more.
You can expand each section in the left pane to drill down into more granular specifics.
If you expand the Software Environment tab, you can list drivers, check their version and location, list the environment variables, etc.
You can also export the specs from the File tab if you want to send all of this data to someone else (often useful for remote troubleshooting).
Generating a User-Friendly System Report
If you find msinfo32 a bit too technical, the DirectX Diagnostic Tool (dxdiag) is a fantastic alternative.
- Press Windows key + R, type “dxdiag“, and press Enter
- The System tab neatly displays operating system, processor, memory, and BIOS essentials
- Click the Display and Sound tabs for focused info on your GPU, monitor, and audio devices
- To save a snapshot of your specs for later reference or sharing, click “Save All Information“
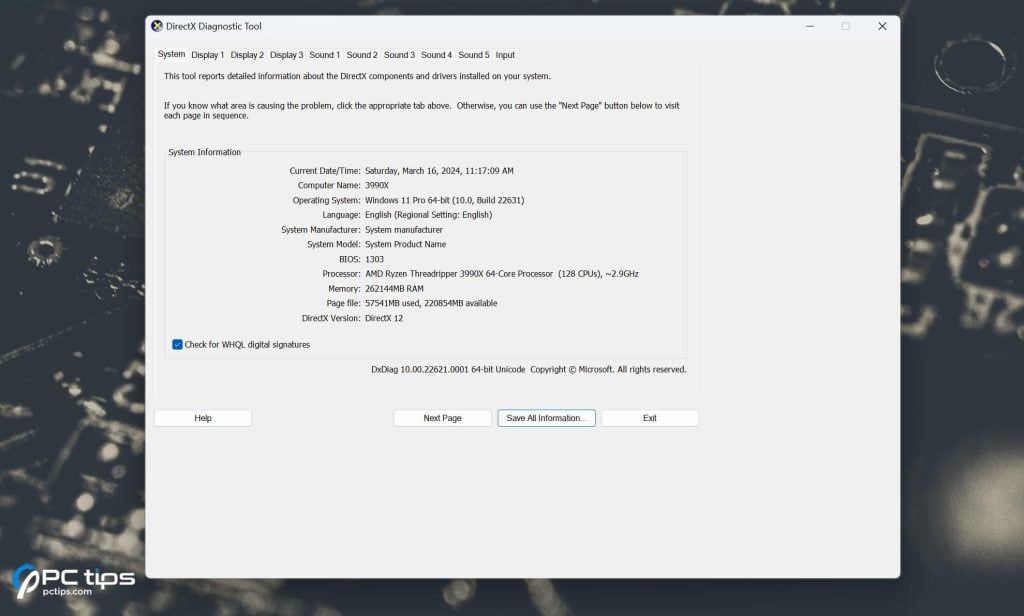
It’s my go-to tool when I need a quick, comprehensive overview without going through a sea of technical details.
Using PowerShell ( My Favorite )
Here’s the favorite trick I was talking about earlier. If you are like me who loves command line, then PowerShell is a fantastic tool for retrieving detailed system information.
Press Win + R and enter “powershell” to open a new PowerShell window.
(Tip: To run the command, simply copy the provided code and paste it into your PowerShell window, then press Enter.)
Check Your Motherboard
Get-WmiObject -Class Win32_BaseBoard | Select-Object Manufacturer, Product, SerialNumber, Version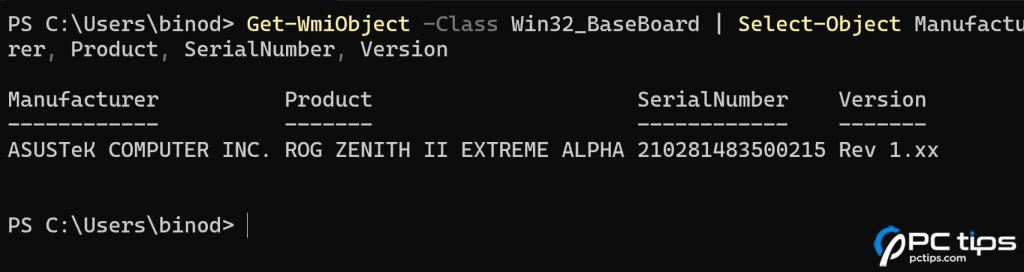
The product tab shows the model of your motherboard, in my case its ROG ZENITH II EXTREME ALPHA.
Check Your Processor
Get-WmiObject -Class Win32_Processor | Select-Object Name, Manufacturer, Description, MaxClockSpeed, NumberOfCores, NumberOfLogicalProcessors
Here you can see I’m running an AMD Ryzen Threadripper 3990X processor. It also shows the total number of cores, threads, and clock speed.
Check Your RAM
Get-WmiObject -Class Win32_PhysicalMemory | Select-Object Manufacturer, PartNumber, SerialNumber, Speed, @{Name="CapacityGB";Expression={[Math]::Round($_.Capacity / 1GB, 2)}}, DeviceLocator, BankLabel, ConfiguredClockSpeed, ConfiguredVoltage, MinVoltage, MaxVoltage, FormFactor, MemoryType, TypeDetail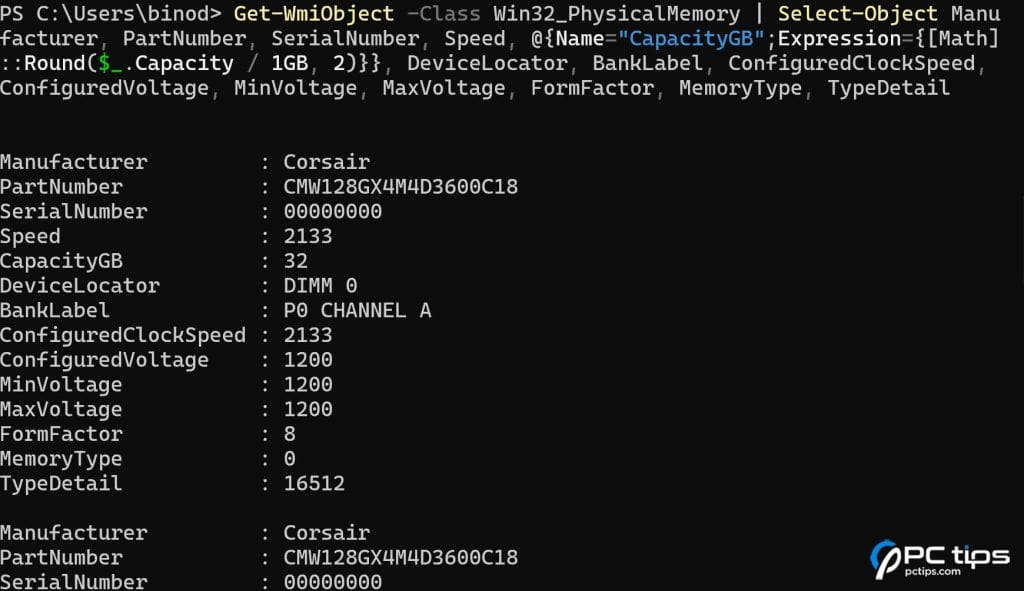
Now you can see information for each installed RAM module (DIMM). Since I have all 8 DIMM slots occupied, I got 8 entries.
Each entry shows the manufacturer, part number, speed, capacity in GB, and other important details.
Check Your Storage
Get-WmiObject -Class Win32_DiskDrive | Where-Object {$_.MediaType -eq 'Fixed hard disk media'} | Select-Object Model, InterfaceType, Partitions, @{Name="SizeTB";Expression={[Math]::Round($_.Size / 1TB, 2)}}, MediaType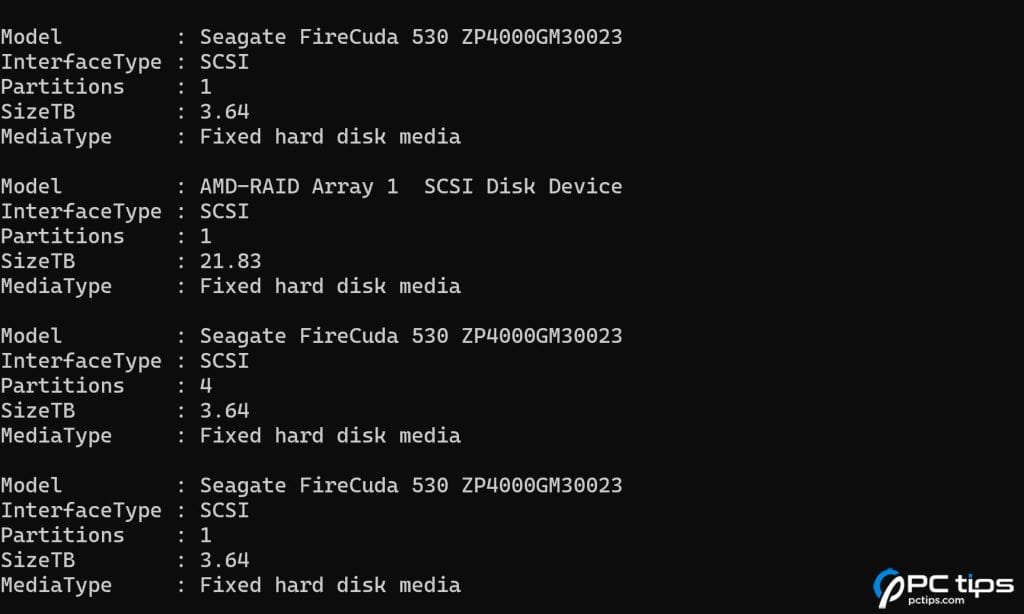
This command returns information about all installed storage drives.
You can see I have three NVMe Seagate Firecuda 530 drives and a 21.83 TB of AMD RAID drive installed.
If you’re interested in learning how to set up a RAID array, check out this article.
To check your GPU
Get-WmiObject -Class Win32_VideoController | Select-Object Name, Status, DriverVersion, VideoProcessor
It shows that I have an NVIDIA GeForce RTX 2080 Ti installed. Well, the RTX 2080 Ti was once a beast, but it might be showing its age a bit with the latest games.
It also shows the status, which hopefully says ‘OK’ for you. Otherwise, there might be a driver or hardware issue.
Quick Tip: Save time typing in PowerShell by using tab autocompletion. For example, start typing “Get-Comp” and press the Tab key – PowerShell will try to complete the command for you!
WMI queries can give you a ton more information than just the basics.
You can find out your BIOS version, what operating system you’re running, details about your network adapters, and even what peripherals are connected.
If you want all that good stuff, I’ve put together a simple PowerShell script to do the work for you. You can download it here.
Check Hardware Status in the BIOS
Sometimes, your PC may not boot or you may need to find the hardware details without logging into Windows.
You can do this from the BIOS/UEFI.
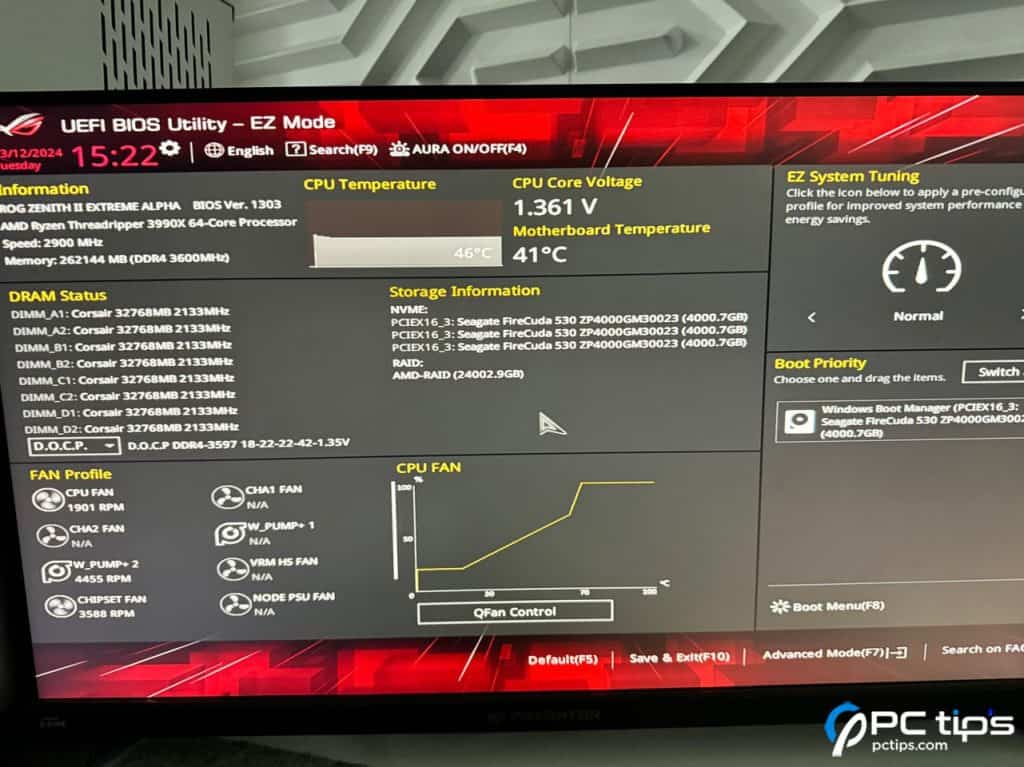
When you power on the system, repeatedly press the BIOS key to access this interface. The Del key will work on most systems.
The Home page summarizes the hardware side of things (device models, clock speeds, temperatures, voltages, etc). This page is accessible in Easy Mode.
You can press the key shown at the top/bottom of the screen to switch to Advanced Mode.
Here, you can find and configure various specs (BIOS version and update, XMP status, RAM timings, CPU clock speed & voltage, boot mode, secure boot status, TPM status, virtualization status, etc).
Use Third Party Apps
The built-in tools are fine for getting your foot in the door. But if you need some in-depth data on your hardware, they’re nowhere near good enough.
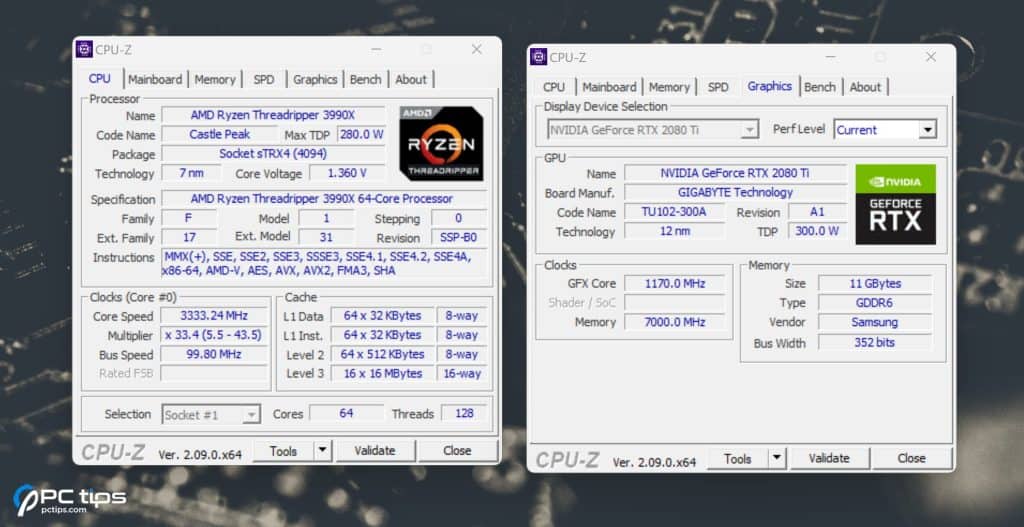
CPU-Z is my most used tool for checking PC specs. It has a very simple interface that cleanly lists the most important info for each major component.
For instance, it updates the CPU clock speed and voltage in real time.
It also lists CPU specs such as the model, core and thread count, supported technologies, cache size, etc.
You’ll see the same theme repeated for the motherboard, RAM, and GPU.
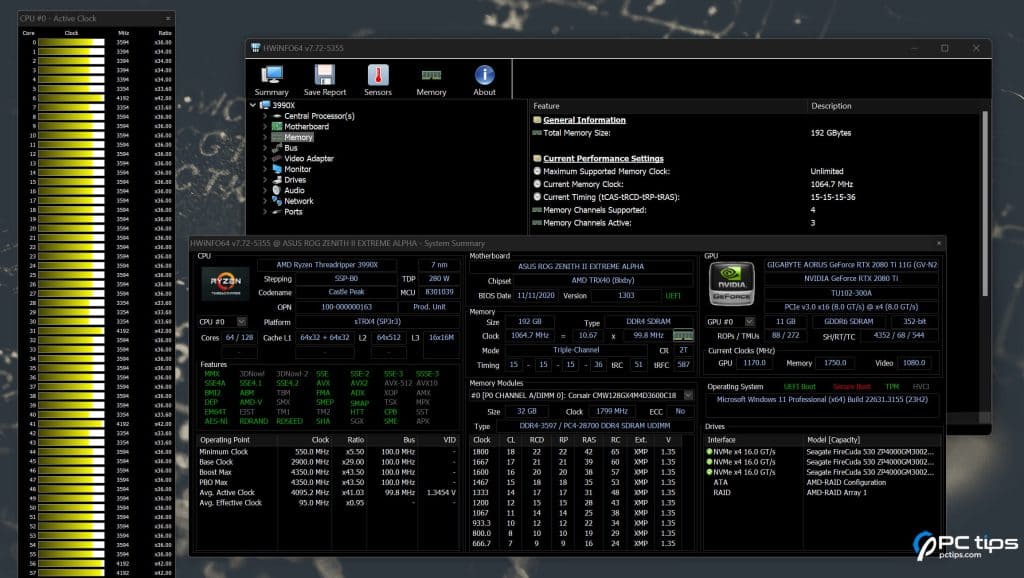
HWiNFO is another one of my favorites. It’s System Summary feature does an excellent job of summarizing the overall specs.
The Sensors feature uses data from sensors across the system to display live CPU, motherboard, and GPU temperatures. It also displays the clock speed, voltage data and much more.
And of course, it provides in-depth info on each individual component too.
Other Ways to Check Specs in Windows
There are various other built-in ways to check system specs. These can be better if you want to find certain types of specs quicker.
- Device Manger: Press Win + X or right-click the Start button and select “Device Manager”. This provides a hierarchical view of all the hardware installed on your system. You can expand each category to see specific device models and details like processors, display adapters etc.
- Task Manager: Press Ctrl + Shift + Esc to launch this. In the Performance tab, you can check and monitor the CPU, GPU, RAM, SSD, and network stats.
- WinVer: Press Win + R and enter winver. This is quick shortcut to find the Windows version, exact build, and license status.
- CMD: Use the systeminfo command to retrieve some basic OS-focused specs.
- PowerShell: Use the Get-ComputerInfo cmdlet to retrieve some OS-focused data.
Use OEM Software
Programs from your motherboard, CPU, or GPU manufacturer often allow you to check basic system specs and monitor performance.
I’m talking about tools like NVIDIA’s GeForce Experience, AMD’s Ryzen Master or Adrenalin Software, Gigabyte’s System Info Viewer, etc.
I wouldn’t go out of my way to install them as third-party tools tend to be superior. But if they’re already installed for other reasons, might as well make use of their versatility.
Check Spec Sheet Online
If you know your component models but want more in-depth data on them, one of the best locations to find this is official spec sheets.

For instance, when troubleshooting memory-related crashes, I often check the max frequency that the motherboard supports.
Whenever I am setting up a RAID or installing new NVMe drives, I make sure to check both the motherboard and CPU specs.
I pay close attention to the number of PCIe lanes, M.2 slot availability, and other related details to ensure compatibility and optimal performance.
What Can Your PC Run
After checking the specs, people often have a new set of questions.
How does it compare to other PCs? Can it run the latest AAA titles? Can you upgrade to a higher-res monitor without upgrading the GPU? How much can you sell the PC for? You get the point.
If you’re in this situation, Steam’s monthly surveys could give you a general idea of your PC’s specs level.
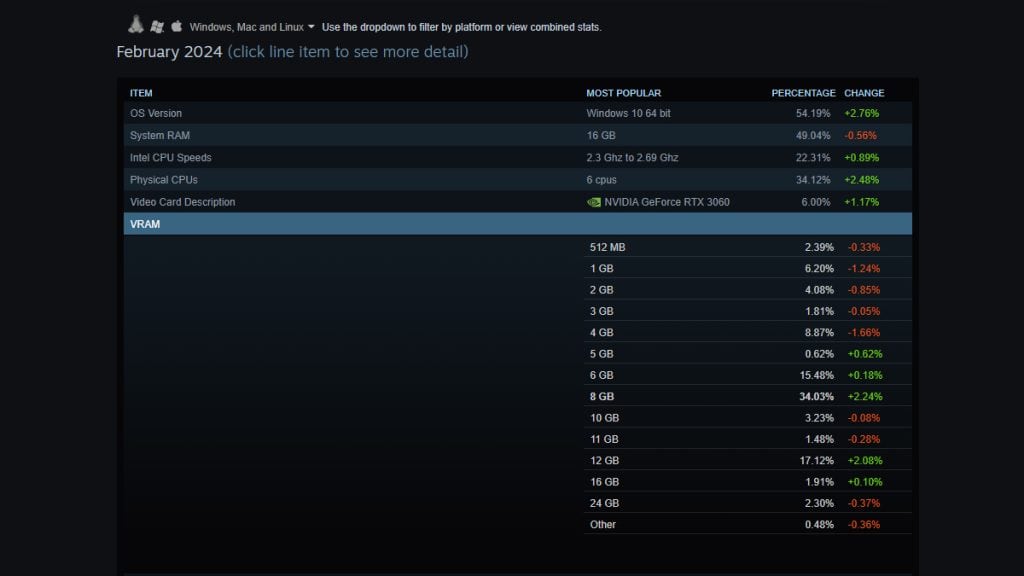
The February 2024 survey showed that the RTX 3060 is currently the most popular GPU, followed by older cards like the GTX 1650. And over 51% of participants had GPUs with 8-12 GB VRAM.
If my GPU had similar stats, I’d be happy with it for now. But if I was browsing for a new GPU, I’d get a 4070 or better GPU with 12GB+ VRAM.
Basically, you can use the stats from the surveys to estimate how powerful your system is and how much longer it’ll last.
If you’re trying to figure out how well your PC will run a specific game, there’s an even better method.
Enter your CPU and GPU specs online and check benchmarks in the exact game or program that you want to run.
Now that you know how to check your PC specs using various methods, it’s time to put this knowledge into practice. Don’t hesitate to refer back to this guide whenever you need a refresher.
Did you find this guide helpful? Are there any other methods or tips you’d like me to include? Let me know in the comments below, and I’ll do my best to update the guide based on your suggestions.
I love your website! Very informative and helpful. Thanks for sharing your experience and time with me. 🤙