18 Windows Settings You Should Change Now
Last Updated:
A lot of the default settings on Windows aren’t optimized, as they need to cater to most users.
I’ll be sharing some of the settings that I always change after a fresh Windows installation.
These changes should improve your privacy, boost system performance, prevent future issues, or provide other optimizations.
Disable Tracking and Targeted Advertising
Windows comes with lots of telemetry options to send your activity to Microsoft as feedback and for targeted advertisement and suggestions.
If you’re like me, who isn’t so keen on broadcasting personal data, I suggest disabling all relevant privacy options.
This includes everything inside Settings > Privacy & security > Windows permissions.
If there’s any option to delete pre-recorded data, make sure to select the option as well.
On a similar note, go inside Privacy & security > Diagnostics & feedback and set Feedback frequency to Never.
Avoid Sharing Your Location
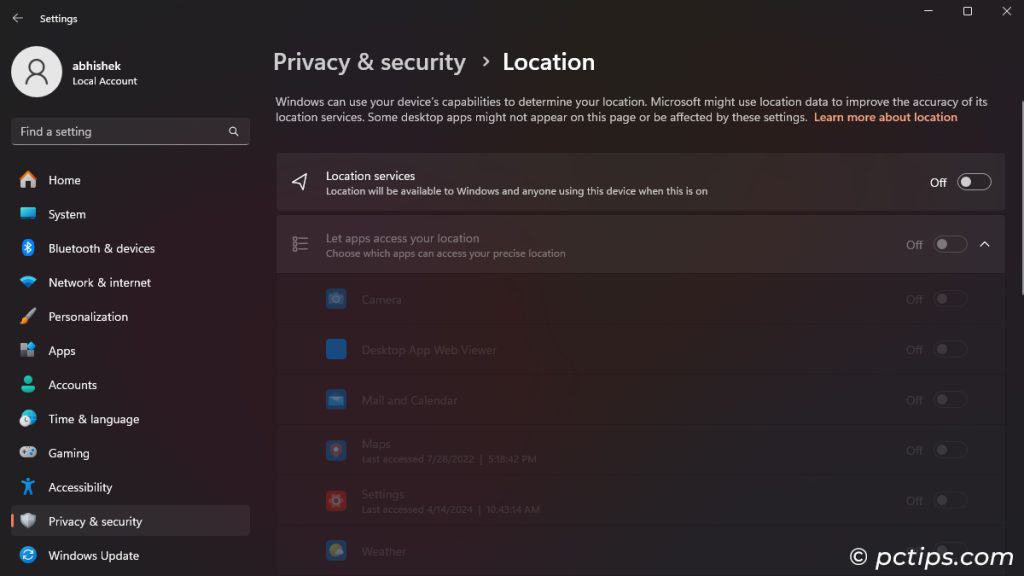
Windows also keeps track of your location by default. This means the apps you use can easily gather your movement habits, where you post from, and so on.
This is very intrusive, so it’s best to disable Location permission to keep your life more private.
To do so, head over to Settings > Privacy & security > Location and toggle off Location services.
If you need to use apps that require location, like Maps, just temporarily enable it for that session.
Safeguard Against Potential Camera and Microphone Hacking
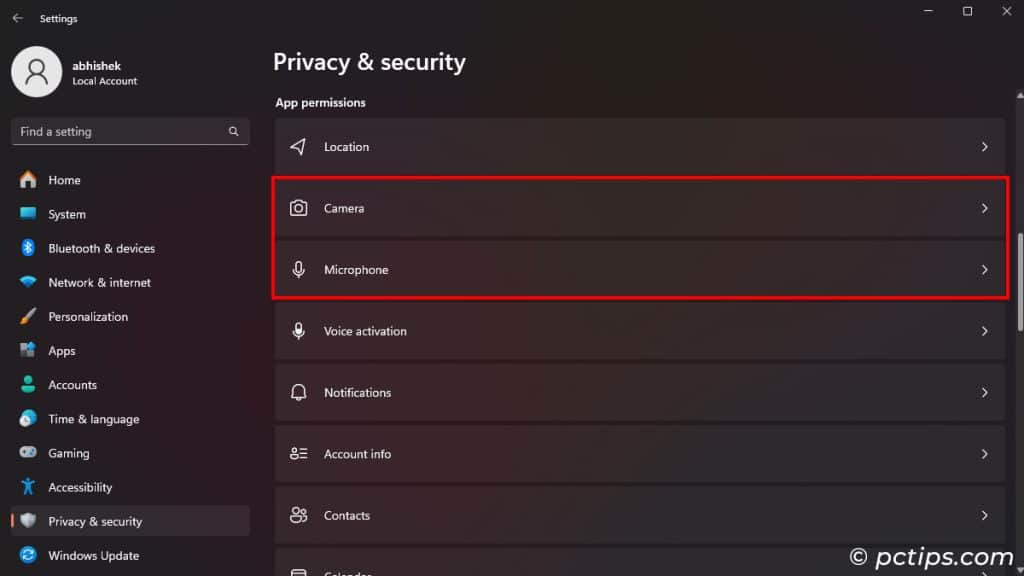
Having a good antivirus and implementing safe practices will protect your system from most threats. But these are not fully bulletproof and there’s always a chance that some hacker finds a way into your system.
So it’s best to keep your microphone and camera disabled to prevent them from recording your real-life activities.
Some laptops or mic/webcam devices come with built-in switches to turn them on/off.
If not, disable access by toggling off the respective options inside Settings > Privacy & security > Camera and Microphone.
Just remember to enable them before a video conference, recording, or any similar activity.
Enable Reputation-based Protection for Further Security
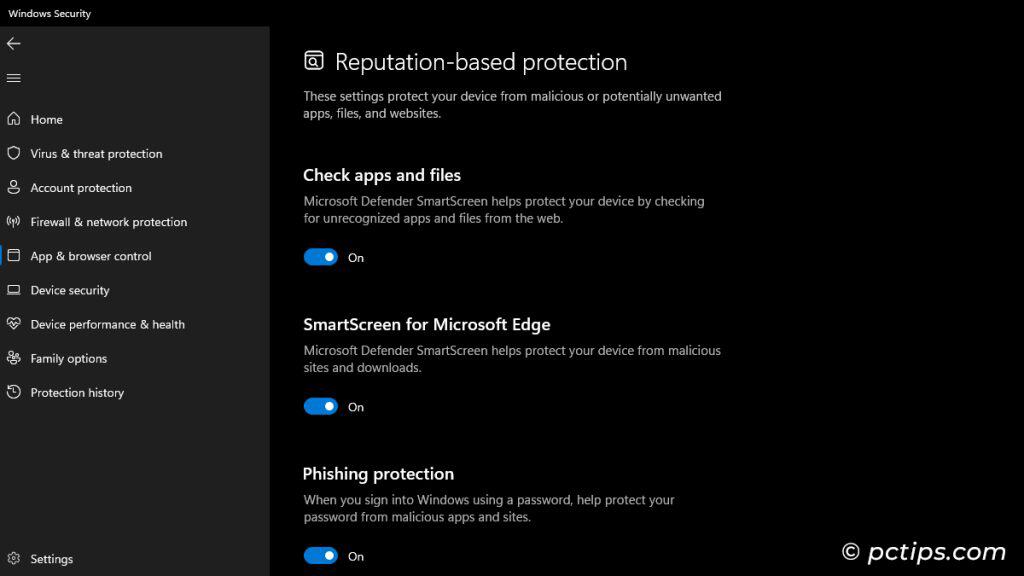
The built-in protection utility, Windows Security, comes with the most optimum default configuration, save for the Reputation-based Protection settings.
This feature safeguards your system from Potentially Unwanted Applications (PUAs), which bring about performance issues, or carry some kind of malware.
Since it’s Off by default, here’s how you can enable it:
- Go to Settings > Privacy & security > Windows Security > App & browser control.
- Click on Turn On under Reputation-based protection.
- Go inside Reputation-based protection settings and make sure everything is On.
Limit Startup Apps to Boost Performance
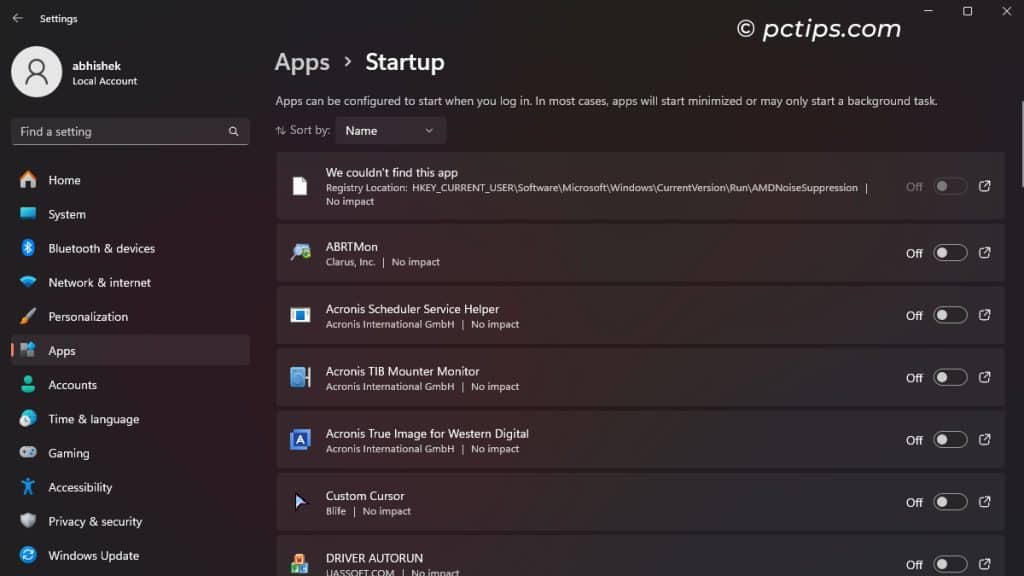
Now it’s the time to stop less-used apps from opening on startup.
These apps only use up unnecessary system resources like memory, CPU cores, etc., so disabling them should improve system performance.
For that, go to Apps > Startup and toggle off everything you don’t need.
It’s also a good idea to turn off unnecessary services to further free up system resources.
You can do so from inside System Configuration > Services. Make sure to check Hide all Microsoft Services first as you don’t want to disable critical system processes.
Avoid disabling GPU services as well, or you may experience some display issues. I encountered this issue personally when I was unable to change my laptop’s screen brightness or even open NVIDIA GeForce Experience.
Configure Storage Sense to Manage Disk Space
Windows regularly creates temporary files for different apps and processes. These will usually build up with time and occupy much of your storage.
They may even affect your system performance, so it’s always best to clean them regularly.
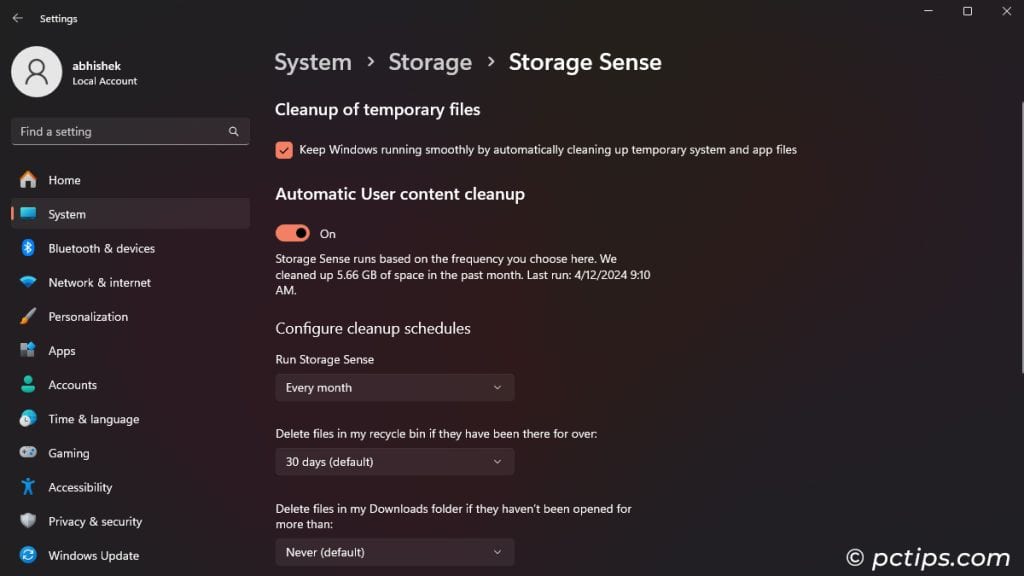
Thankfully, you can enable automatic cleanup through Storage Sense. Here’s how,
- Go inside Settings > System > Storage and toggle on Storage Sense.
- Click on the option (Storage Sense) and check Keep Windows running smoothly by automatically cleaning up temporary system and app files.
- Set the intervals under Configure cleanup schedule depending on your need. I find it optimal to run Storage Sense every month/week and delete files in the Recycle Bin every 30 days.
Decide Whether You Need Notifications
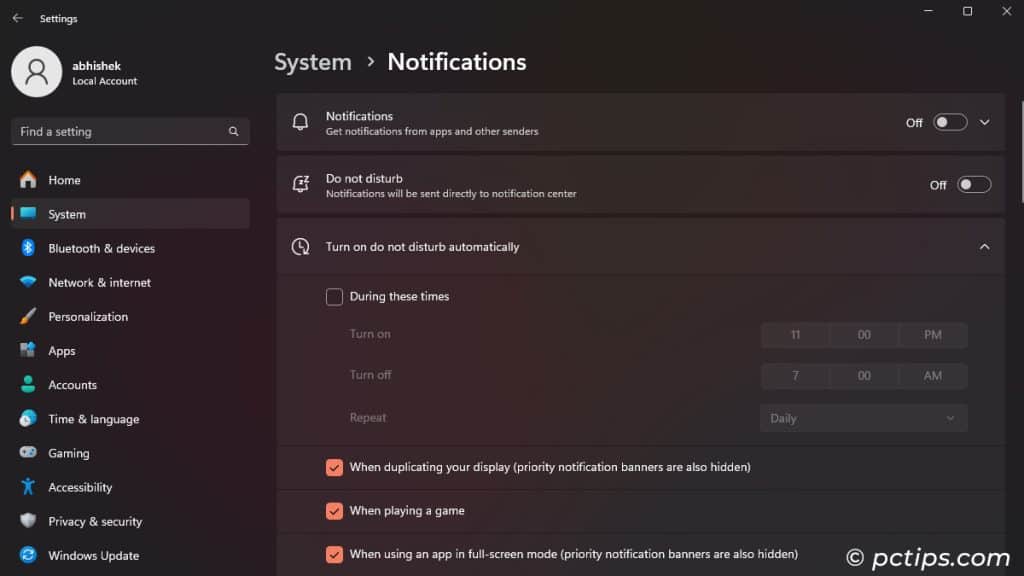
I like to disable all notifications since I don’t want any distractions.
But if you want to keep yourself informed about specific app activities, it’s possible to disable notifications for the remaining apps only.
You can do both from inside Settings > System > Notifications.
After that, expand Turn on do not disturb automatically and enable all except the first option.
If you don’t want to be disturbed when you’re at work or during regular study sessions, enable the first option as well.
Windows Security uses separate notification settings. To disable them, go to Settings > Privacy & security > Windows Security > Open Windows Security > Settings and toggle off everything.
Declutter Start Menu and Taskbar
Now, it’s time to organize your Taskbar and Start menu.
Windows provides various recommendations and extra utilities on these components that you won’t really be using.
So remove them to make sure your Taskbar and Start menu only contain the necessary items. For that,
- Go to Settings > Personalization > Start.
- Check More pins and disable all the options below.
- Go inside Folders and enable the components you want quick access to. They will show up as separate icons next to the power icon.
- Now, go to Personalization > Taskbar and disable everything inside Taskbar items and System tray icons.
- Expand Other system tray icons and toggle off everything except Hidden icon menu and Windows Update Status.
Then, manually pin necessary apps and features to the taskbar/start menu while removing the rest.
Turn off Delivery Optimization for Stable Internet Speed
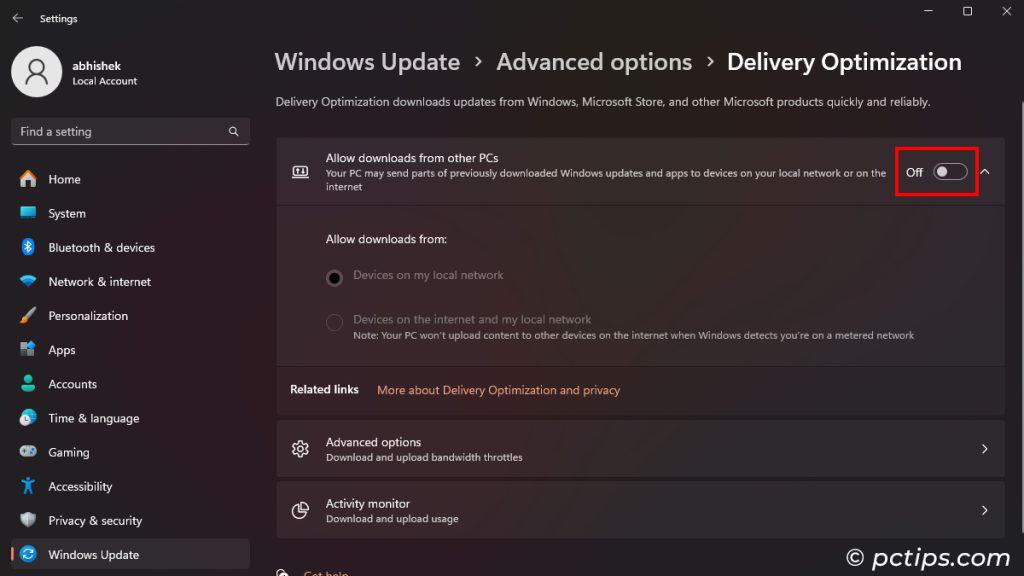
Delivery Optimization shares downloaded Windows update files from your PC to other computers on the network. This is really not necessary and may even affect system performance.
To disable this feature, head over to Windows Update > Advanced options > Delivery Optimization. and toggle off Allow downloads from other PCs.
Enable Hardware Accelerated GPU Scheduling for Better Gaming Performance
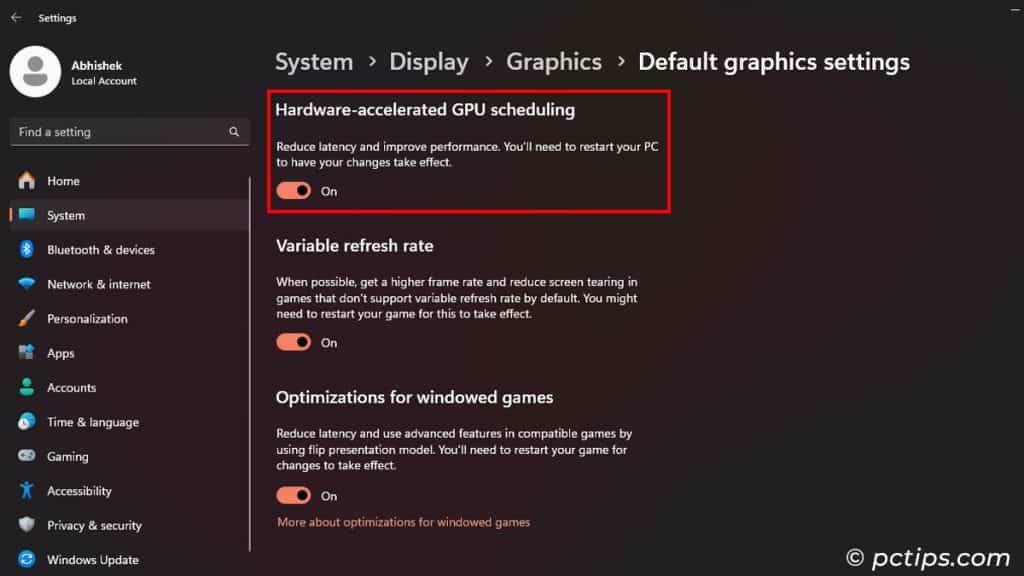
Hardware-accelerated GPU Scheduling (HAGS) offloads specific graphics-related tasks from the CPU to the GPU.
If you have a powerful GPU, enabling HAGS should reduce the input latency while playing games. So you’ll get faster responsiveness, which is great, especially for FPS gaming.
HAGS is also a requirement for NVIDIA DLSS3 Frame Generation, which is basically a scaling technology that delivers high-quality images without a heavy impact on the frame rate.
To enable this feature, go to Settings > System > Display > Graphics > Change default graphics settings and toggle it On.
HAGS may actually increase the input latency if NVIDIA Reflex is On in some systems.
I resolved this issue on my system by completely removing NVIDIA Driver with Display Driver Uninstaller (DDU) and reinstalling it anew. If it doesn’t work out for you, you must disable HAGS altogether.
Use HDR for Natural and Clear Display
High Dynamic Range (HDR) produces clear and natural images by increasing the color gamut and the level of detail for both lighter and darker areas.
I didn’t have a great experience with HDR on Windows 10, but it looks fantastic on my Windows 11 system.
You can enable HDR for video streaming and gaming as long as your GPU and the videos/games support this feature.
To enable it, go inside Settings > System > Display > HDR and enable the option.
Make sure to install Windows HDR calibration from Microsoft Store and calibrate the HDR display beforehand or you may end up with washed-out colors.
You can also enable Auto HDR, which provides HDR support to non-HDR games and videos.
Specify the Highest Refresh Rate
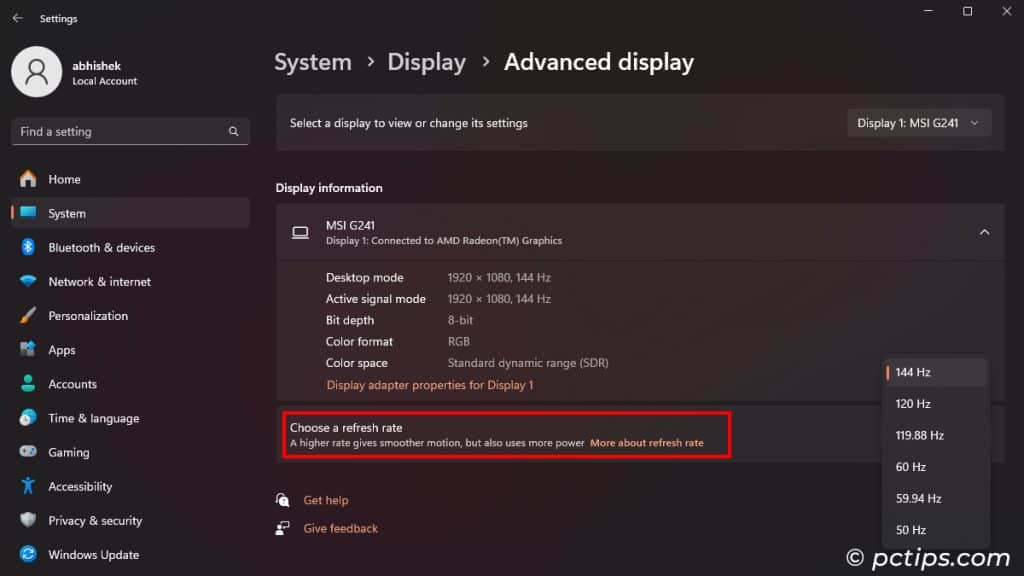
Your GPU may not automatically use the maximum refresh rate of your monitor on a desktop system.
On my office PC, I was actually running the 144 Hz monitor at 60 Hz for a few weeks before I noticed it.
To have the smoothest possible gaming experience, go to Settings > System > Display > Advanced display and set the highest refresh rate.
Depending on your GPU, your monitor brightness may decrease while increasing the refresh rate. Make sure to re-configure the brightness and contrast through the monitor’s OSD menu.
Change to Public DNS for Less Internet Restriction
Whenever you enter any address or URL on your web browser, the Domain Name System (DNS) servers translate this URL to the IP address of the website server. Only then can your computer access the website and show you the necessary content.
By default, you’ll be using the DNS assigned by your ISP, which may come with some limitations, like:
- Restrictions to certain websites
- Lack of filters for harmful websites
- Occasional power outages, which can cut off the internet connection
To prevent or reduce such issues, try out some reliable public DNS that undergo frequent management and servicing. To do so,
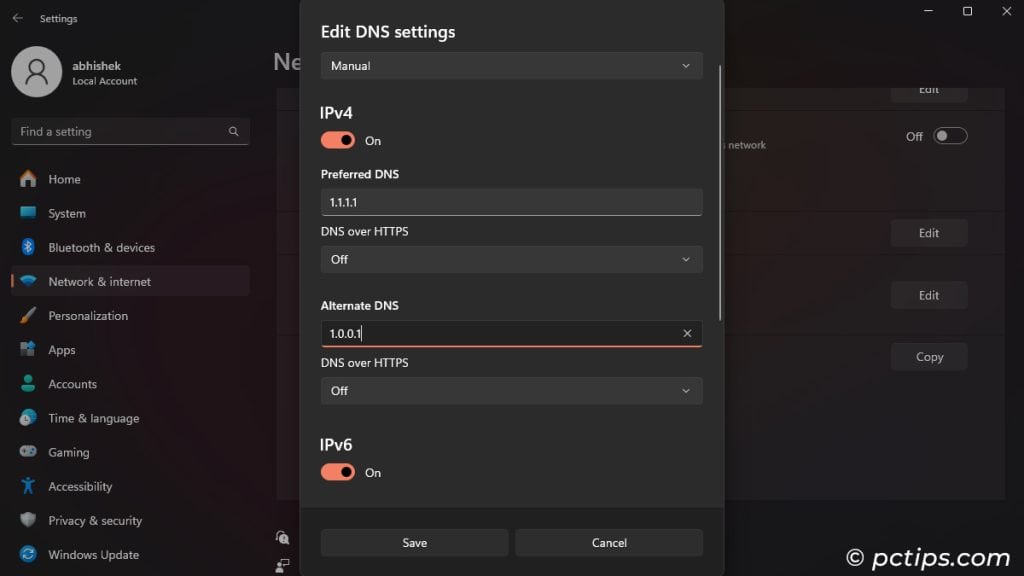
- Go to Settings > Network & internet > Wi-Fi/Ethernet > Your current network and click on Edit beside DNS server assignment.
- Set the drop-down box to Manual and toggle on IPv4.
- Set Preferred and Alternate DNS to one of the following:
- Google:
8.8.8.8and8.8.4.4 - Cloudflare:
1.1.1.1and1.0.0.1 - OpenDNS:
208.67.222.222and208.67.220.220 - Quad9:
9.9.9.9and149.112.112.112
- Google:
- Click Save.
Disable Hibernation to Free Up More Storage
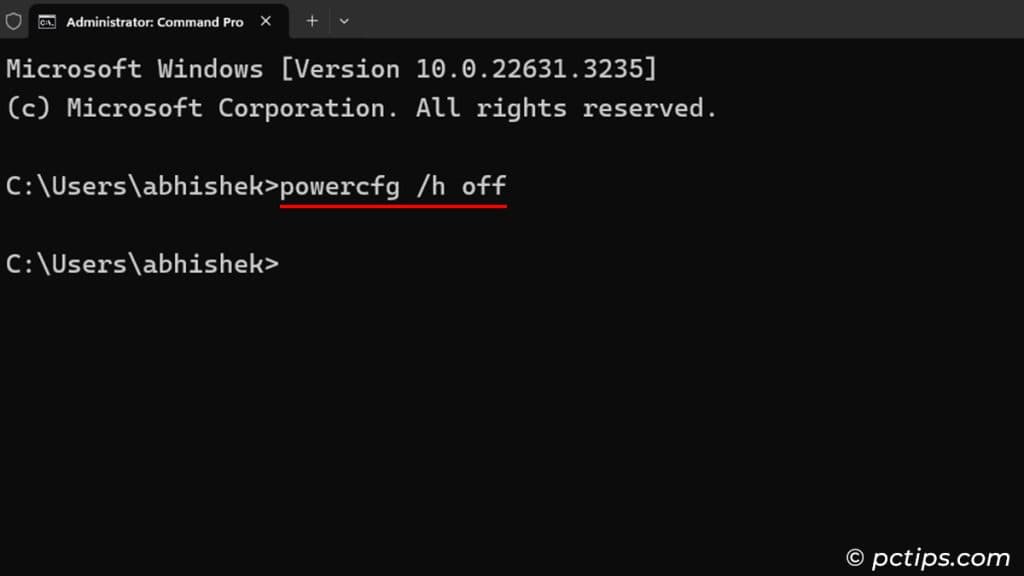
The hibernation feature in Windows makes use of a Hiberfil.sys file to store the current state of the RAM. This way, you can quickly get back into your work after powering up the PC.
The Hiberfil.sys file is present even if you don’t hibernate your PC and it takes up the same storage space as 40% of your RAM capacity. So for 32 GB RAM, it uses about 12 GB of disk space.
However, you can actually disable hibernation and free up your disk if you don’t need this feature.
To do so, open Command Prompt and run powercfg /h off.
Disabling hibernation turns off Fast Startup as well. However, you won’t notice any significant difference in your startup time as long as you use an SSD as your system drive.
Enable Automatic Registry Backups
Windows stores all necessary settings and system behavior inside its registry.
So any haphazard modifications due to broken updates, installation of problematic software, virus infection, or even manual changes may cause serious system issues.
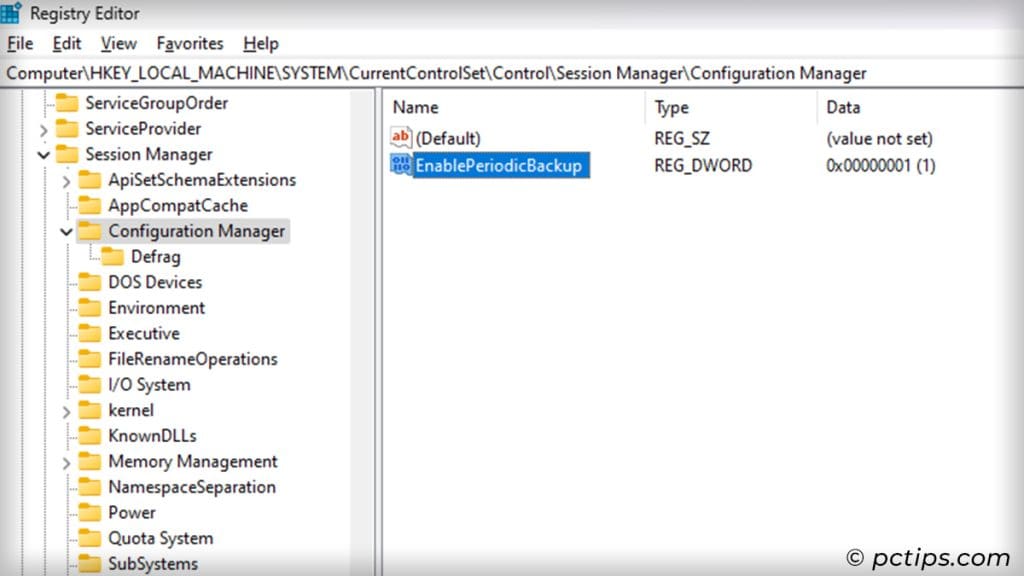
To account for such scenarios, enable automatic registry backups as soon as possible:
- Open the Registry Editor and go to
HKEY_LOCAL_MACHINE\SYSTEM\CurrentControlSet\Control\Session Manager\Configuration Manager - Create a new DWORD,
EnablePeriodicBackup, and set its value to 1.
Then whenever you can’t access your system due to broken registry records, get to Advanced Startup options and restore your registry.
Show Hidden Files/Folders and Extensions for Better File Management
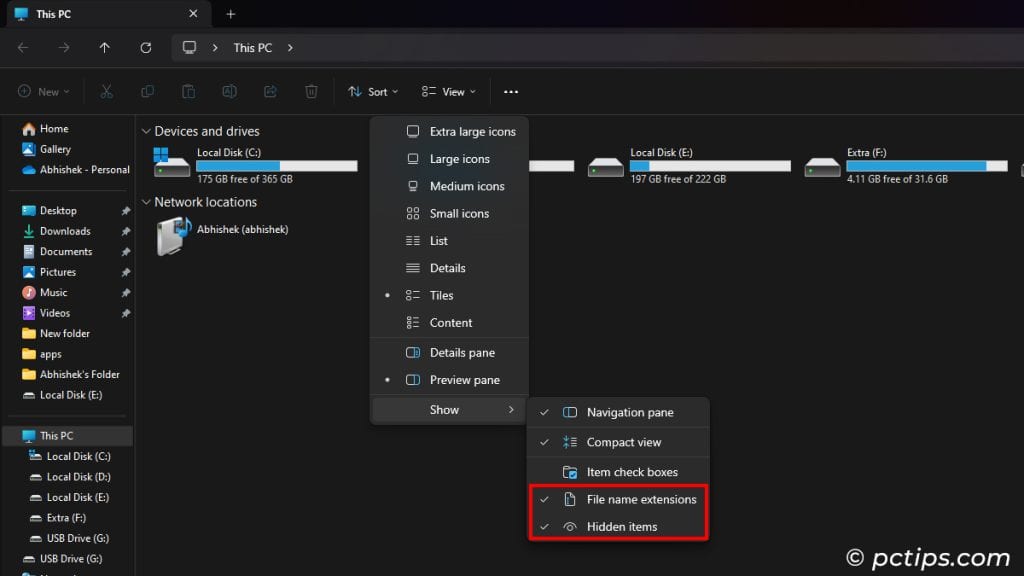
Windows hides many files, folders, and even the file extension by default. So you’ll usually have no idea what files you’re dealing with and what additional folders/files you can access.
It’s better to be aware of all these things to better navigate through your computer. So, try out these steps to unhide them:
- Open the File Explorer and check Hidden items and File name extensions inside View > Show.
- Open Run and enter control folders. Here, go to View and uncheck Hide protected operating system files.
Bring Back the Old Right-click Context Menu
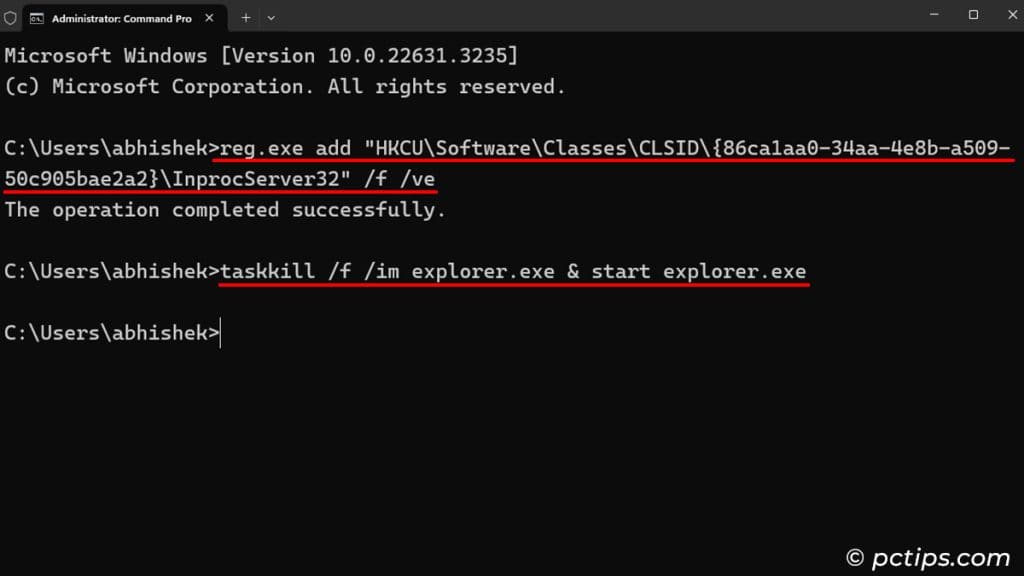
The new context menu introduced in Windows 11 is not bad per se, but it does lack many options.
If you don’t like having to select Show more options every time after right-clicking, here’s a quick way to bring back the old context menu.
- Open Command Prompt as admin.
- Type
reg.exe add "HKCU\Software\Classes\CLSID\{86ca1aa0-34aa-4e8b-a509-50c905bae2a2}\InprocServer32" /f /veand press Enter. - Then, enter
taskkill /f /im explorer.exe & start explorer.exe.
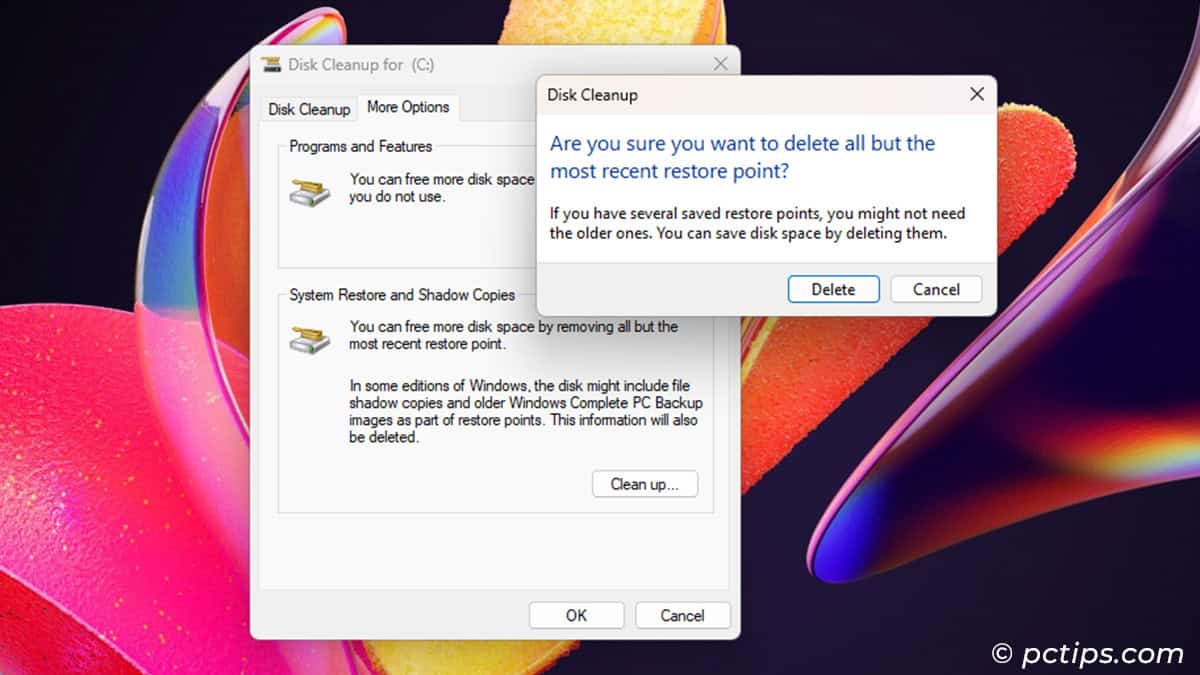
Delete Old Restore Points and Reduce Space for New Ones
Windows reserves certain space on your disk to store system restore points.
Since these points help recover your system after serious system issues, you shouldn’t remove them.
What you can do is erase all but the most recent points as they won’t really be necessary. To do so,
- Open Run, type
cleanmgr, and press Enter. - Set Drives to C and click OK.
- Select Clean up system files. Click OK again.
- Go to the More Options tab and under System Restore and Shadow Copies, select Clean up > Delete.
It’s also a good idea to limit the reserved space for the restore points. This way, your disk won’t fill up as quickly. For this,
- Open Run, type systempropertiesprotection, and press Enter.
- Select your system drive and click on Configure.
- Reduce the Max Usage to less than 10 GB and click OK.
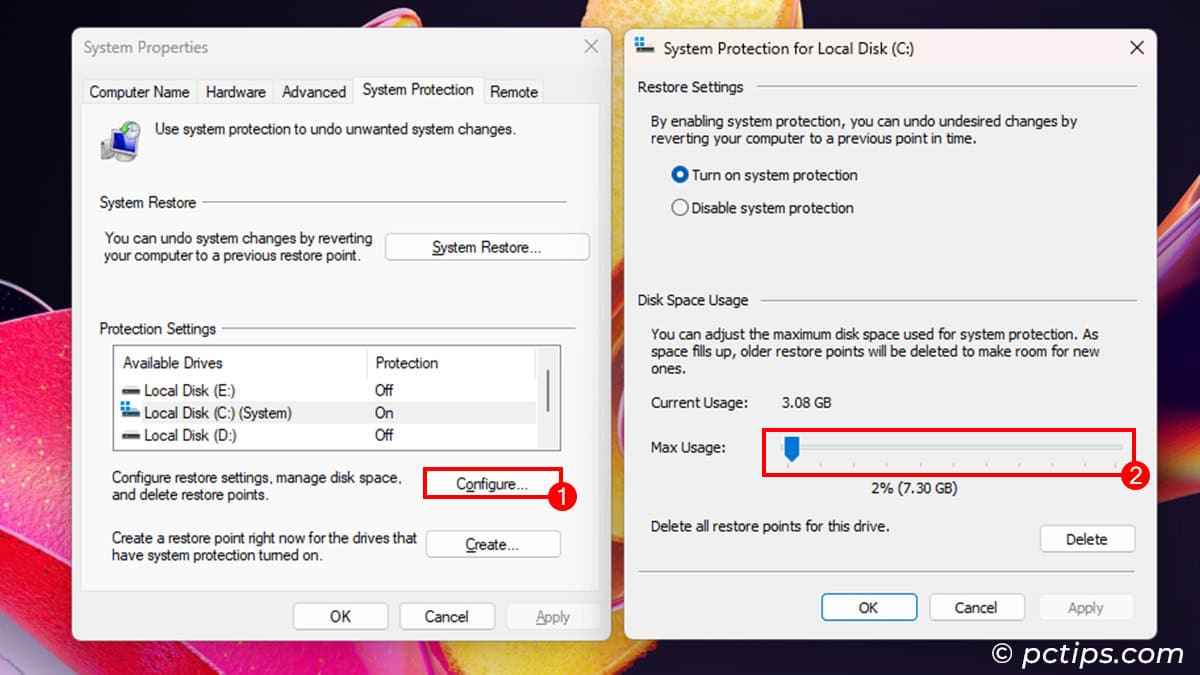
Reducing the maximum usage will also delete any previous restore points. So create a new one as soon as possible.
Made These Changes! What Now?
After making all these changes, it’s best to change other settings using your laptop/motherboard’s OEM configuration application.
For example, I always enable Battery Conservation mode (limit max battery to 60%) on my Legion 5 laptop using Lenovo Vantage to prolong the battery’s lifespan.
You can also change your GPU configuration using NVIDIA GeForce Experience, AMD Radeon Software, or Intel Graphics Command Center.
These are all the changes that I personally think you should make. If you don’t agree with certain options or want to share more settings you’d rather change, do share with us in the comments below.
I, at last, found an article chocked full of legitimate and easy to follow information. I did get off in the weeds on some of the later, more complex, instructions and some of the titles regarding apps I could not find in the stated location. Overall, I wanted to thank you for a clearly well structured tutorial and when my new laptop arrives, I will definitely be using many of your suggestions. Thank you.