Customize Your Desktop (Why You Should And How)
Last Updated:
Look, I’m just gonna say it straight: your Desktop is a mess. It’s not just you – we’re all guilty of it from time to time. But the truth is, all those forgotten files and ancient aliases aren’t doing you any favors. In fact, they’re slowing you down. Big time.
Why Your Desktop is Dragging You Down
It’s simple, really:
- Clutter kills productivity. When your workspace is a disaster, your brain has to work overtime just to find what you need. Talk about a motivation killer!
- Disorganization breeds distraction. Every errant icon is a shiny object waiting to steal your focus. And we all know how precious focus is these days.
- Old files = wasted space. Those “temporary” items you saved months (or years!) ago? They’re dead weight. Ditch ’em and enjoy the sweet freedom of a lean, mean hard drive.
The Solution: A Desktop Makeover
If you’re stuck with the same old dull Windows interface, it’s time for a change!
I was able to customize my desktop using four extremely handy third-party tools.
Don’t worry, I’ve got you covered even if you prefer customizing your desktop without using any software.
Let me walk you through the steps now.
Step 1: Download Necessary Tools
If you want to customize your desktop without downloading anything, jump directly to this dedicated section.
After thorough testing of 15 to 20 software, only four of them turned out to be helpful for me. These are the ones I use and recommend:
- Fences: To group desktop icons based on their categories
- Lively Wallpaper: To set a live wallpaper for better aesthetics
- Rainmeter: To add clock, date, weather, Google search bar, power/lock/sleep shortcuts, quick reminders, calendar, and hardware monitor
- NeXuS Dock: To replaced Windows taskbar with a Mac-like dock
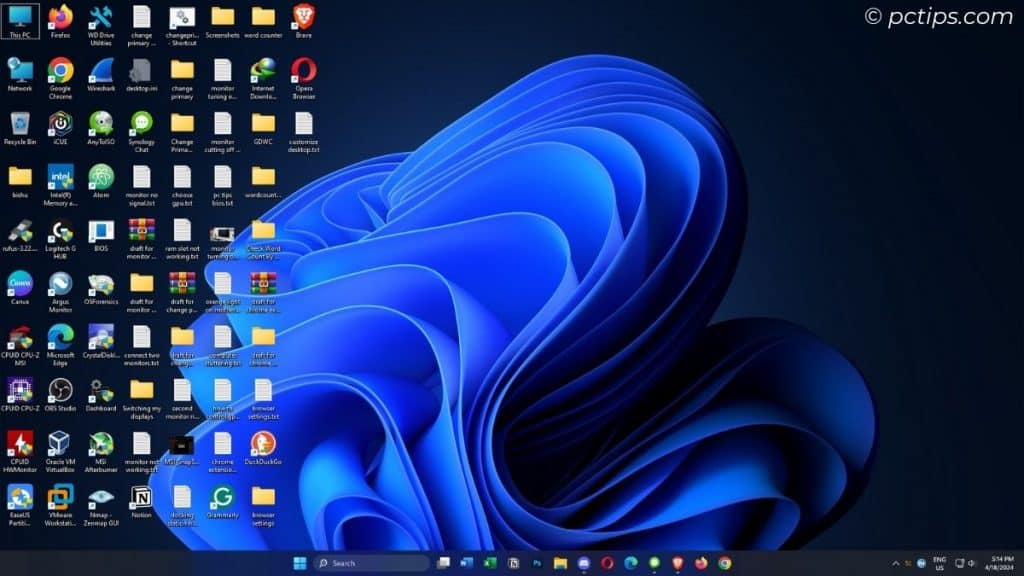
My desktop before customization:
Step 2: Customize Desktop Icons with Fences
A cluttered desktop jammed with icons (like mine above) is indeed a nightmare! It’s not just hard to navigate through but it even kills all the vibes.
With Fences, you can organize related icons into different folders. Here’s how:
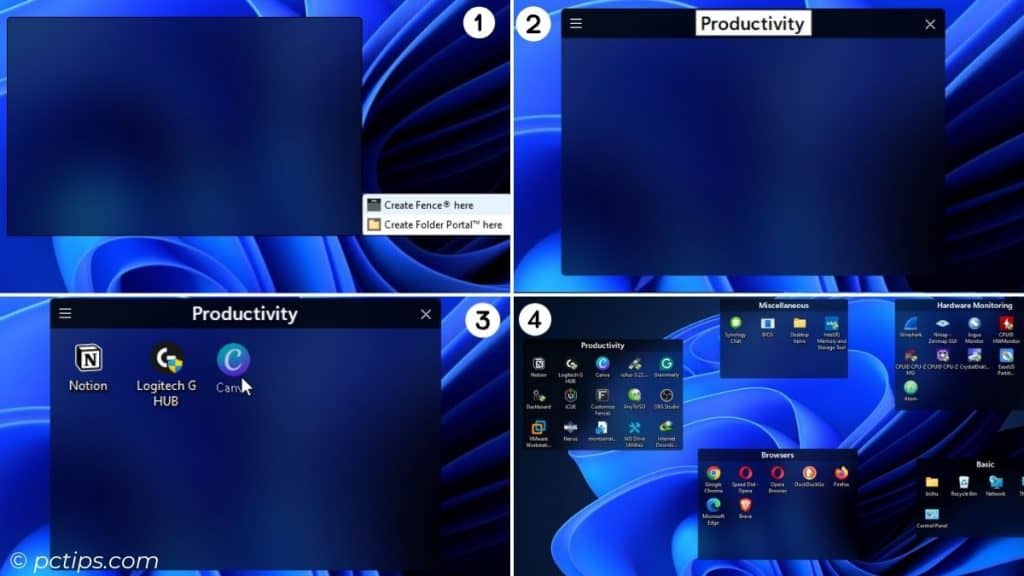
- Navigate to your desktop and draw a rectangle.
- Select ‘Create a fence here’.
- Rename the fence and add the relevant desktop icons.
- Repeat the process to create more fences.
To further customize the fences, you can:
- Drag each fence and place them as per your preference.
- Double-click anywhere on the empty desktop to quickly hide/show them (I always do this!).
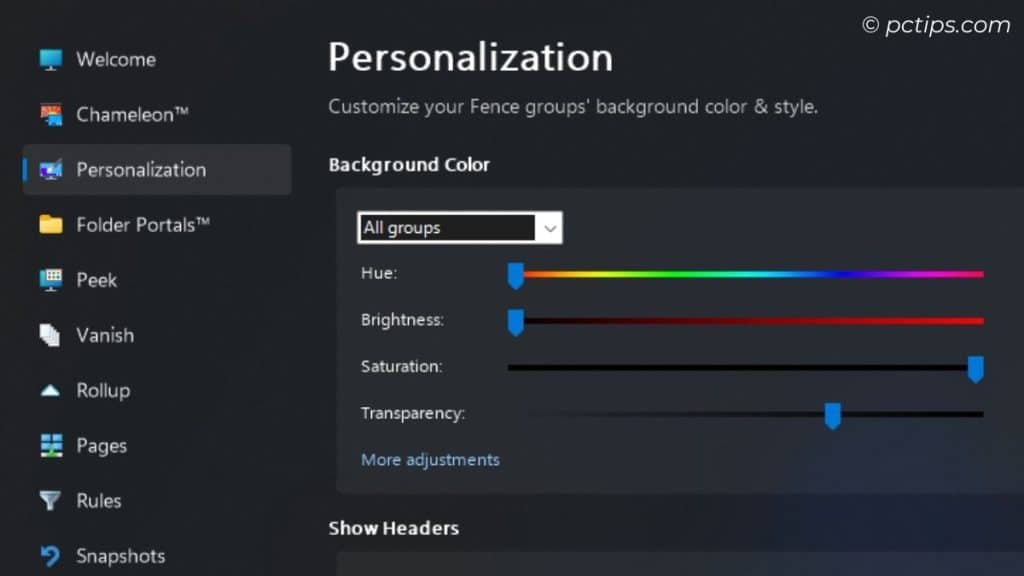
- Launch the Fences app to customize the background (Personalization> Background Color > Select group > Tweak Hue, Brightness, Saturation, and Transparency).
- To blend your icons to the wallpaper, Chameleon > Enable Chameleon.
- Manage shortcuts via Peek > Hotkeys.
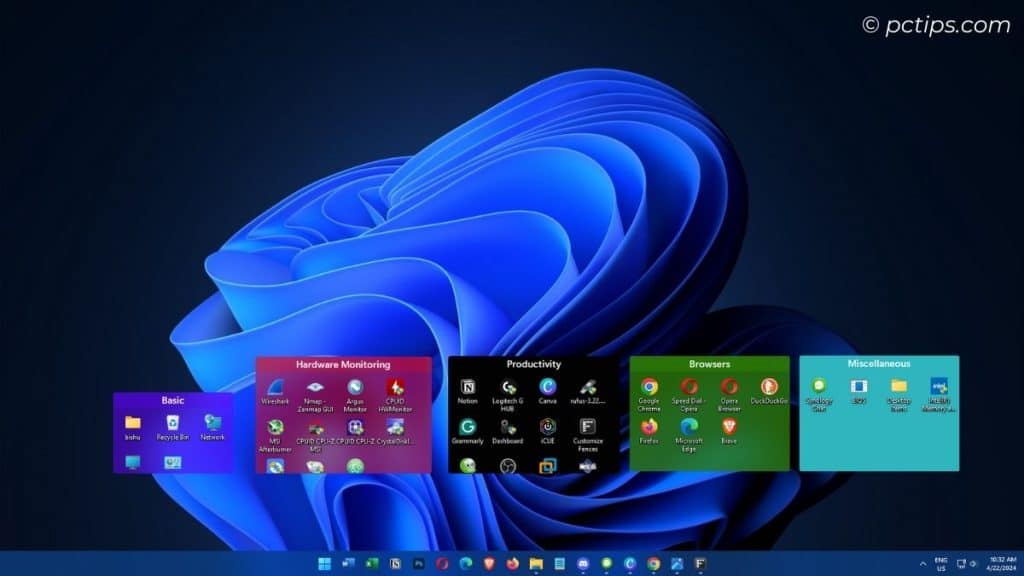
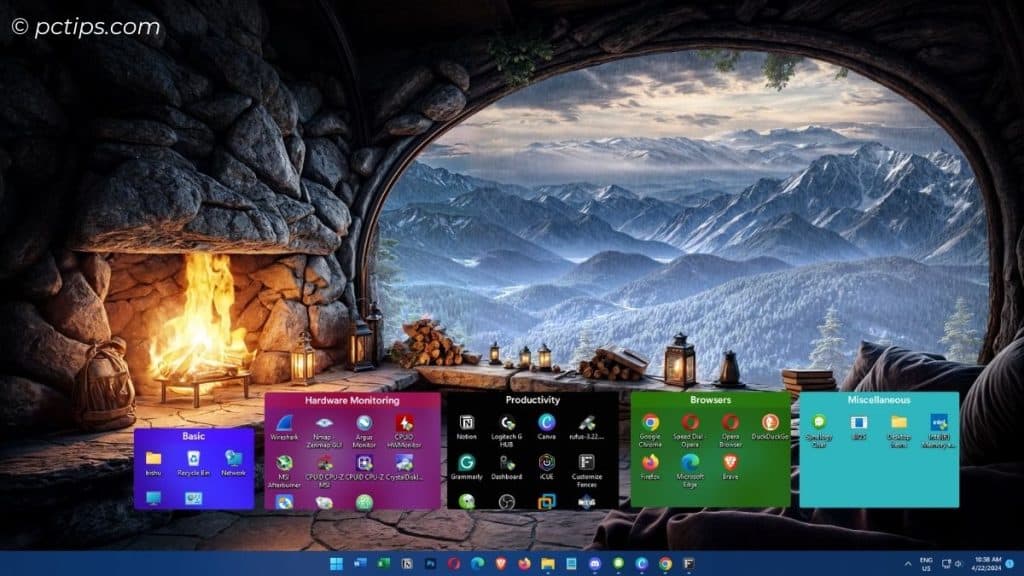
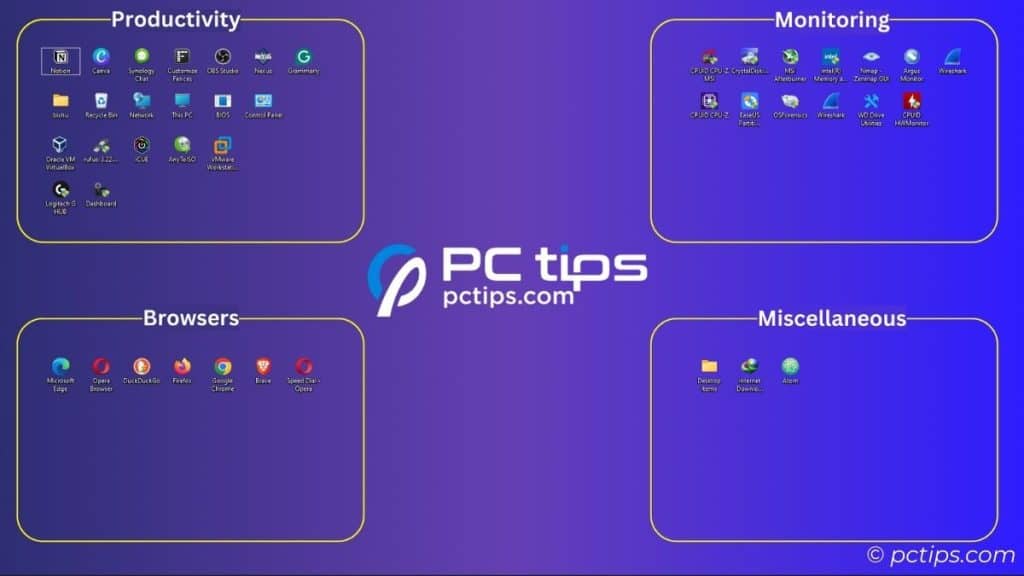
My desktop after using Fences:
Step 3: Change Background Using Lively Wallpaper
The next step is to change your static desktop background into something dynamic. Lively Wallpaper is my go-to-choice to set live wallpapers.
You can set any background available in its library or add custom ones, including videos!
This is how you do it:
- First, find relevant live wallpaper from different online sites, like Freepik, Pexels, Desktop Hut, etc. I’ve downloaded mine from Pixabay.
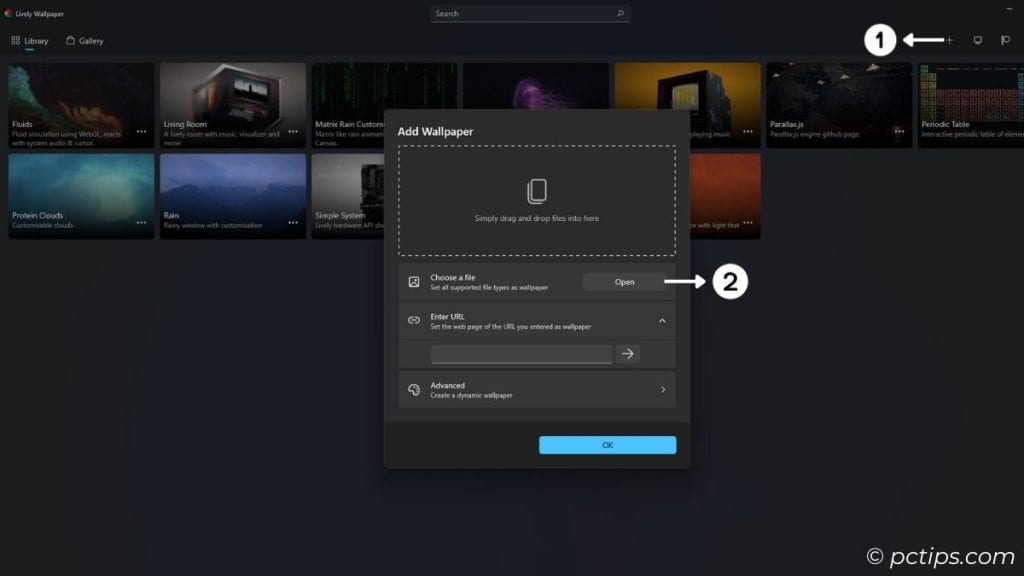
- Launch the app and select the ‘+’ icon.
- Press Open in Choose a file.
- Select your downloaded file.
- Once the upload is complete, simply click on the item to set it as your new desktop background.
My desktop after using Lively Wallpaper:
Step 4: Use Rainmeter For Ultimate Desktop Customization
While our desktop looks sleek and minimal, it still lacks a spark!
With Rainmeter, you can add interactive widgets, like clock, calendar, weather, hardware monitoring, Google search, and more.
One thing to note is that its default interface doesn’t offer the best aesthetics.
So, I advise finding relevant ‘skins’ based on your preferences. Visual Skins and Deviant Art are the best platforms for that.
Skins I’ve used for this guide: Sonder, Weather Desk, Paper Notes, Cyber Search
Just double-click on the downloaded item and select Install. Do this step-by-step as we proceed below.
Add Different Widgets Using Sonder
This skin comes with multiple built-in widgets for dedicated purposes. I’ll be using Time, System (Advanced), Date, Calendar, and a few items from Utilities.
As soon as the skin is installed, all the widgets get loaded automatically. To remove the unwanted ones, right-click and choose Unload skin.
Once that’s done, let’s proceed to customize this skin further:
- Get to the settings. If you closed this earlier, launch the Rainmeter app > Sonder > Settings > !
Settings-All.ini> Load.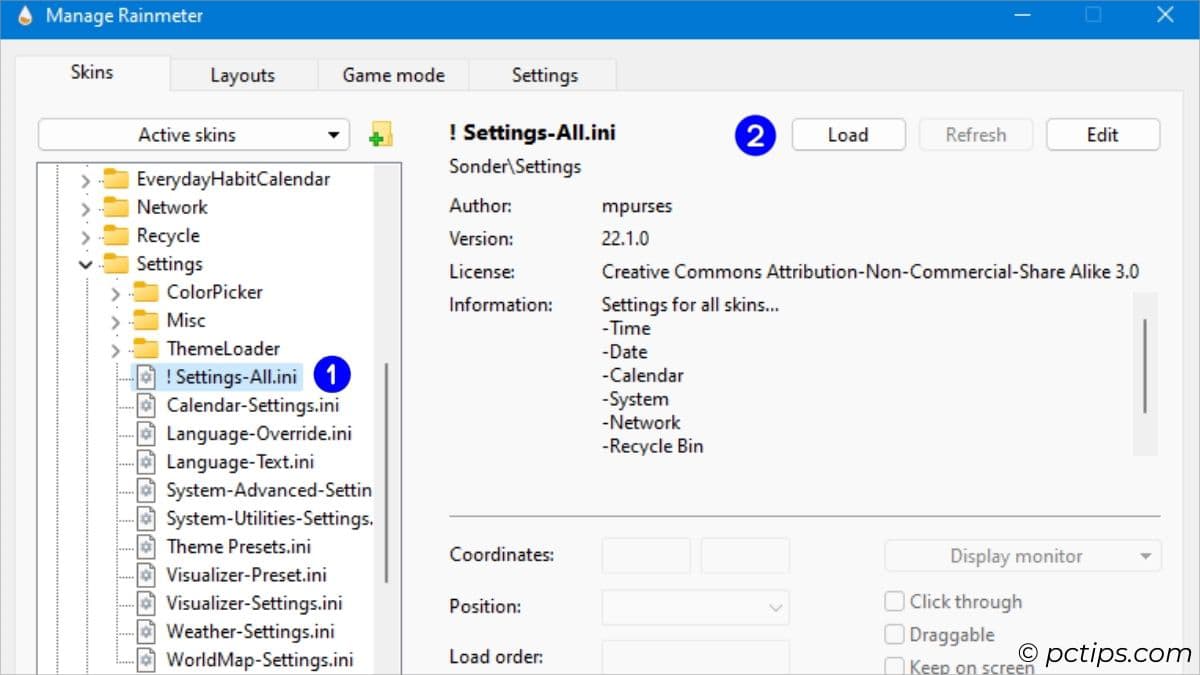
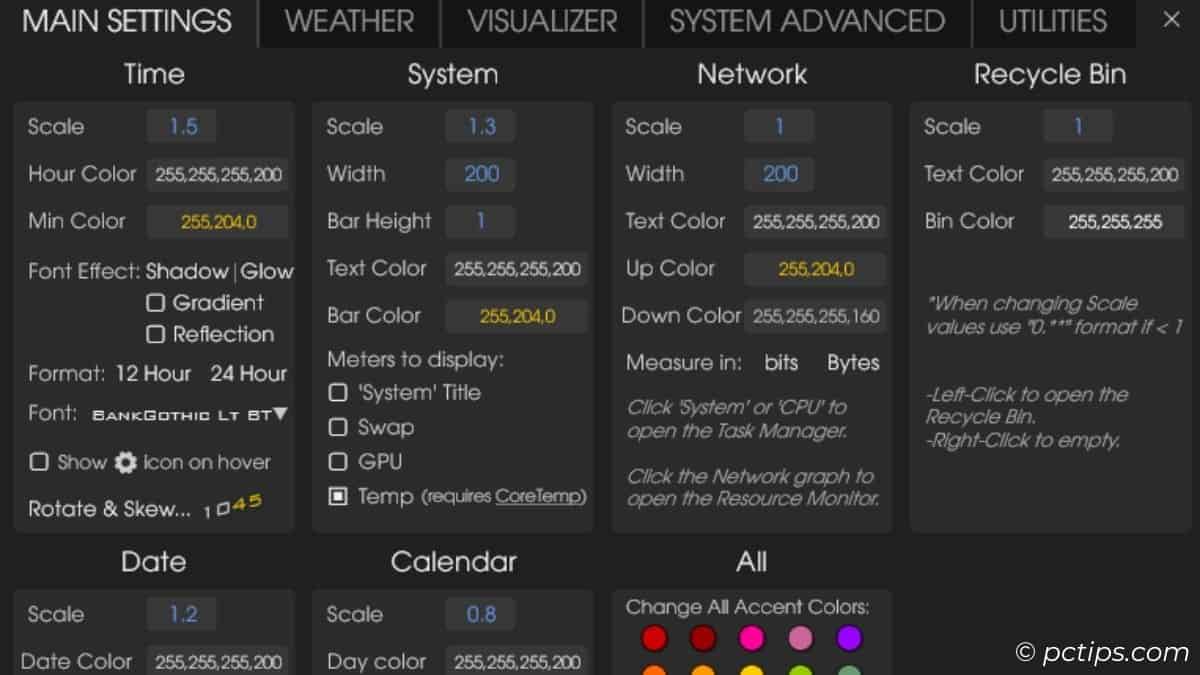
- Use Scale to increase/decrease the widget size.
- Set a desired RGB color. I’ve used the #All# section to do this.
- Now, individually manage other widget properties, like font, format, effect, etc.
To change system monitoring to advanced, right-click on the skin > Manage skin > Switch to System-Advanced.ini > Load. Now, get to the Settings skin > #SYSTEMADVANCED# > set the desired controls.
Weather Desk For Weather Report
While Sonder also comes with a weather utility, I found it a bit buggy as it couldn’t trace my location’s data.
Weather Desk is the best alternative. This is how to customize your location here:
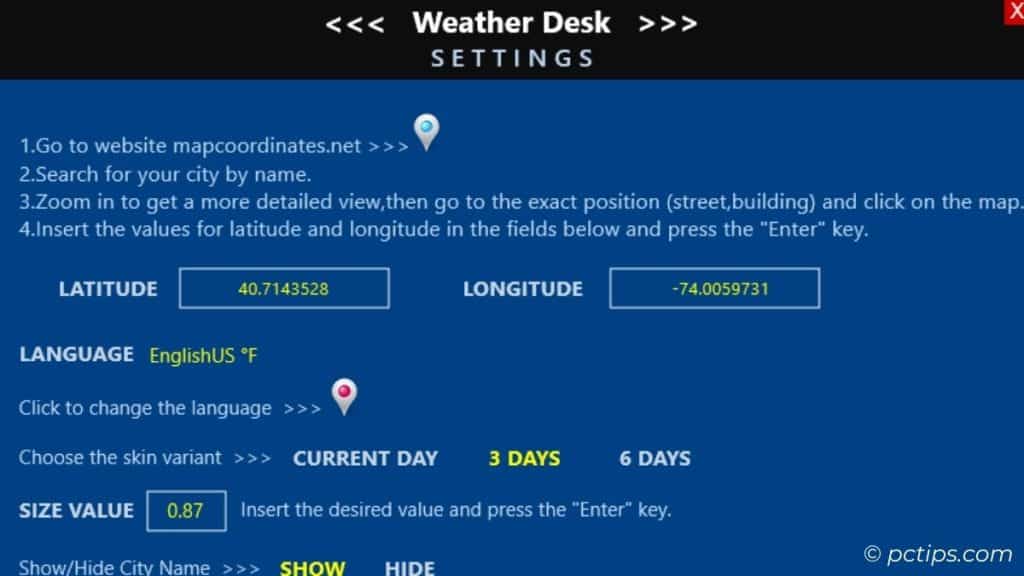
- First, navigate to mapcoordinates.net and find the latitude and longitude of your location.
- Show Desktop > Right-click on the skin > SETTINGS MENU.
- Set the Latitude and Longitude fields as found earlier.
- Tweak other options too. For example, I’ve set the skin variant to 3 days and chosen to show the city name.
Use Paper Notes For Quick Reminders
I’ve used this skin to set quick reminders for my upcoming events. It’s possible to add up to four notes.
Paper Notes is indeed straightforward to configure. Here are a few things to help you out:
- To edit any note, just double-click on it. A Notepad window pops up where you can add the necessary texts.
- Hover over and set a custom color to each note.
- Use pin to bring the note forward and close to unload it.
- To add extra notes, right-click > Manage skin > Expand the note >
Note#.ini> Load.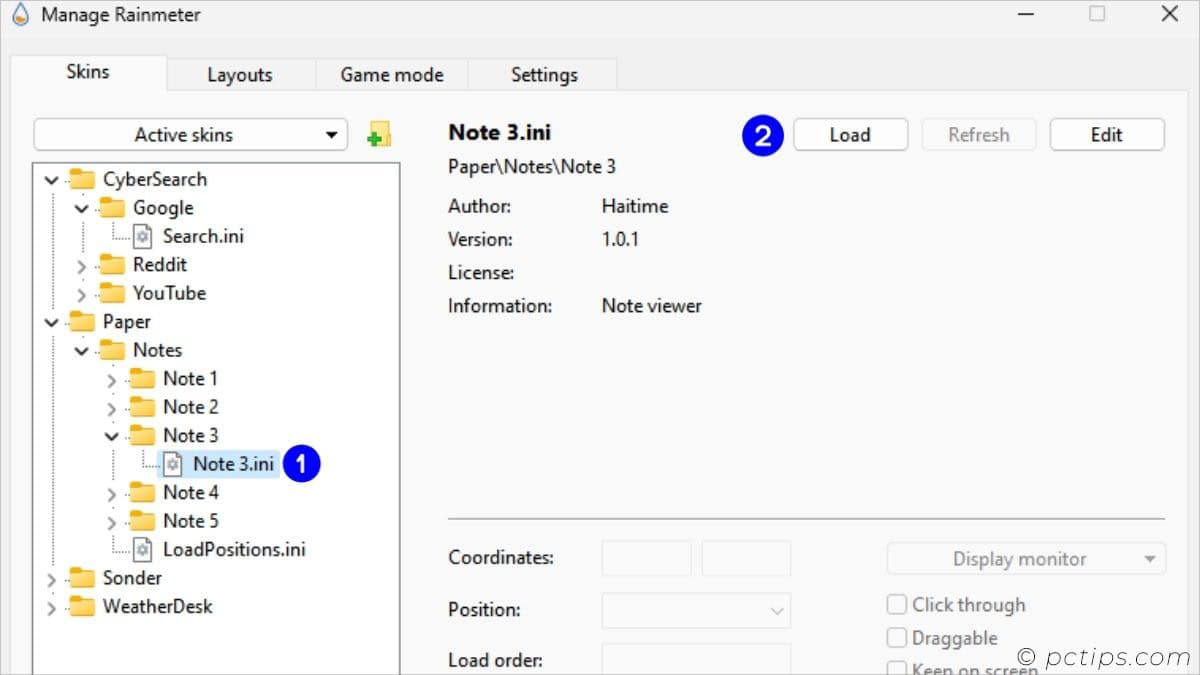
Add a Direct Search Feature Using Cyber Search
To finalize, let’s add a Google search bar so that you don’t have to open your browser every time.
Cyber Search isn’t just limited to one search engine. You may opt for Reddit or YouTube search too.
Here’s how:
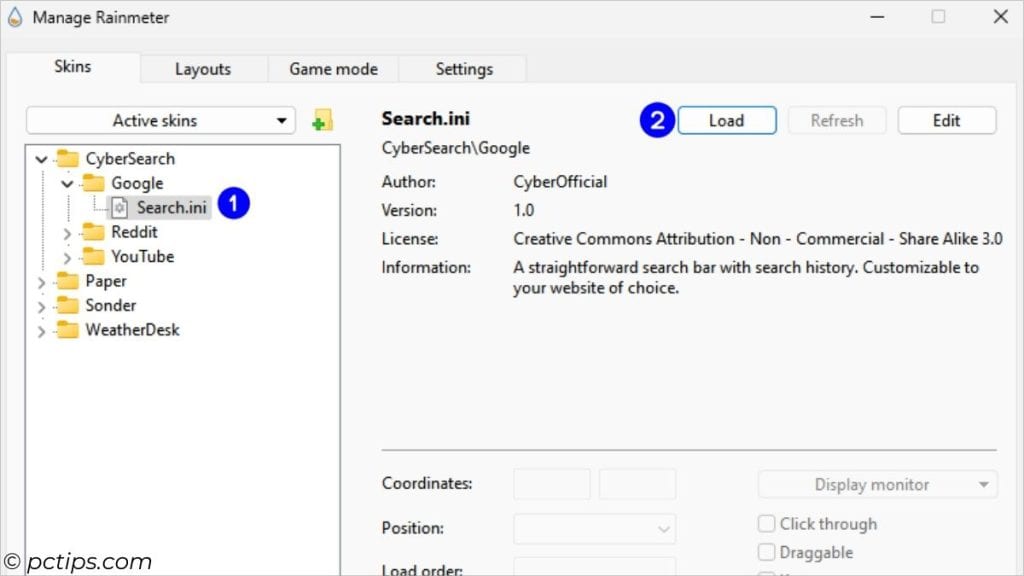
- Launch Rainmeter.
- Expand Cyber Search > Expand the search bar you want.
- Click on the
.inifile and load it.
Once you’ve set up all Rainmeter skins, finalize by doing these:
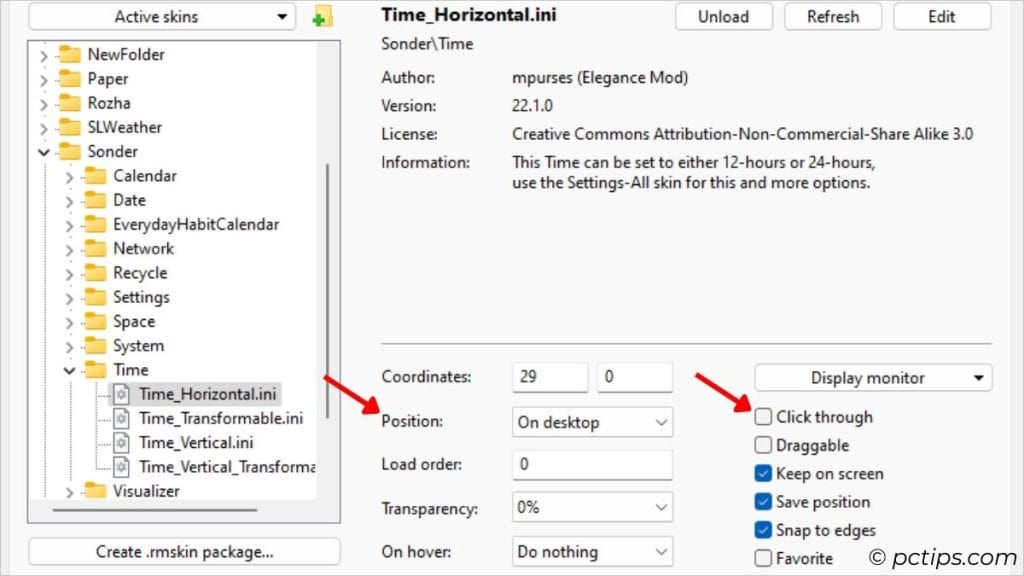
- Drag the skins to the desired desktop positions.
- Right-click on each skin > Manage skin > select the .
inifile > Uncheck ‘Draggable’. This locks the skin into its place. - Set Postion to On Desktop. This ensures the skin doesn’t overlap the open windows.
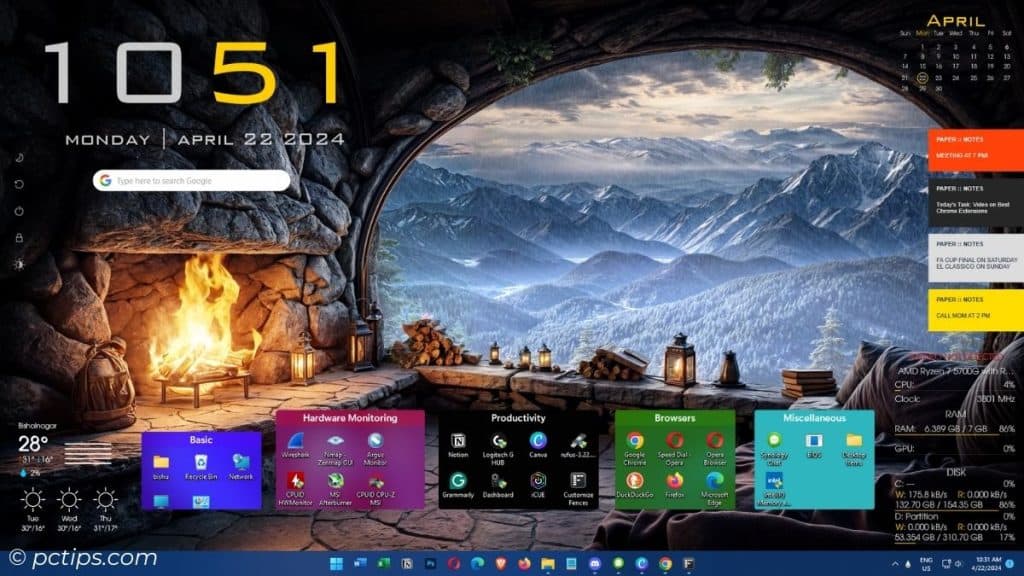
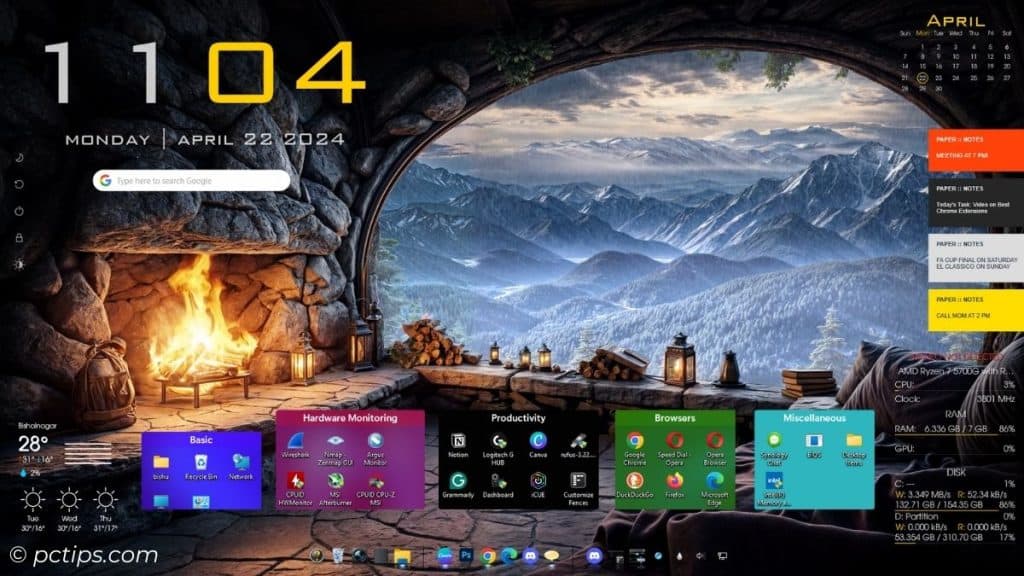
My desktop after using Rainmeter Skins:
Step 5: Transform Your Taskbar With NeXuS Dock
If you want an animated taskbar, NeXuS Dock is the right option for you.
It overtakes your existing Taskbar and gives your Windows a Mac-like feel. In fact, you can further customize this to suit your needs.
Here are the necessary tips to help you master NeXuS Dock:
- First, right-click on Nexus icon from System Tray and choose Preferences.
- Enable these items from Content:

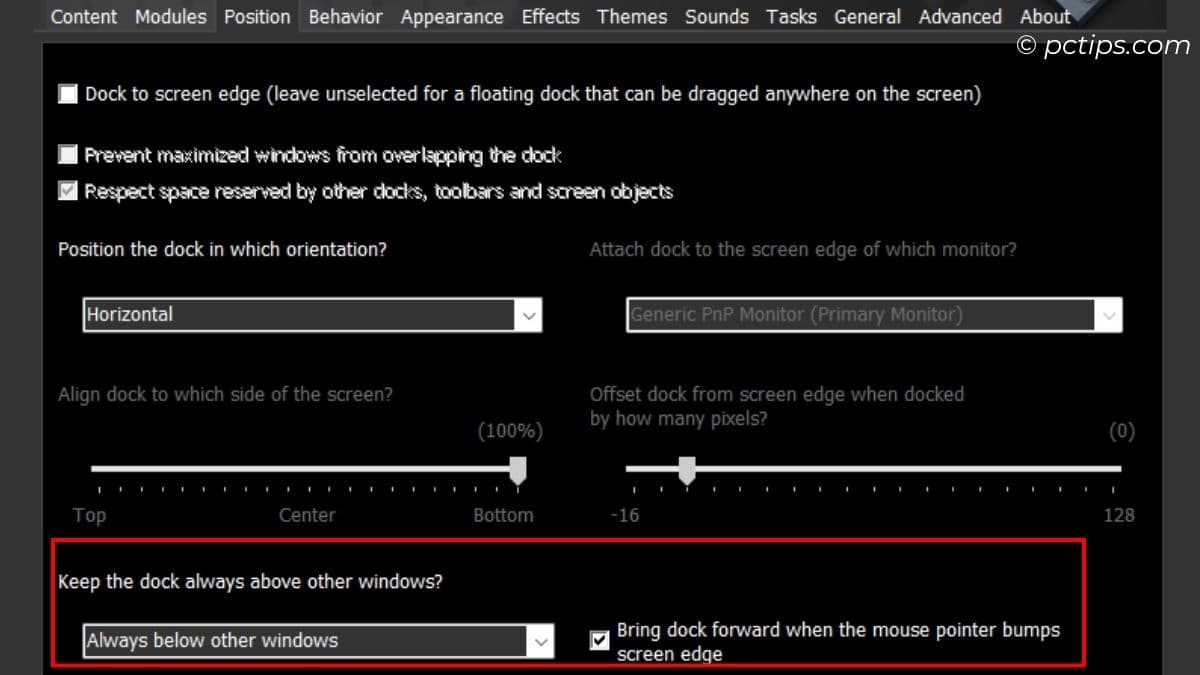
- Switch to Position and ensure the dock is always below other windows. Also, check the ‘Bring dock forward when the mouse pointer bumps screen edge’ option.
- In the Appearance tab, configure the following:
- Dock’s icons size and reflection
- Icon drop shadows/labels
- Transparency (mine is set to 100%), icon spacing, color, and blur
- Customize the effects and themes as per your needs.
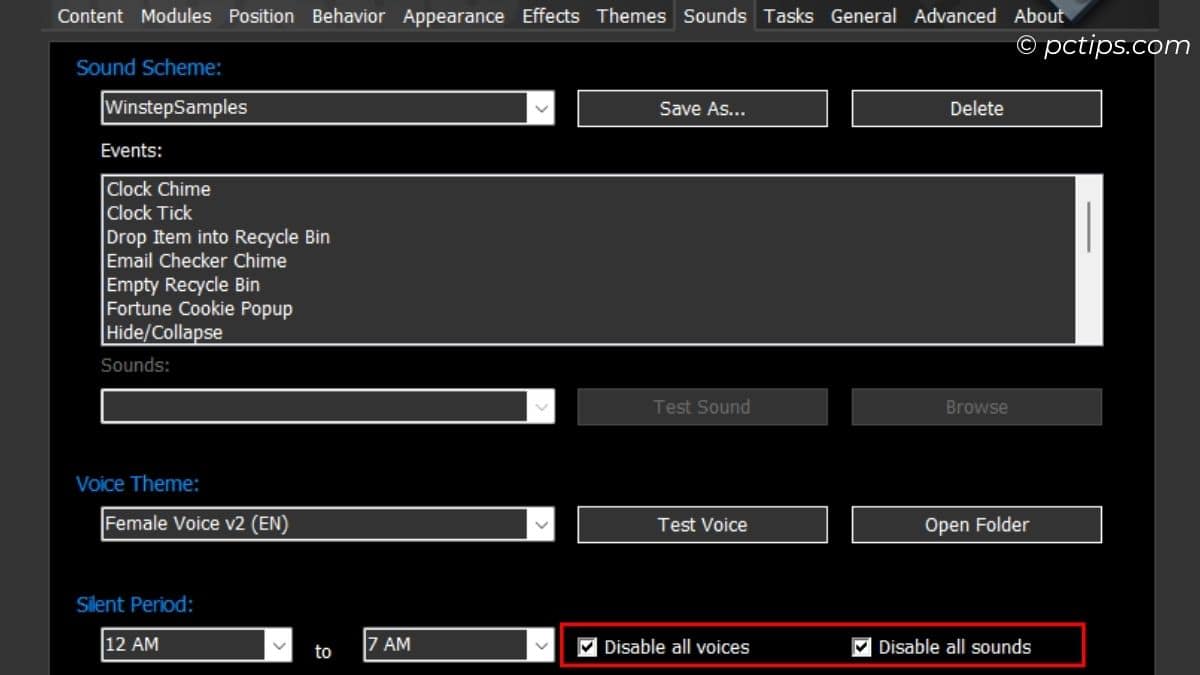
- While you may add sound effects to certain events, I’ve rather disabled this – Sounds > put a check on both Disable all voices and Disable all sounds.
- In the General tab, enable these options:
- Run NeXuS at Windows Startup
- Hide Windows taskbar
- Apply the changes and you should be good to go.
Now,
- Drag the taskbar to your preferred location.
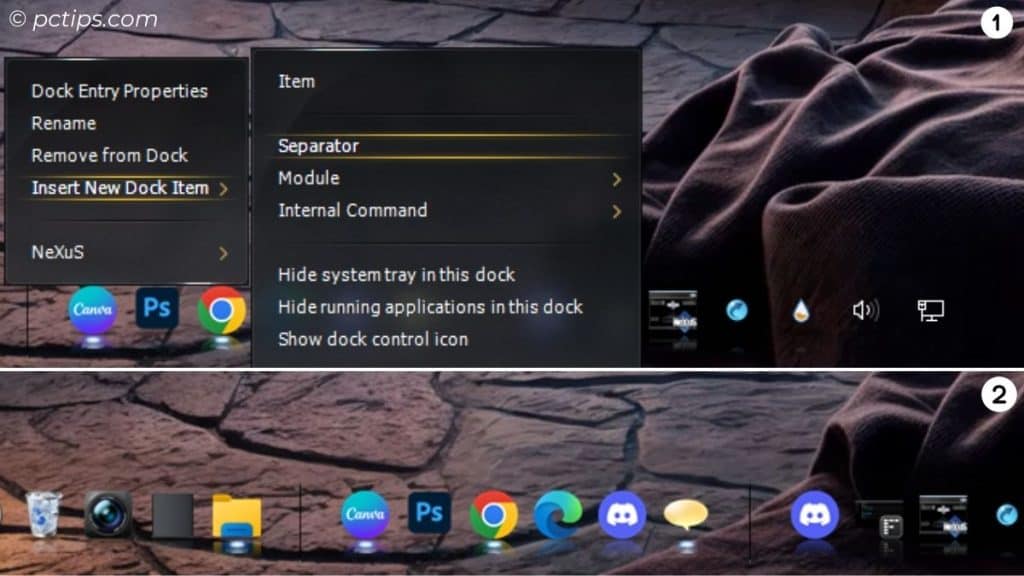
- Right-click on the dock and choose Insert New Dock Item > Separator.
- Add your favorite items one by one and arrange them in different sections. All you need to do is drag and drop.
My desktop after using NeXuS Dock (final look):
Enable all tools at startup so that you don’t have to load your customization each time you boot into Windows. To do this, navigate to Settings > Apps > Startup.
Customizing Desktop Without Downloading Anything
Third-party apps can indeed slow down your PC or lead to random stutters.
Even in my case, I experienced an average of 6-10% memory and 4-7% CPU increase.
While my high-spec PC can easily handle this, other low-end systems (like my laptop) can’t.
Fortunately enough, Windows does offer some amount of customization without having to download anything.
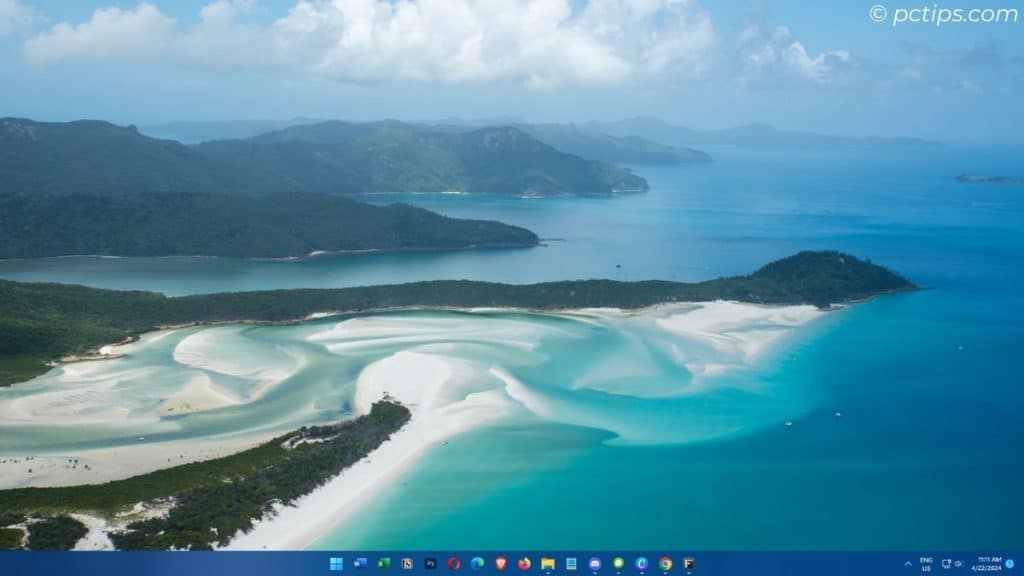
I gave it a shot and here’s the final result:
Let me teach you how you can do it too.
Step 1: Personalize Your Background
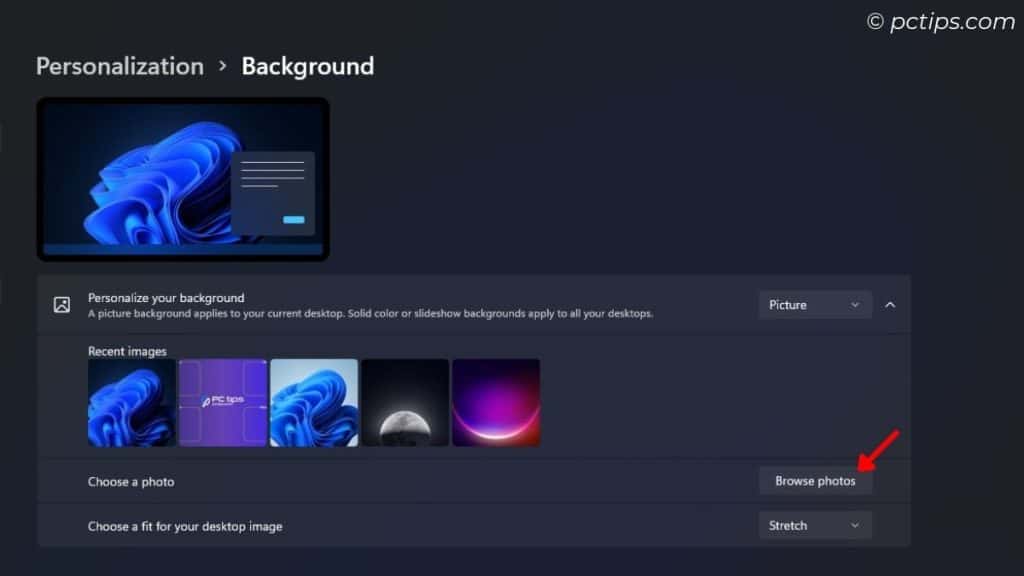
Open Settings > Personalization > Background > Personalize Your Background > Picture > Browse photos > select your favorite picture.
Like my background picture? I’ve created a sample one for you. Download it from here.
Step 2: Arrange Icons or Hide Them
Now, show your desktop > right-click on empty area > View > Uncheck ‘Auto arrange icons’.
Arrange all your desktop icons to the respective group.
I even tried this alternative idea:
Just pick Windows Spotlight in Personalize Your Background. Then, right-click on desktop > View > Uncheck ‘Show desktop icons’.
Step 3: Change Taskbar Behaviors
Right-click on Taskbar > Taskbar Settings > Disable all taskbar items, corner icons, and corner overflow apps.

Then, expand Taskbar behaviors and put a check on ‘Automatically hide the taskbar’.
Step 4: Customize Additional Settings
Navigate to Personalization > Colors > Enable Transparency effects.
Pick an accent color that blends well with your wallpaper (like I’ve done). You may choose a custom color too.
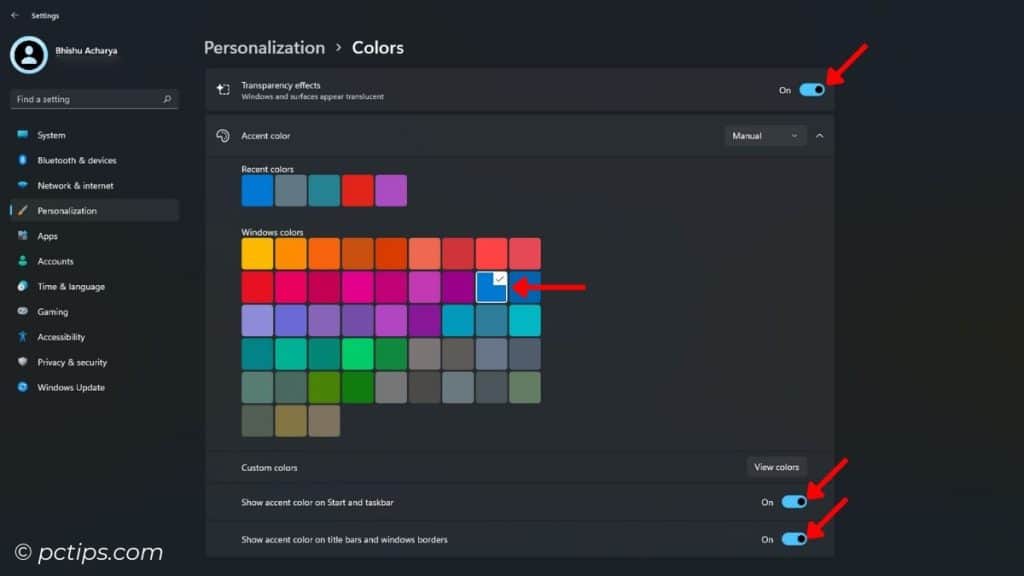
Toggle on both ‘Show accent color on Start and taskbar’ and ‘Show accent color on title bars and windows borders’.
What Next?
I’m hopeful my tips helped you customize your Windows desktop. Feel free to post your screenshot in the comments below – I’d love to see it!
Now, you can proceed to customize other parts of Windows:
- Set an appropriate theme. I’ve chosen Dark mode. You may go with any Windows-related, contrast, or even download a custom one.
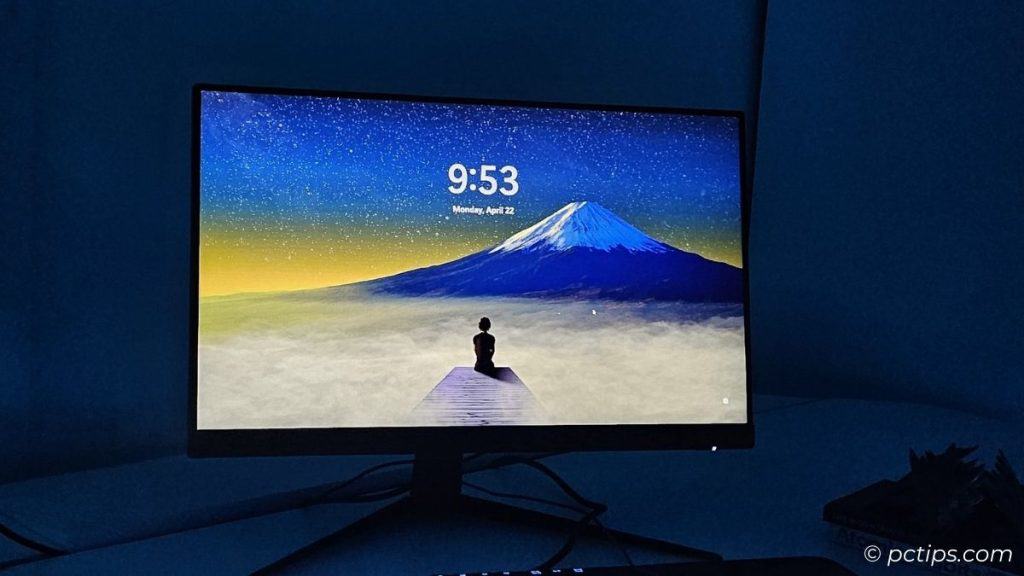
- Customize your lock screen:
- Go to Settings > Personalization > Lock Screen.
- Choose your favorite picture or set this to Windows Spotlight.
- Check mark ‘Get fun facts, tips, tricks, and more on your lock screen’.
- To customize your browser, install one of these extensions – Manganum, Unmind, Momentum, Earth View, Google Arts & Culture, Start.me.
And there you have it! Your customized desktop tailored for aesthetics as well as productivity.