All You Need to Know About Windows Firewall
Last Updated:
Windows Firewall keeps you safe from threats (especially on public networks) by blocking most incoming traffic. It only allows connections that you’ve permitted.
It does its job pretty well by default, so most users never need to tinker with it.
But there are exceptions.
Occasionally, the firewall blocks legit programs and you’ll need to manually make an exception for it.
Or, you might want to block certain outgoing traffic (like your data that Microsoft and other corporations love to collect).
I’ll teach you the ins and outs of Windows Firewall today – from managing ports and firewall rules to general best practices.
What is Windows Firewall? Why Do You Need It?
Windows Firewall, now called Microsoft Defender Firewall, is a host-based firewall included and enabled by default on Windows.
It filters network traffic that enters and exits your device based on various criteria.
This provides several benefits, with the main one being security; especially if your device is a laptop that you might use on public networks.
Without the firewall, you’d have no means to filter any incoming malicious traffic. The open ports would make you an easy target for attackers.
But with Windows Firewall, all incoming traffic is blocked by default.
You might find that one of your apps doesn’t have internet access until you allow it. Or, a friend can’t remotely access your device.
You get to choose which services can receive data from which ports and which IP addresses are allowed.
Windows Firewall also has Public, Private, and Domain profiles. So, you can set different rules for different networks (e.g., home WiFi vs public WiFi).
Basically, the firewall allows you to control exactly which connections to allow to your device.
How to Access Windows Firewall Settings
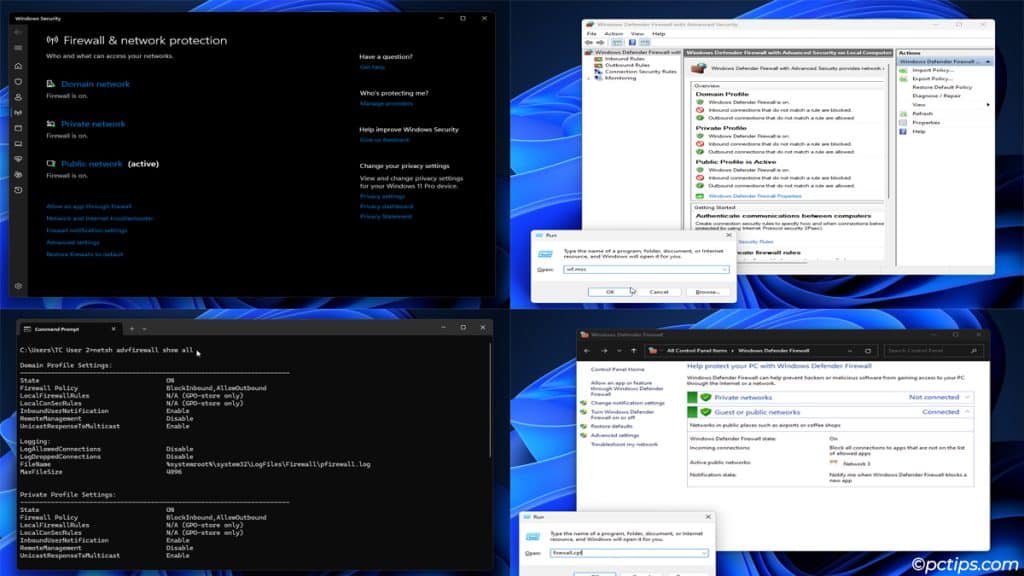
Windows supports multiple ways to view and configure the firewall settings:
- Windows Security
- Press Win + I and open Privacy & security > Windows Security > Firewall & network protection.
- Control Panel
- Press Win + R and enter
firewall.cpl.
- Press Win + R and enter
- Advanced Firewall Settings
- Press Win + R and enter
wf.msc.
- Press Win + R and enter
- Command-line tools
- CLI tools like
netshandNetFirewalllet you configure the firewall from the terminal.
- CLI tools like
Windows Firewall Network Profiles
I prefer the firewall.cpl run command, and that’s what I’ll use for demonstration. Feel free to use any other method you like.
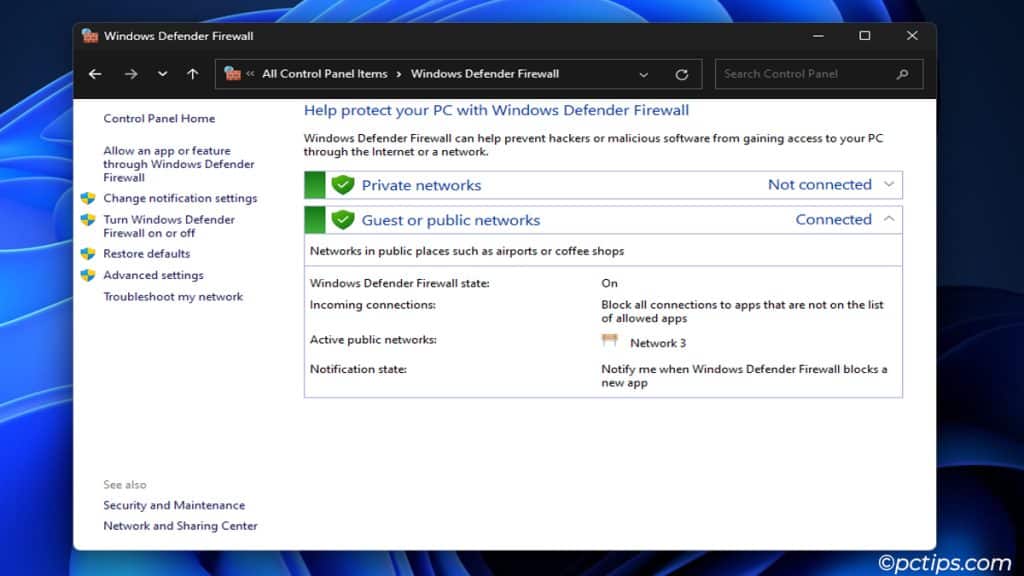
This command opens the Windows Defender Firewall page where you’ll see different network profiles:
- Private networks: Profile used for home or small office networks where you trust other devices
- Guest or public networks: Profile assigned to public networks (not trusted, thus this profile is more restrictive for higher security)
- Domain networks: Workplace network profile applied to devices that are part of an Active Directory domain
These different profiles allow you to set different restriction levels for different networks via varying firewall rules. You’ll understand this better as we explore more firewall features.
Turn Firewall On or Off
On the Windows Defender Firewall page, click on Turn Windows Defender Firewall on or off.
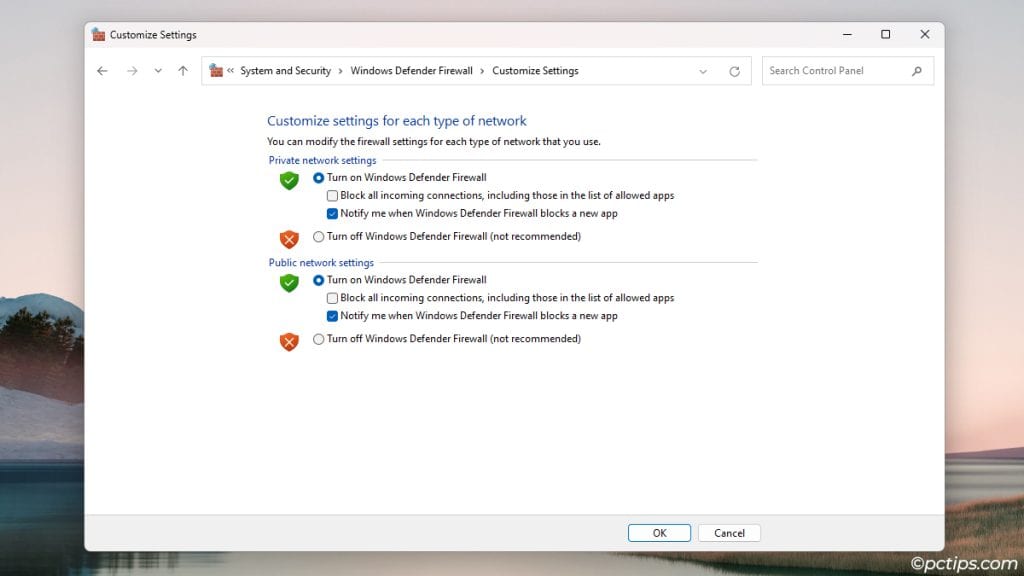
From here, you can enable or disable the firewall for each profile.
But as I explained earlier, you’d be wide open to threats without a firewall. So, I recommend that you DON’T disable the firewall under most circumstances.
If the firewall is blocking certain programs or causing other problems, there are better ways to fix those issues.
Allow Blocked Apps through Firewall
You’ve likely seen the “Windows Firewall has blocked this app – Allow access” prompt before. Clicking Allow there auto-creates an inbound rule to allow traffic.
You can also allow apps through like so:
- Click on Allow an app or feature through Windows Defender Firewall.
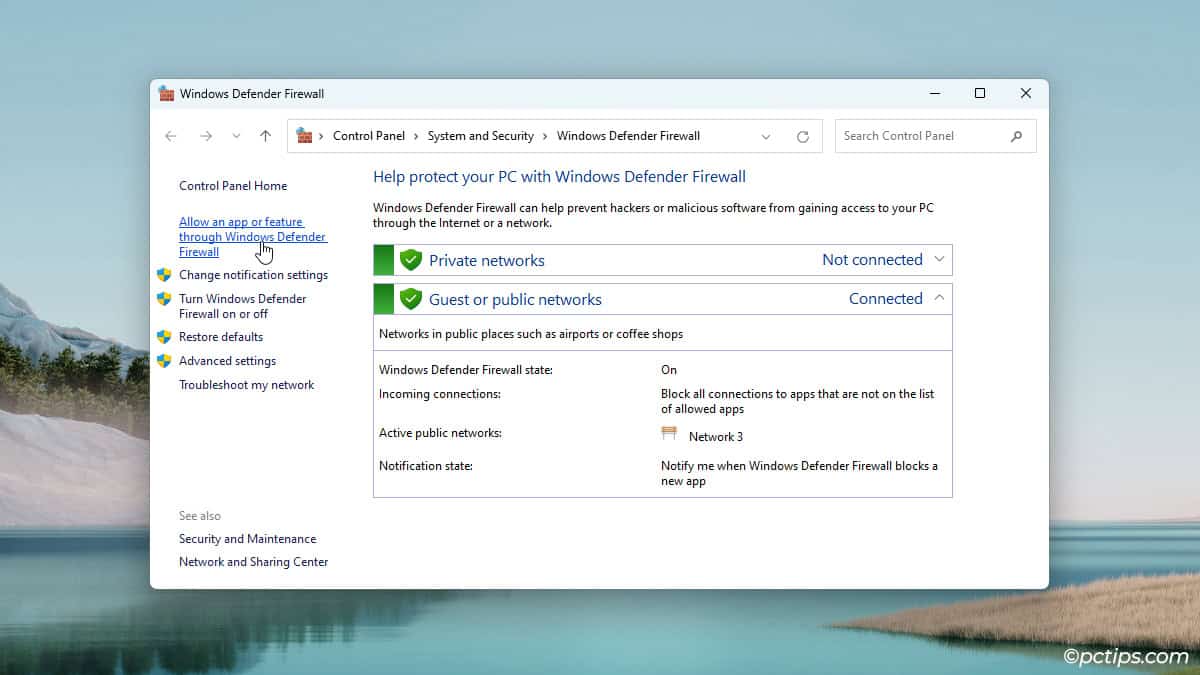
- Click on Change settings.
- Enable the checkboxes for the app you want to allow.
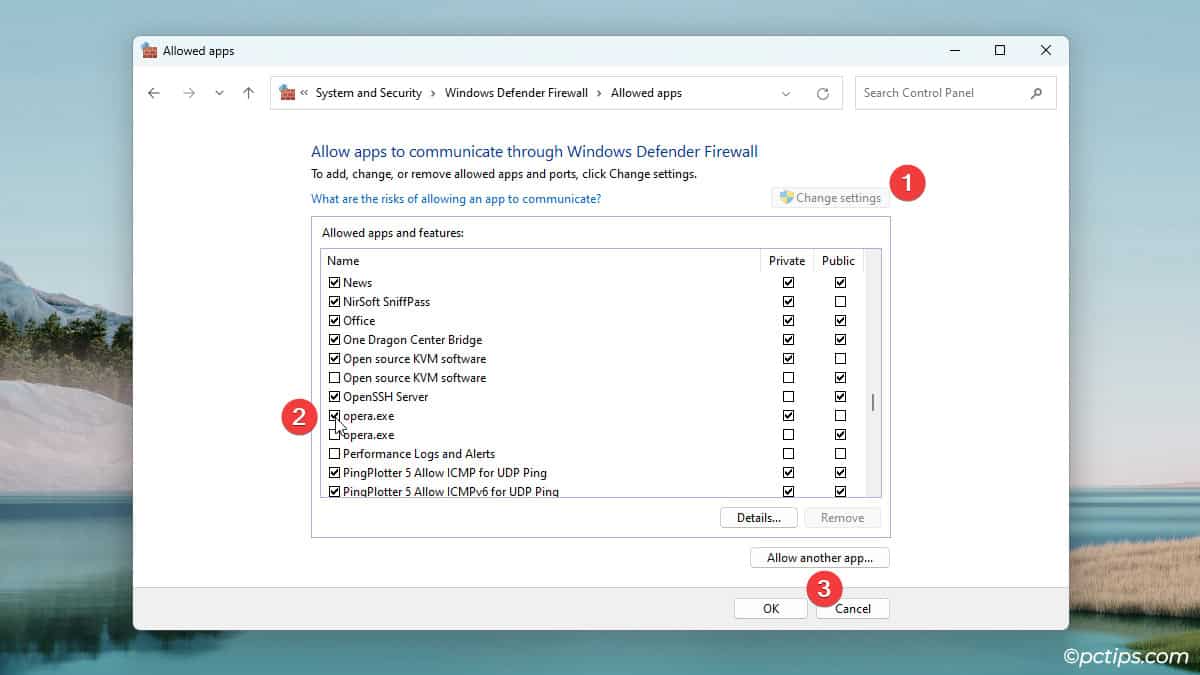
- If it’s not on the list, click on Allow another app.
- Browse the app and click on Add > Ok.
There’s one more way; you can manually create an inbound rule to allow apps. We’ll get into that in a bit.
Configure Firewall Rules
By default, Windows blocks all incoming traffic and allows all outgoing traffic.
But what if you’re tired of Windows spying on you and sending data to their servers? An outbound rule to block traffic to Microsoft servers could help.
Or, you might need to manually open some ports to download Steam content.
For me, knowing how to create and manage firewall rules has been useful on more than one occasion.
Create an Outbound Rule
Let me show you how to block outgoing traffic. It’s easy:
- Press Win + R and enter
wf.msc. - Click on Outbound Rules > New Rule.
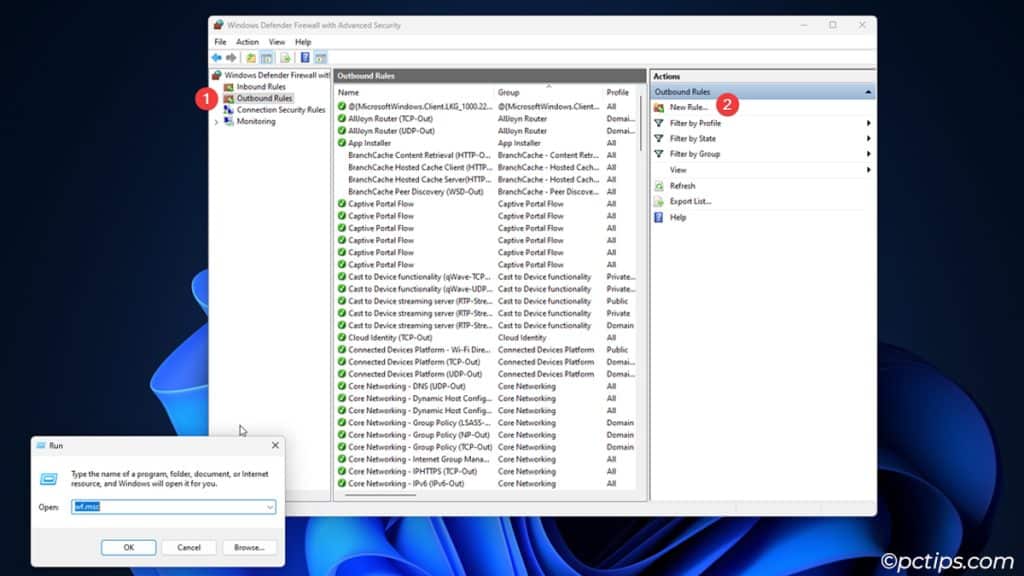
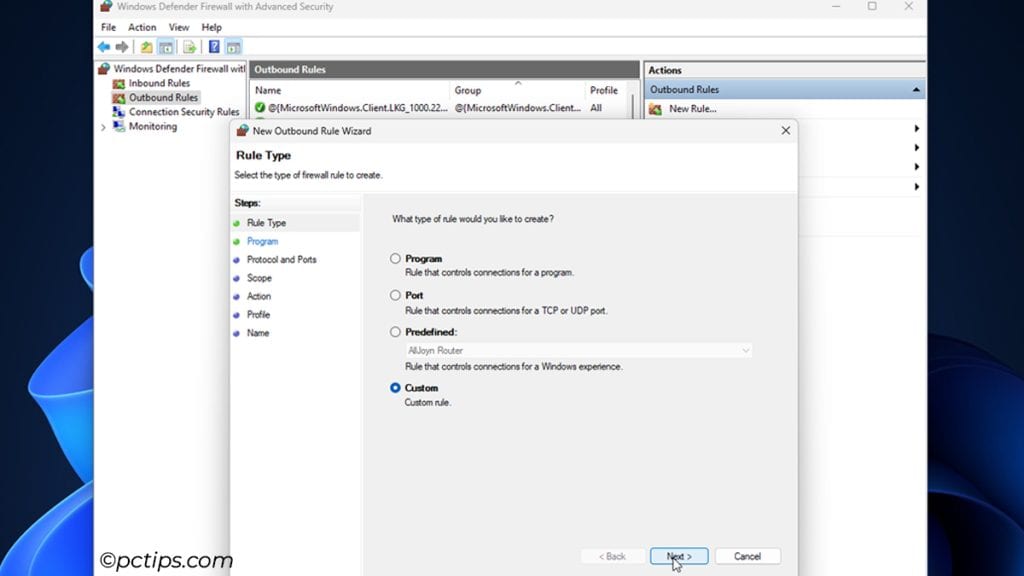
- Select the Rule Type.
- Program: Control connections for programs (e.g., block internet for specific apps)
- Port: Control connections for TCP or UDP ports (block vulnerable ports – e.g., WannaCry ransomware exploited port 445)
- Predefined: Control connections for Windows components (File and Printer Sharing, Remote Assistance, Wireless Display, etc)
- Custom: Customize every part of the rule (program, protocol, port, scope, action, profile)
- I’ll go with Custom for now. Press Next.
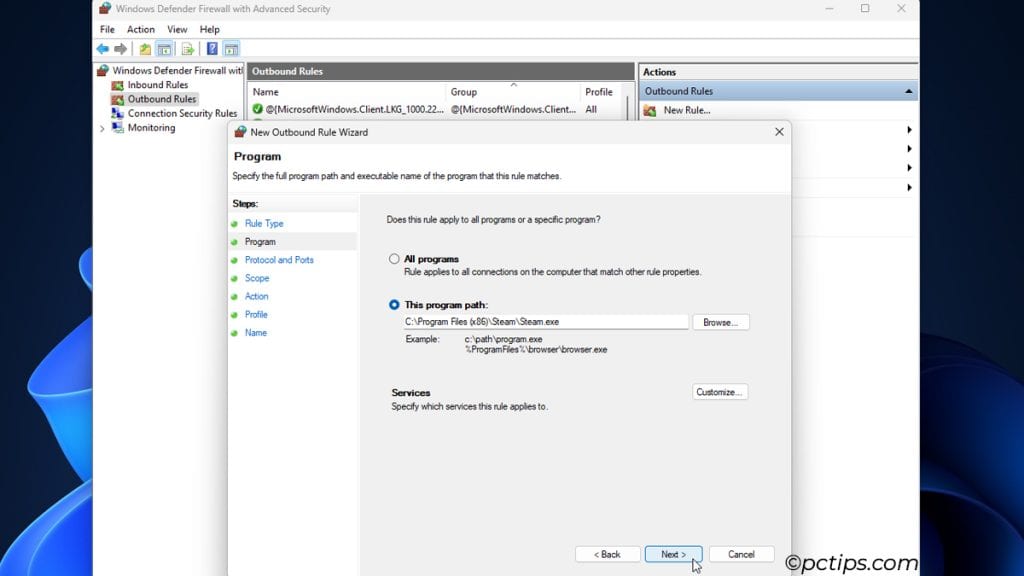
- Program: Select the programs to apply the rule to. For demonstration, I’ll block Steam on a friend’s device.
- Ports: All protocols and ports are selected by default. You can stick to that, or pick the exact ports to block. In my case, blocking TCP and UDP ports 27015-27050 will block Steam too.
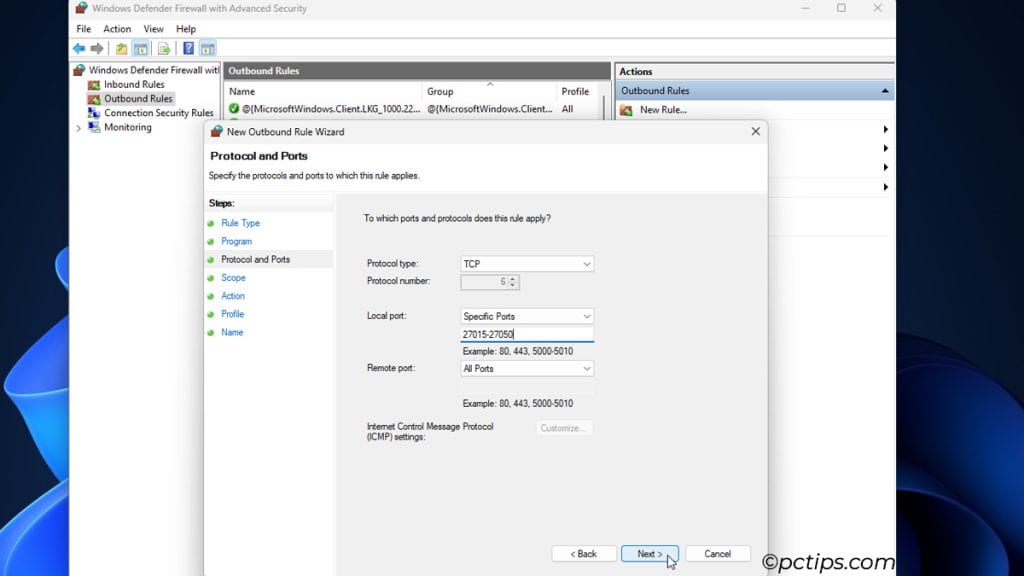
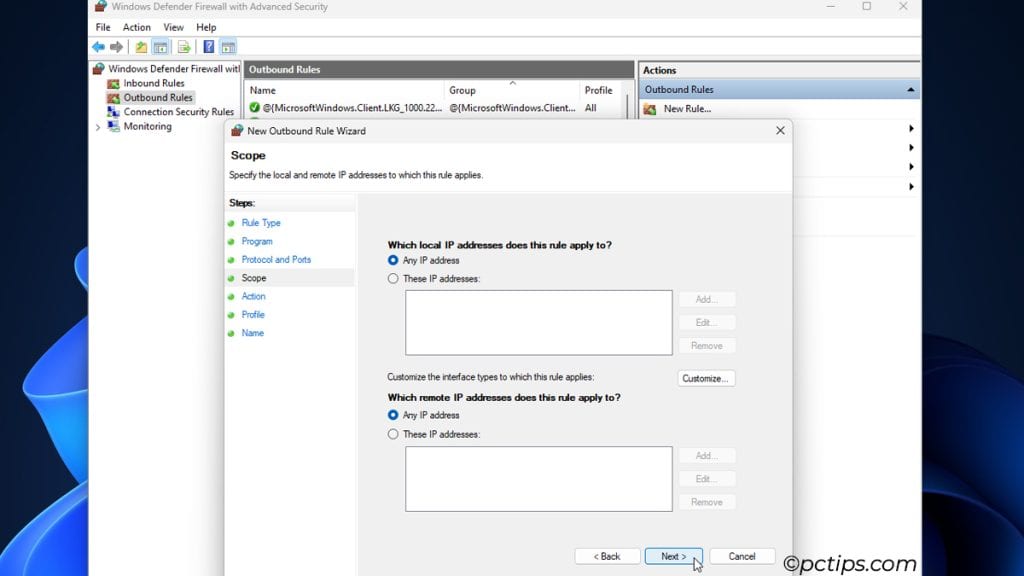
- Scope: In my example, I can apply this rule to all IP addresses. But for certain things like blocking Microsoft telemetry, you’d enter the exact IP addresses of the Microsoft servers.
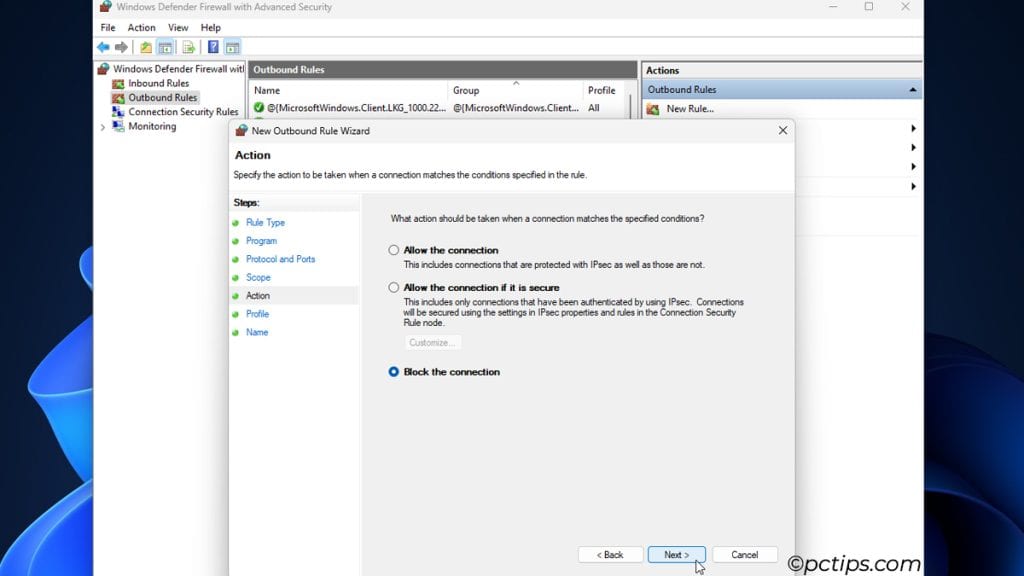
- Action: Choose to block the connection here.
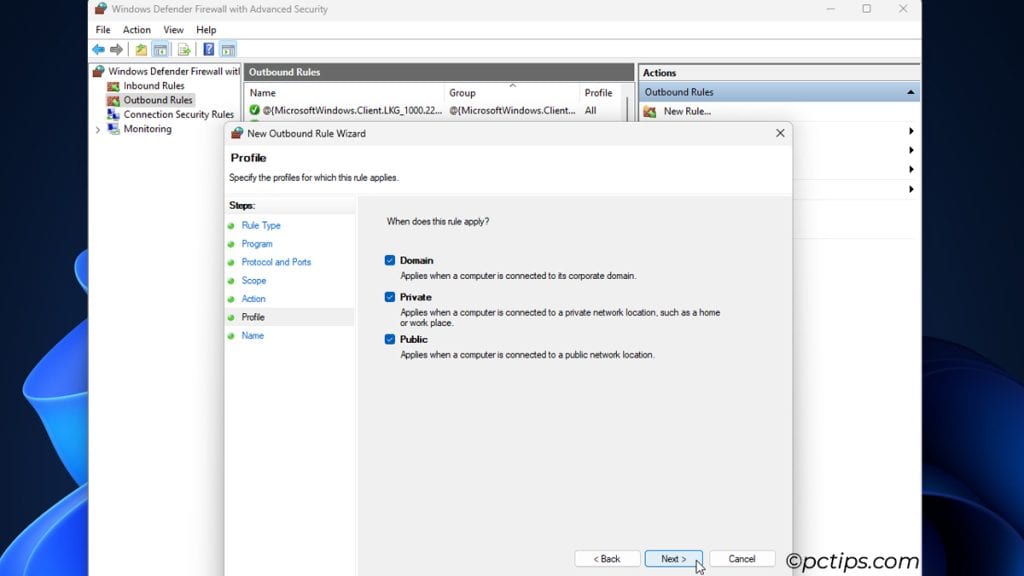
- Profile: Select the profiles to apply this rule to (you might want to block a program on public or domain networks, but allow it on a private home network).
- Name: Name the rule and click on Finish.
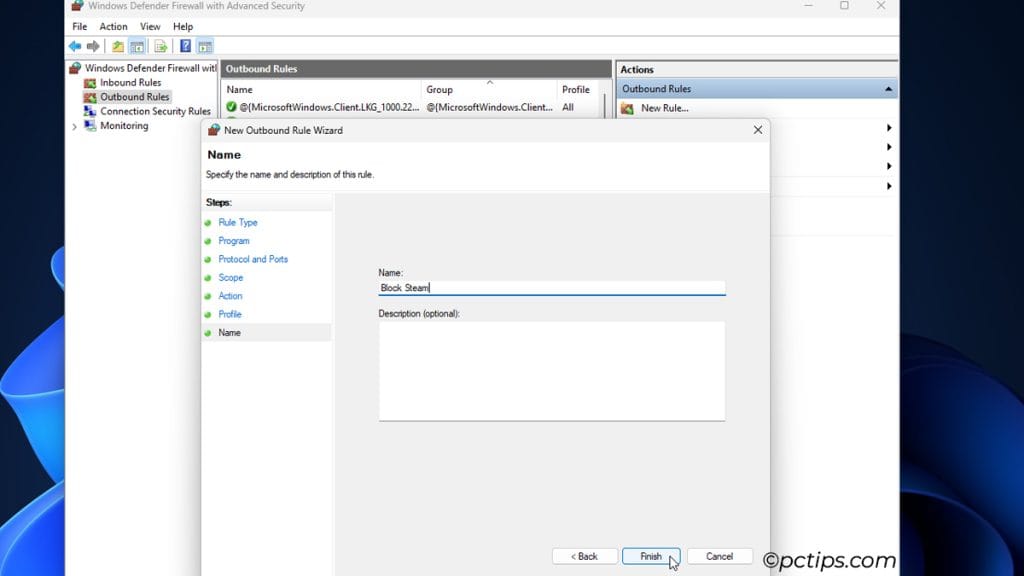
Create an Inbound Rule
If you follow the zero-trust security model, you might want to block most incoming traffic and only allow connections that you trust (e.g., allow SSH access but only from specific trusted IP addresses).
To do that, create Inbound Rules like so:
- Click on Inbound Rules > New Rule.
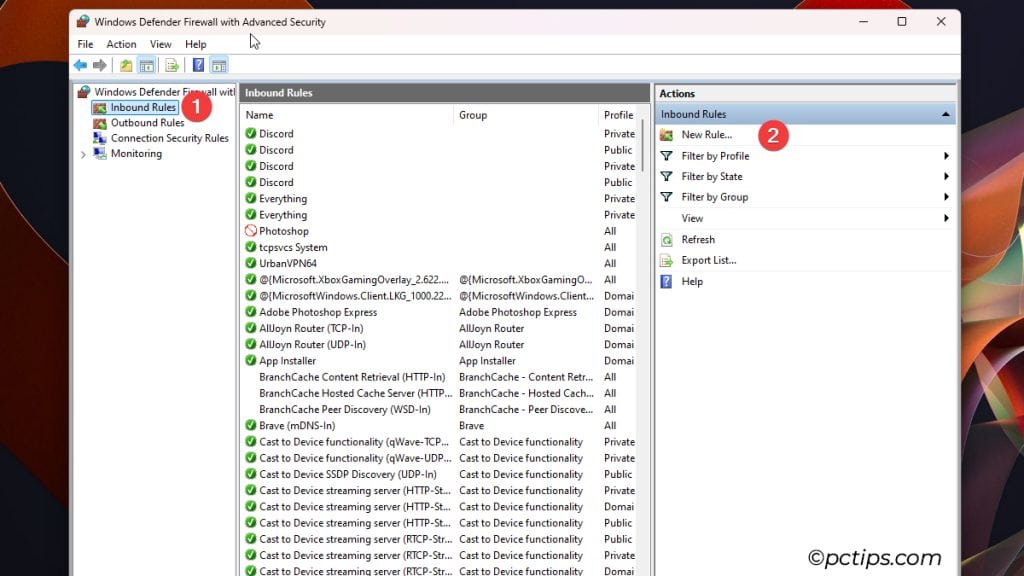
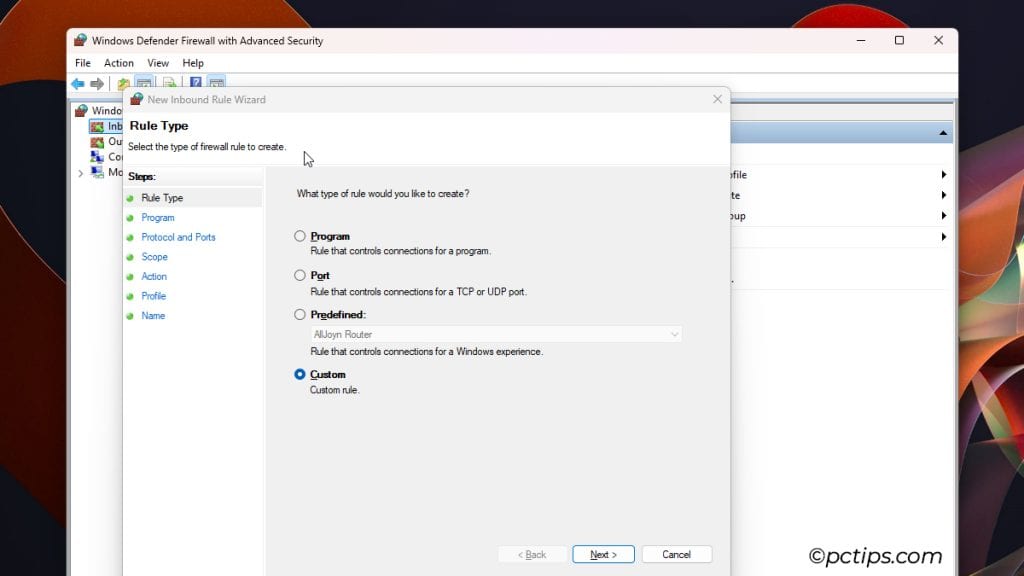
- Select the Rule Type. I’ll pick Custom again.
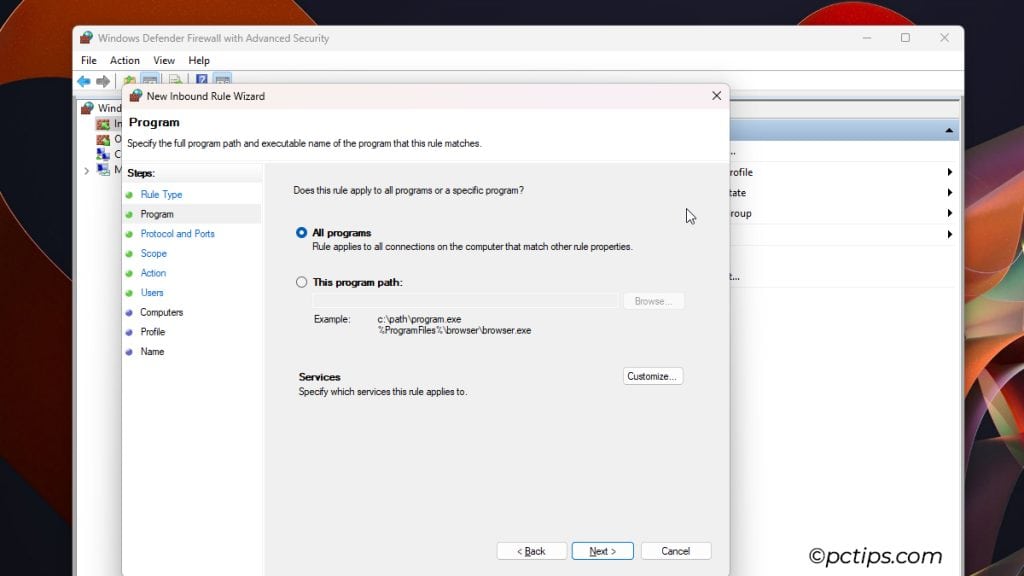
- Pick your SSH client as the program or leave it to default.
- Allow TCP port 22 or any other custom port you’ve used.
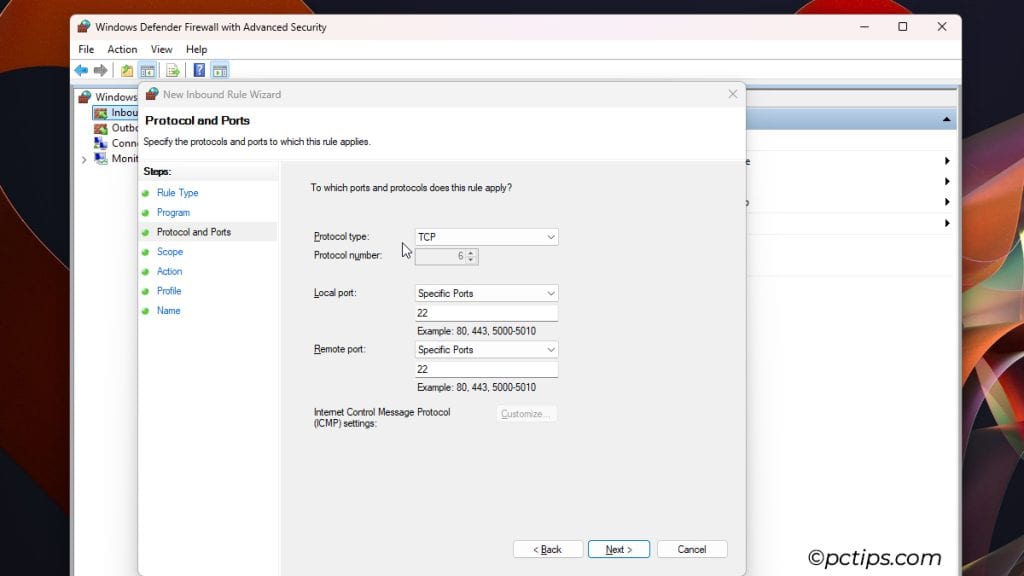
- Add the local and remote IP addresses.
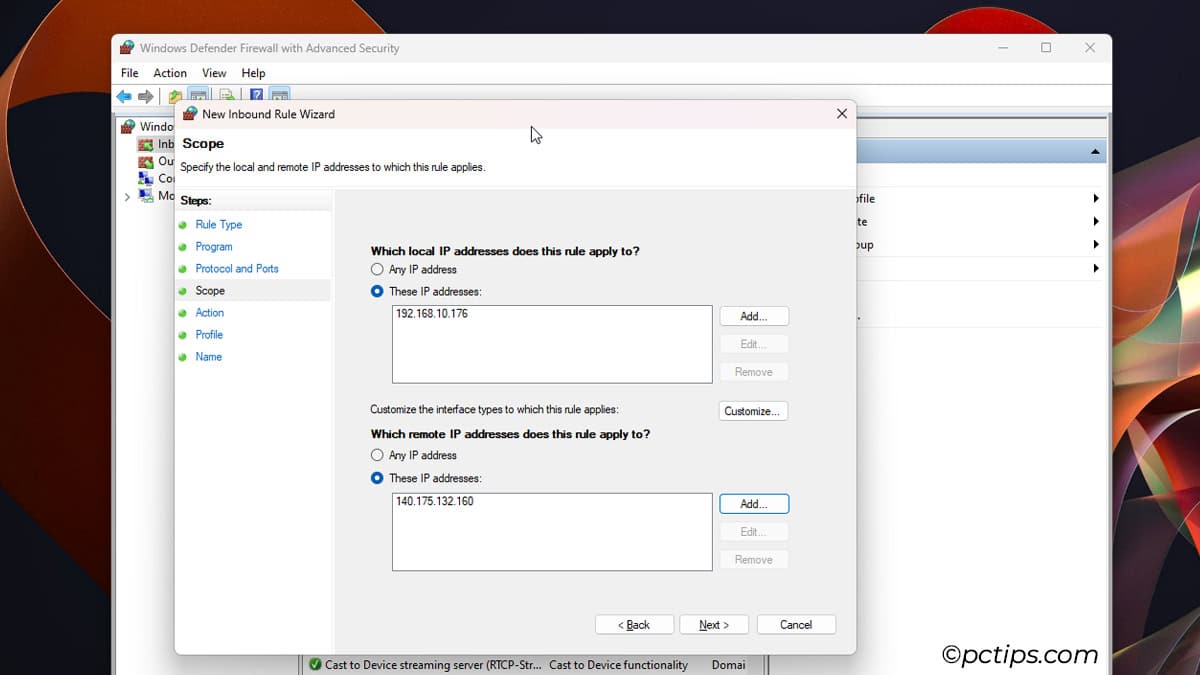
- Allow the connection, select the profiles, and name the connection as done earlier to finish creating the rule.
Edit, Disable, and Enable Rules
Select any firewall rule and click on Properties from the Actions menu on the right.
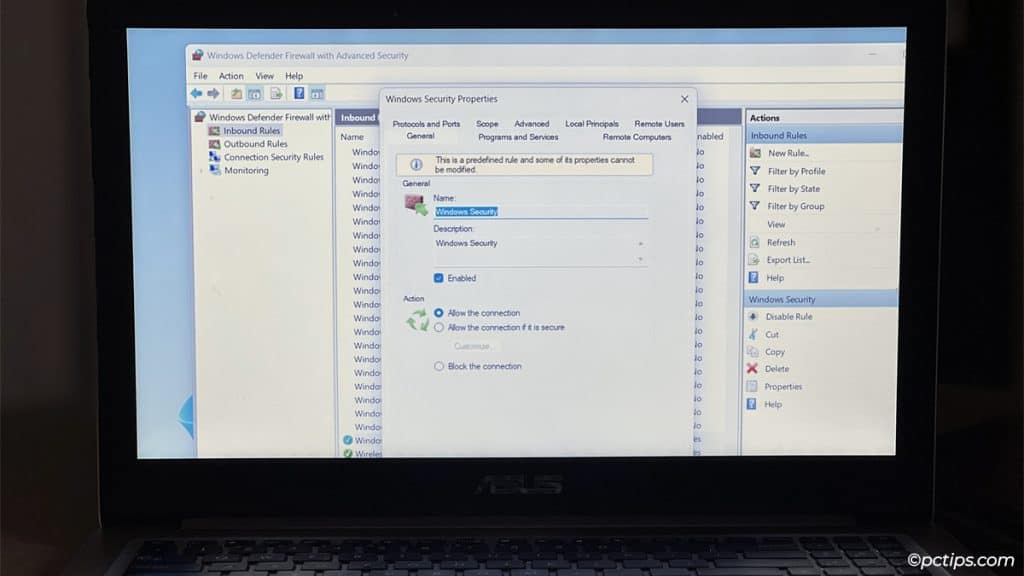
Here, you can edit existing rule properties like-
- Set the rule status (enabled or disabled).
- Change Allow to Block or vice-versa.
- Change the name and description.
- Change the program, port, profile, and scope of the rule.
- Allow remote connections from specific users or devices only.
- Apply the rule to specific network interfaces only, and more.
You can also press Ctrl + A or Shift + Arrow Keys to select multiple rules at once. This lets you perform actions en masse (disable, enable, delete, cut, copy, etc).
You Might Like: 100 Most Useful Keyboard Shortcuts Everyone Should Know
Best Practices for Firewall Rules
For inbound rules, explicit block rules have the highest priority, and explicit allow rules come second.
Often, a program doesn’t work even if you create an allow rule. This happens because an older deny rule has higher priority and is negating the allow rule.
Additionally, specific rules get priority over generic rules (e.g., a rule for an exact IP address gets priority over rules with defaults).
Ideally, be as specific as possible when creating rules.
Keep these best practices in mind when managing firewall rules.
Toggle Shields Up Mode
Windows Firewall has a feature called Shields Up mode. It’s designed to temporarily increase security in the event of an attack, or if a vulnerability is present on your system.
Open the Turn Defender Firewall on or off page from earlier.
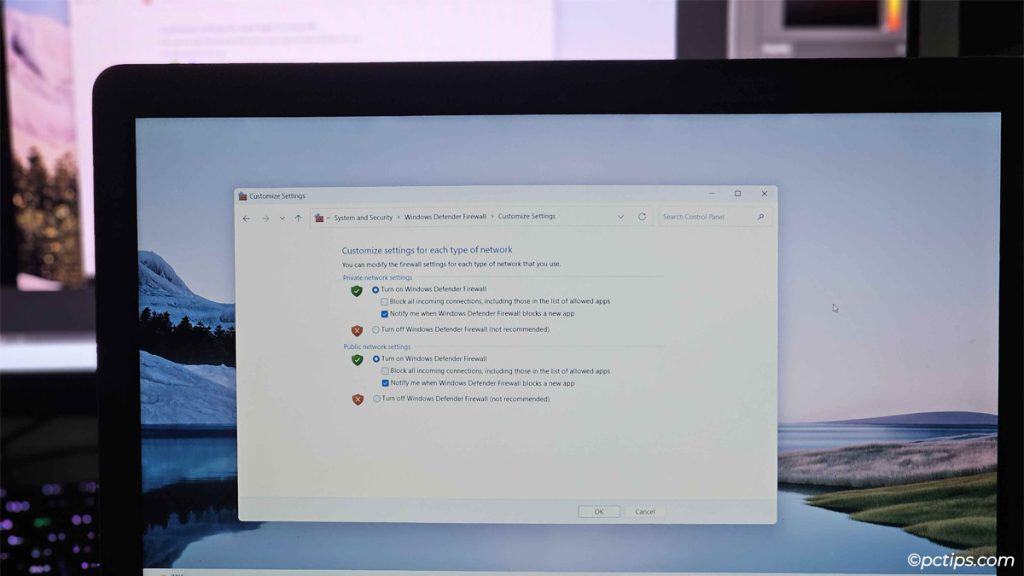
Here, you’ll find this option for each profile: Block all incoming connections, including those in the list of allowed apps.
While it’s active, it negates all the Allow rules you’ve created and blocks ALL incoming connections.
Once you’ve patched the exploit on your system, you can disable this feature to restore the old Allow rules.
Enable Windows Firewall Logging
Sometimes, it can be difficult to figure out why a certain program is having internet issues. Especially on devices with hundreds of rules or more, combing through each one isn’t ideal.
Firewall logs can be a lifesaver in such cases.
Besides dropped packets, it’s also useful for keeping track of all successful connections.
To enable it, you can enter these commands in the Terminal:
netsh advfirewall
set allprofiles logging allowedconnections enable
set allprofiles logging droppedconnections enable
Or, you can follow these GUI steps:
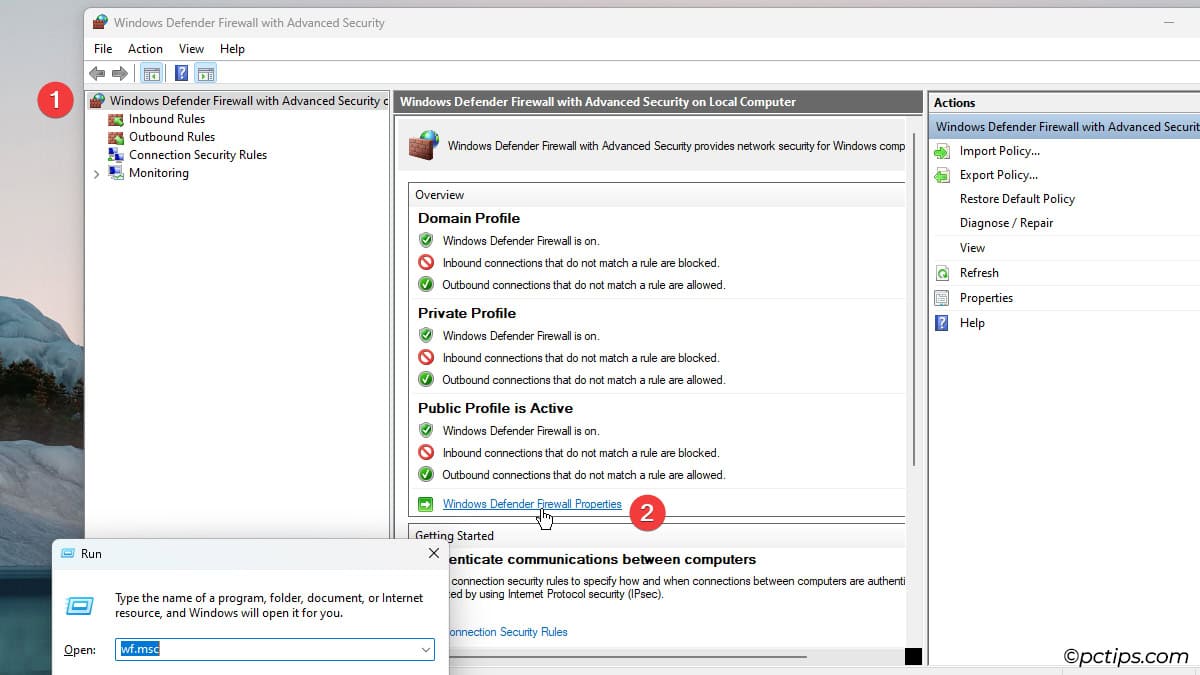
- Click on Windows Defender Firewall with Advanced Security on Local Computer.
- Click on Windows Defender Firewall Properties.
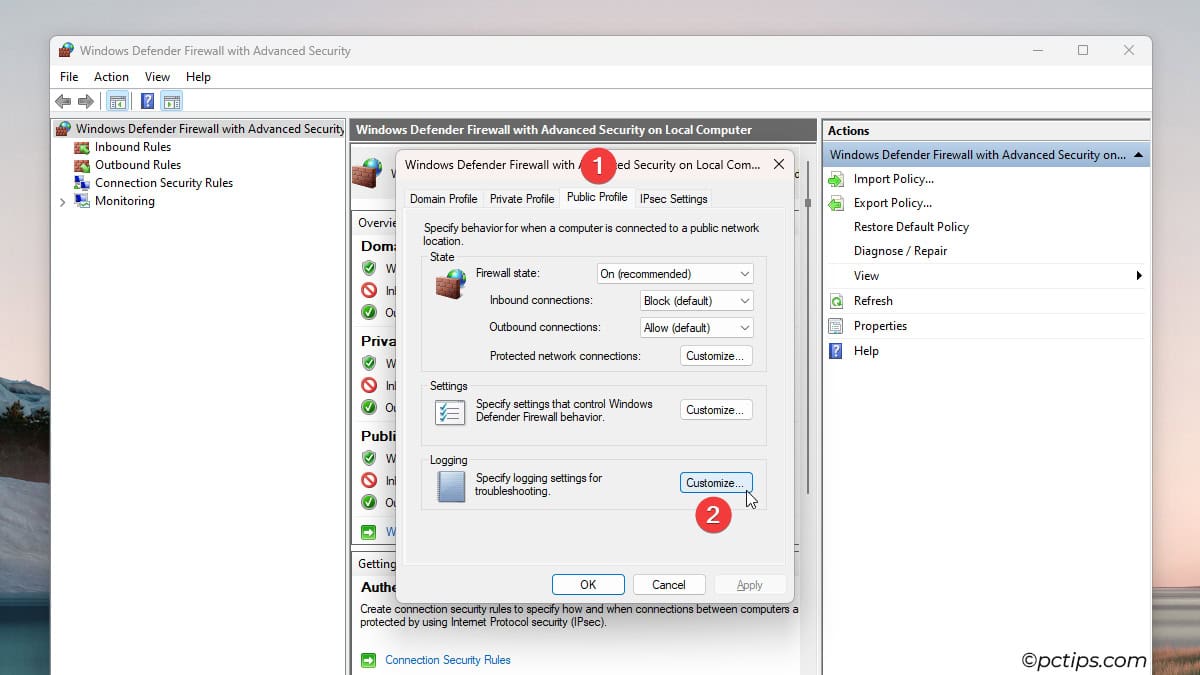
- Select the right profile. Then, click on Customize Logging.
- Set Log dropped packets and Log successful connections to Yes.
- Increase the max log size (you can go up to 32,767 KB i.e., 32 MB). A larger file will take longer to fill up.
- Additionally, you could change the log name for each profile. Change them from
pfirewall.logtodomain.log,private.log, andpublic.log. This can help you identify exactly which profile is blocking connections.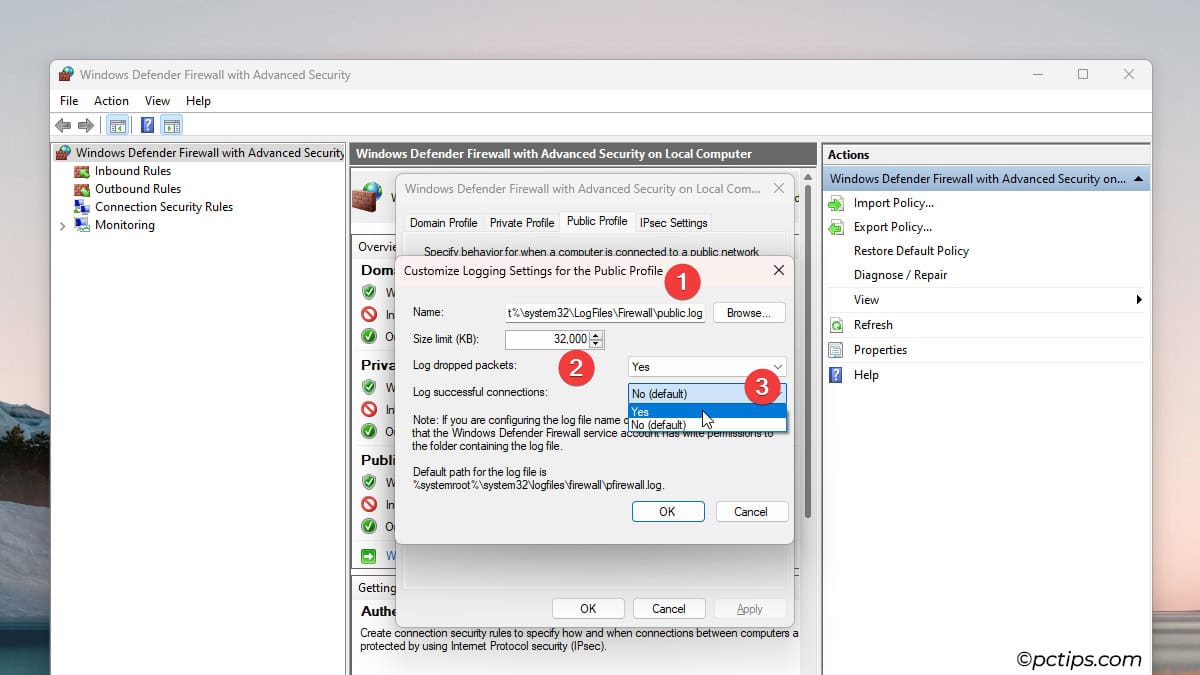
Troubleshooting Windows Firewall Problems
Microsoft provides a dedicated firewall troubleshooter for common problems like:
- File sharing and Remote Assistance are blocked by Windows Firewall
- Windows Firewall doesn’t start (Error Code 80070424 or Service-specific error 5 (0x5))
- BFE service is missing, and more
If a blocked app is troubling you, go through the rule list. There’s probably a Deny rule buried somewhere that’s blocking it. You could also check the logs for dropped packets.
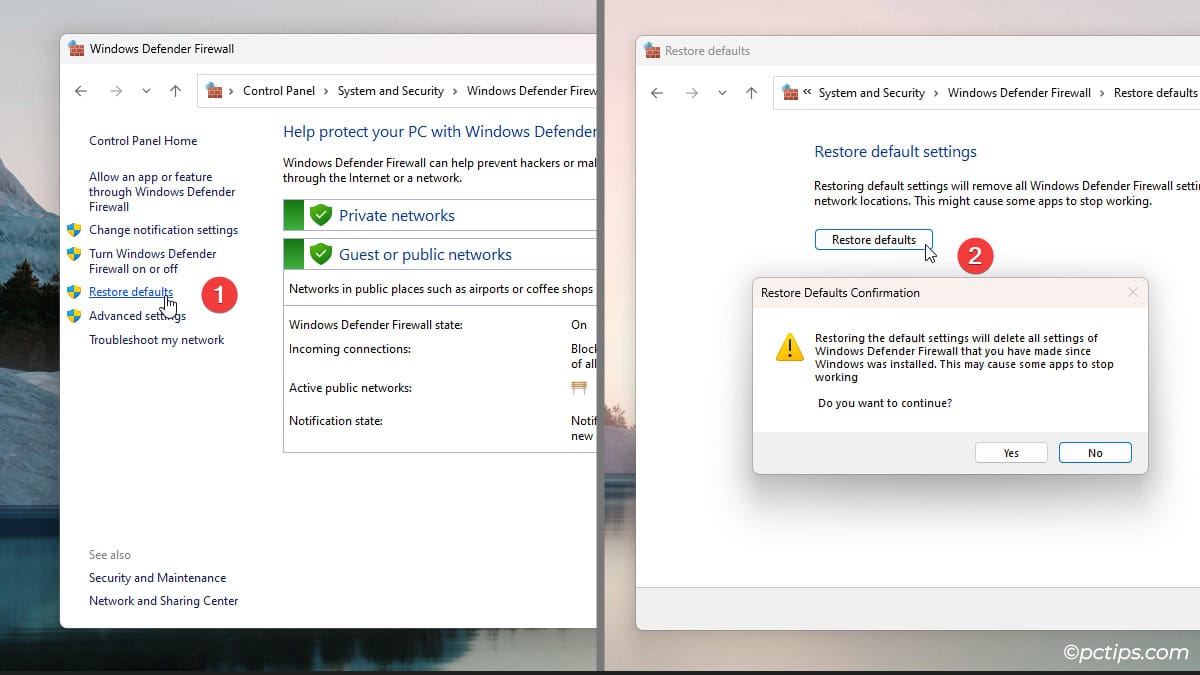
Another option is to reset the firewall configs. Enter netsh advfirewall reset in the Terminal. Or, follow these GUI steps:
- Click on Restore defaults.
- Click on Restore defaults and press Yes to confirm.
There’s More to Staying Safe
Whether you want to block communication with specific devices or unblock some apps, you’re now equipped with the tools to do so.
But don’t forget that security happens in layers.
Windows Firewall is just one part of a larger security model. Make sure to configure Defender Antivirus properly as well. And always follow safety best practices when online.
We have some excellent security guides to get you up to speed on that:
Recently, when I go to a video on YouTube, the video window for watching the video is green and the video only shows when I scroll my mouse back and forth, but it only shows the video for a split second. Why doesn’t the video show all the time..??