Microsoft Edge Settings You Should Change Immediately!
Last Updated:
If you’ve switched to Microsoft Edge but haven’t dug into its settings yet, you’re missing out on some serious improvements.
I was shocked at how much better my browsing became after tweaking just a few hidden options that Microsoft doesn’t enable by default.
Ever wonder why Edge sometimes feels sluggish when loading websites?
Or why you’re seeing eerily personalized ads following you across the internet?
The default settings aren’t optimized for speed or privacy.
They’re set up to benefit Microsoft, not you.
I’ve identified the most impactful settings changes that actually make a difference.
These aren’t just cosmetic tweaks; they’ll boost your privacy, speed up page loading times and reduce distractions.
Best part? None of these changes require technical expertise.
I’ve included step-by-step instructions with each recommendation, so you won’t get lost along the way.
Ready to take back control of your browser?
Let’s fix Edge together.
1. Enable Strict Tracking Prevention
Do you ever feel like ads are following you around?
That’s because they are!
Trackers are tiny bits of code that monitor your online activity, and boy, are they everywhere.
Edge comes with tracking prevention turned on, but it’s set to “Balanced” by default.
Let’s fix that:
- Click the three dots (⋯) in the upper right corner of your browser
- Select “Settings”
- In the left sidebar, click “Privacy, search, and services”
- Find “Tracking prevention” and click on it
- Select “Strict” instead of “Balanced”
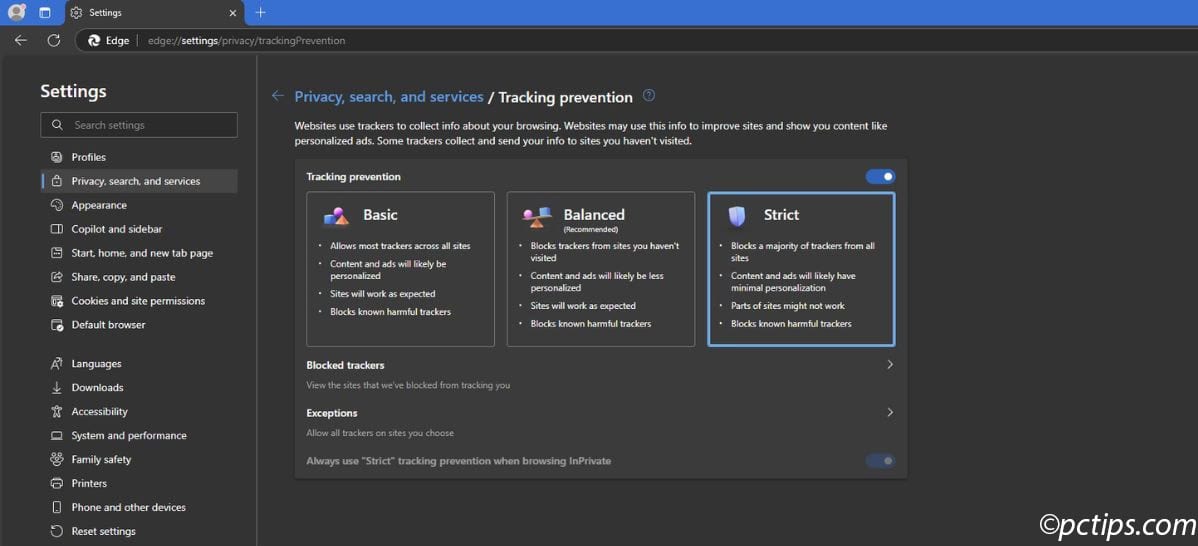
Quick Tip: Edge will warn you that “parts of sites might not work” with strict tracking.
I’ve personally had this set to strict for a long time and have never encountered a broken website.
What’s the real benefit here?
With strict tracking prevention, you’ll see fewer ads following you around.
Your browsing will be faster (because it’s not loading all those trackers), and you’ll have better privacy protection overall.
Win-win-win!
2. Customize Your Home Page
The default Edge home page is BUSY.
That endless scrolling news feed can be a real productivity killer.
One minute you’re about to start working, the next you’re 20 minutes deep into celebrity gossip or sports highlights.
Not only is it distracting, but it can actually be dangerous.
Remove the News Feed
That scrolling feed of news articles isn’t just a time-waster — it can sometimes contain links to sketchy websites.
I’ve tested this myself and found that some of these “news” links can direct you to scammer sites posing as Microsoft support.
Here’s how to turn it off:
- Click on the gear icon in the top-right corner of your homepage
- Turn Off “Show feed”

Just like that, the news feed disappears, giving you a cleaner, safer homepage.
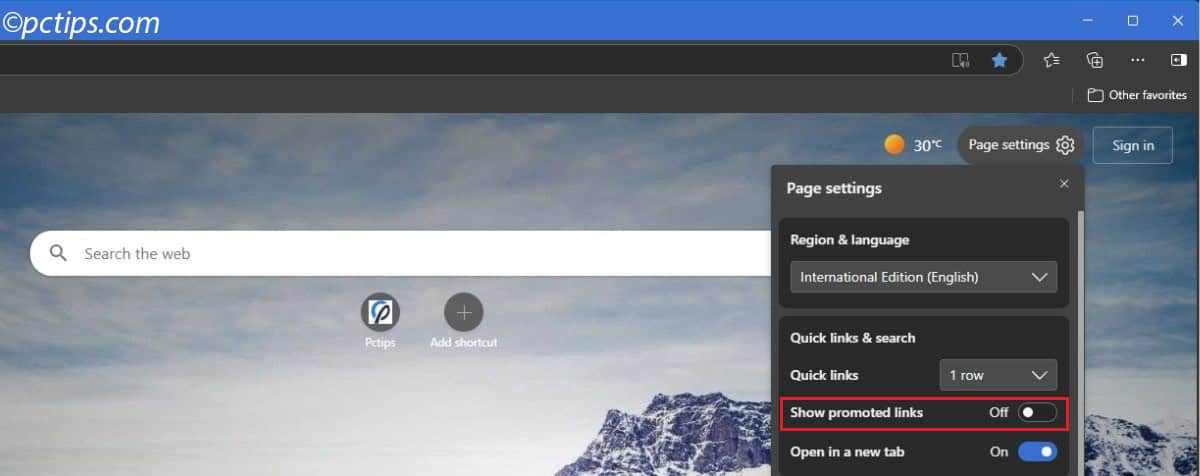
Get Rid of Those Promotional Links
Those “suggested” links that appear on your homepage?
They’re basically ads.
Here’s how to remove them:
- Click the gear icon again
- Look for the “Show promoted links” toggle
- Switch it OFF
Add Your Own Favorite Shortcuts Instead
Now let’s replace those unwanted links with sites you actually visit:
- Click the “Add shortcut” button (it’s usually a + symbol)
- Type a name for your shortcut (like “Pctips”)
- Enter the full URL (https://www.pctips.com)
- Click “Save”
Quick Tip: Don’t worry if the icon doesn’t appear immediately. It will show up when you refresh the page or restart the browser.
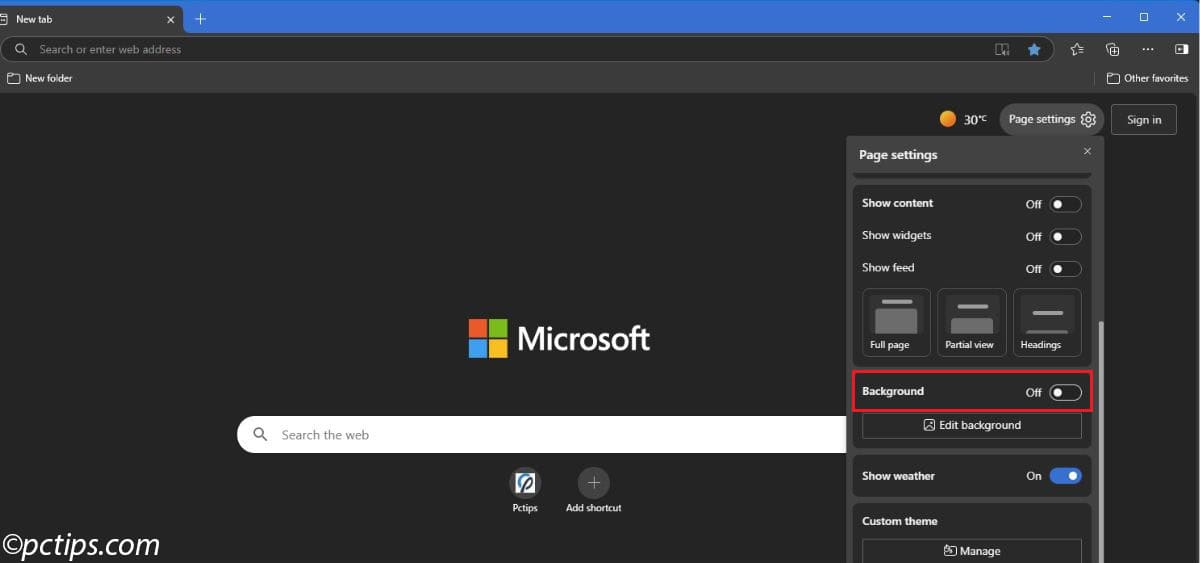
Turn Off the Background Image (If You Want)
Some people find the background images distracting. If that’s you:
- Click the gear icon
- Find the “Background” toggle
- Switch it OFF
Or if you prefer, you can keep the background but customize it:
- Click “Edit background” under the toggle
- Choose from the available images
- Or upload your own by clicking “Upload”
Remove Weather Updates
Not everyone needs constant weather updates in their browser:
- Click the gear icon
- Find the “Show Weather” toggle
- Switch it OFF
3. Change Your Default Search Engine
When you type a search into the address bar in Edge, it uses Bing by default.
Now, Bing isn’t terrible, but many people prefer alternatives like Google or the privacy-focused DuckDuckGo.
Here’s how to set YOUR preferred search engine:
- In Settings, stay in “Privacy, search, and services”
- Click on “Search and connected experiences”
- Select “Address bar and search”
- Find the dropdown for “Search engine used in the address bar”
- Choose your preferred search engine (Google, DuckDuckGo, Yahoo, etc.)
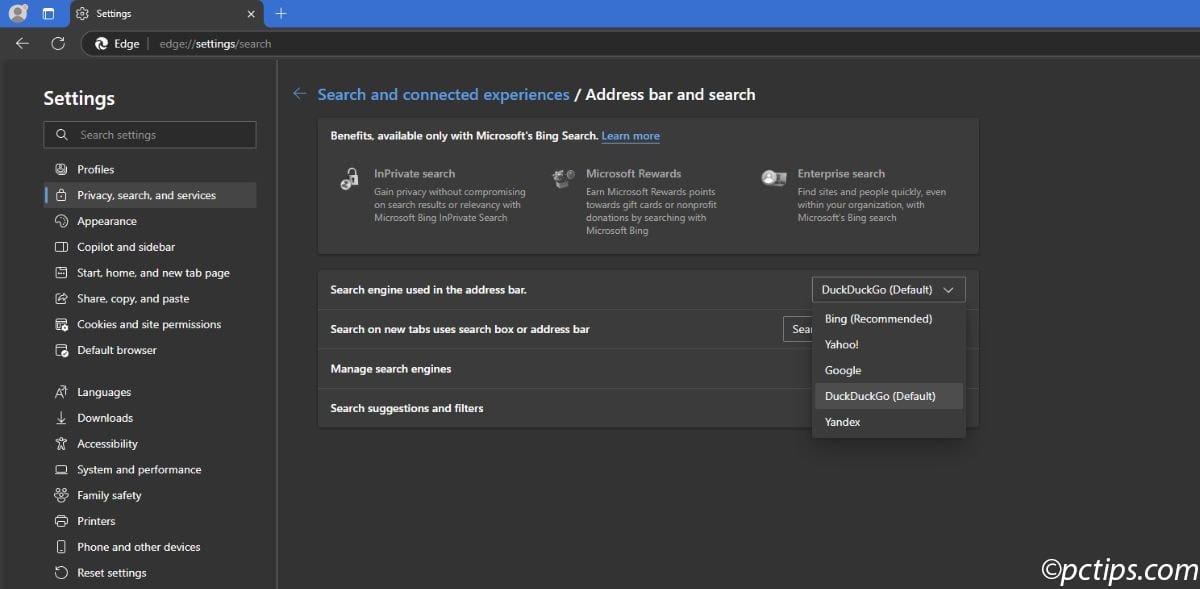
I personally recommend DuckDuckGo if privacy is your main concern.
It doesn’t track your searches or create a profile about you.
No search history, no targeted ads based on what you’ve been looking for.
4. Disable Copilot Sidebar
Microsoft is betting big on AI with their Copilot feature (formerly known as Bing Chat).
While it can be helpful for some tasks, many find the Copilot sidebar icon distracting or simply taking up valuable screen real estate.
Let’s remove it if you don’t use it:
- In Settings, click on “Copilot and sidebar” in the left pane
- Click on “App and notification settings”
- Select “Copilot”
- Toggle the switch to OFF
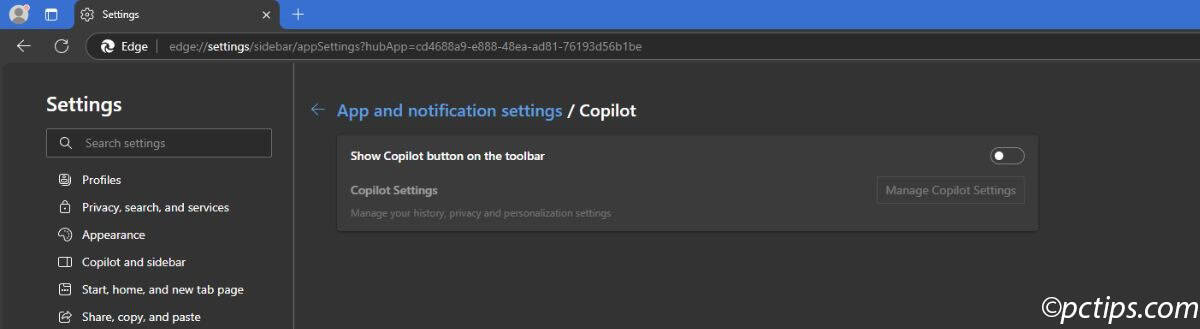
The icon disappears from your toolbar, giving you a cleaner, distraction-free interface.
Don’t worry — if you ever want to bring Copilot back, you can always return to this same setting and turn it back on.
5. Enhance Privacy
Disable Data Collection for Personalization
Microsoft, like many tech companies, collects data about your browsing habits to show you personalized ads, shopping recommendations, and curated news.
If you’d rather not have your data used this way, there’s a setting for that:
- In Settings, go to “Privacy, search, and services”
- Scroll down to “Privacy” and click on “Search and service improvement” and “Personalization & advertising””
- Toggle OFF both options
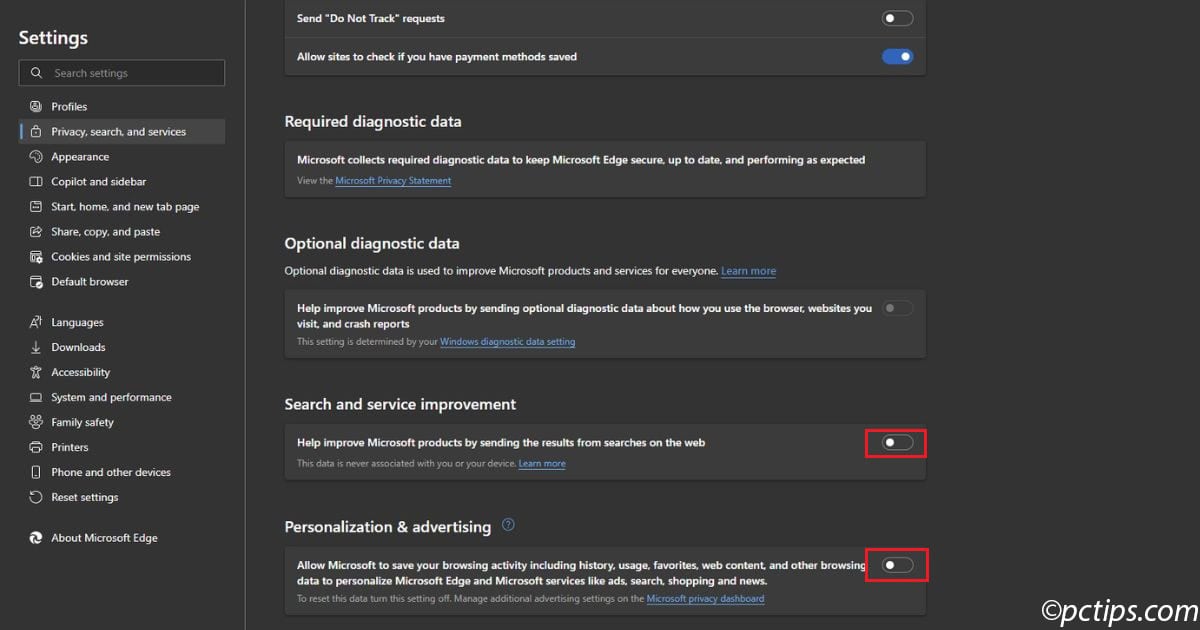
With these toggles disabled, Microsoft will no longer use your browsing activity for personalization or advertising.
Your browsing becomes more private, though it also means the content you see will be less tailored to your interests.
For many people, that’s a worthwhile trade-off for enhanced privacy.
Block Notification Requests
Those pop-ups asking if you want to allow notifications from websites?
Incredibly annoying. Here’s how to stop them for good:
- Click the three dots (…) in the top-right corner
- Select “Settings”
- Click on “Cookies and site permissions” on the left
- Click on “All permissions”
- Scroll down to “Notifications”
- Switch the toggle from “Ask before sending (recommended)” to OFF
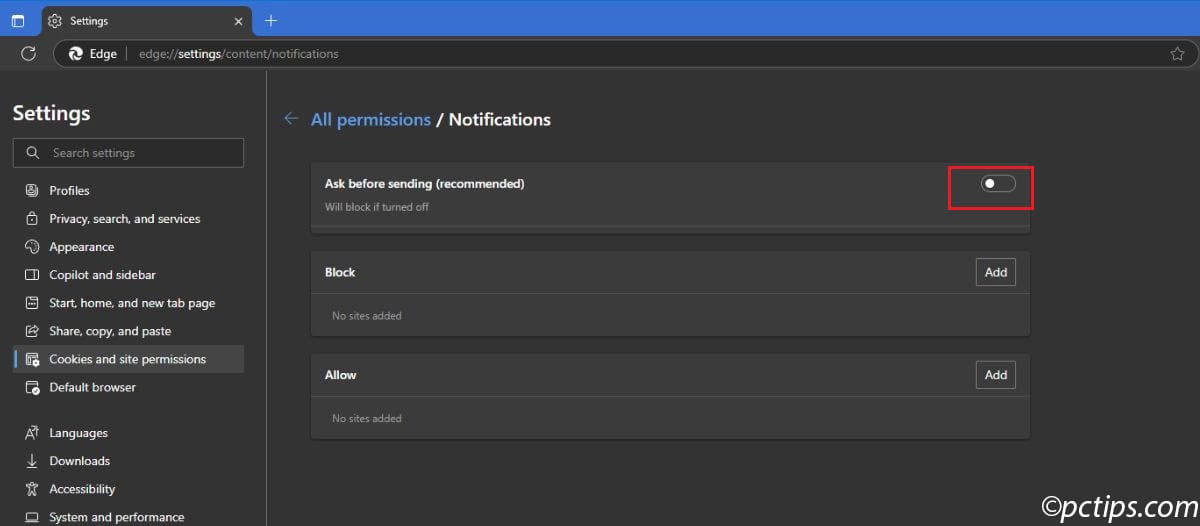
No more constant interruptions asking for notification access!
If there are specific sites you DO want notifications from, you can add them manually in the “Allow” section.
Enable “Do Not Track” Requests
While not foolproof, sending “Do Not Track” requests can help reduce tracking:
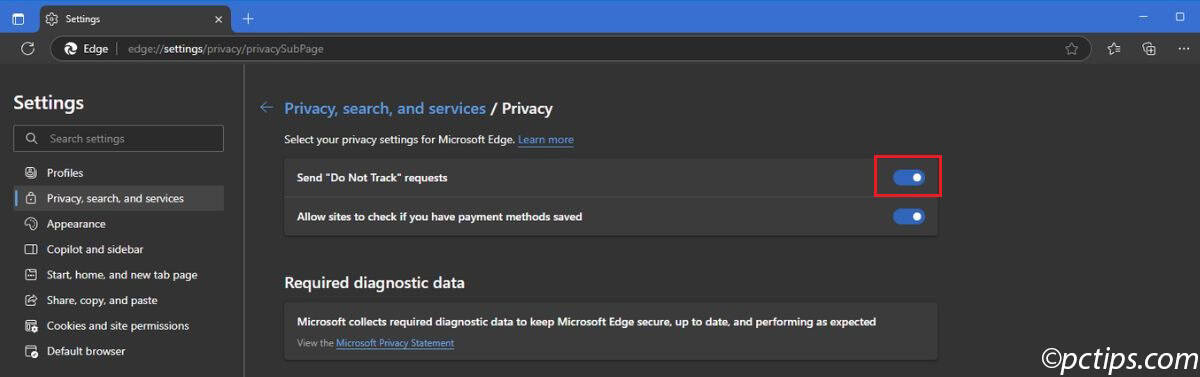
- Go to “Settings”
- Click on “Privacy, search, and services”
- Select “Privacy”
- Toggle ON “Send ‘Do Not Track’ requests”
Change Your DNS for Better Security and Speed
Your Internet Service Provider (ISP) has its own DNS, but others might be faster or more secure.
To change your DNS in Edge:
- Go to “Settings”
- Click on “Privacy, search, and services”
- Click on “Security”
- Look for “Use secure DNS to specify how to lookup the network address for websites”
- Toggle it ON
- Select “Choose a service provider”
- Choose from options like Cloudflare, Google, or CleanBrowsing
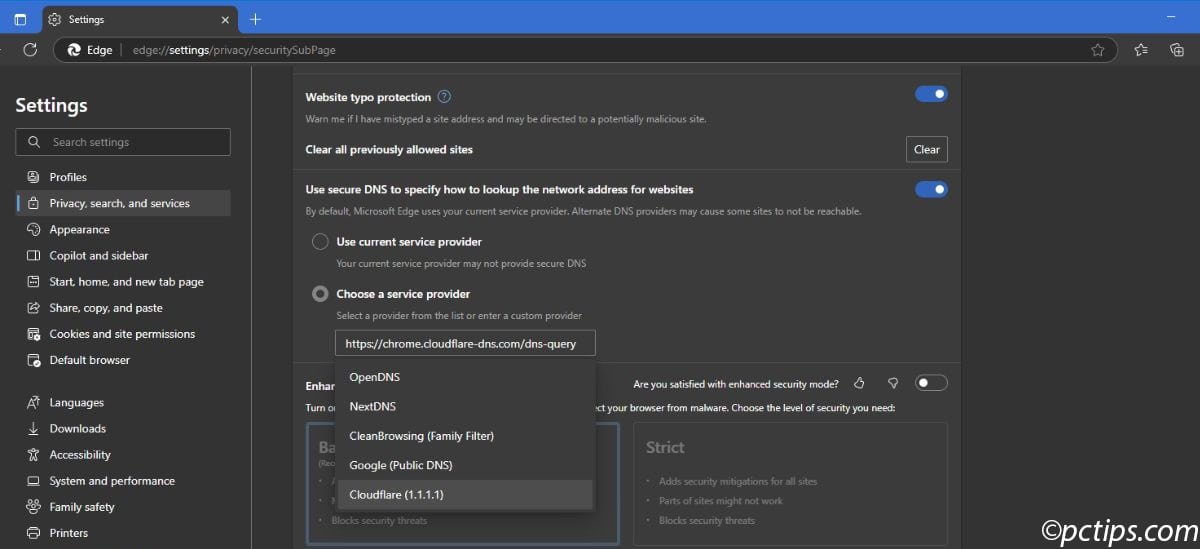
For families with kids, the CleanBrowsing option provides family filtering to block adult content.
I’ve tested various DNS providers and found Cloudflare (1.1.1.1) to be consistently faster than my ISP’s default.
6. Declutter Your Browser Interface
Try Vertical Tabs for Better Organization
Vertical tab is a game-changer if you typically have lots of tabs open.
Instead of squishing them across the top of your browser, Edge can display them in a sidebar:
- Right-click on any tab
- Select “Turn on vertical tabs”
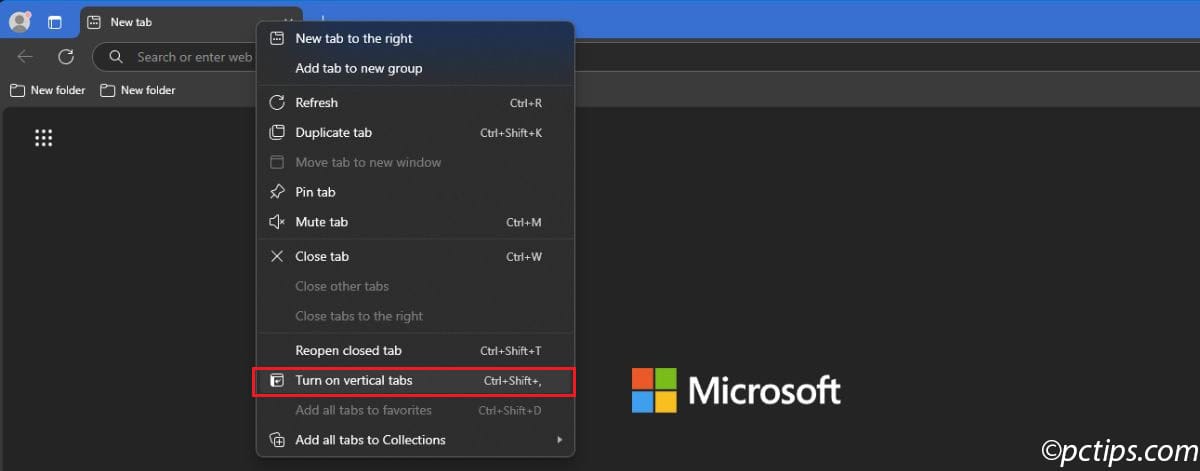
A sidebar appears on the left with your tabs. The best part? You can:
- Resize the sidebar by grabbing and dragging its edge
- Click the arrow at the top to collapse it to icons only
- Hover over the collapsed sidebar to see full tab names
This gives you MUCH more screen space while keeping your tabs organized.
This feature comes in clutch — especially when researching topics that require multiple websites open at once.
Hide the Favorites Bar
The favorites (bookmarks) bar sits right below your address bar, taking up precious space.
But here’s the thing — you can access all those same favorites from the menu anyway, so why have them visible all the time?
Let’s reclaim that space:
- In Settings, go to “Appearance”
- Find “Toolbar” (under “Other appearance settings”)
- Look for “Show favorites bar”
- Change it from “Always” to “Never”
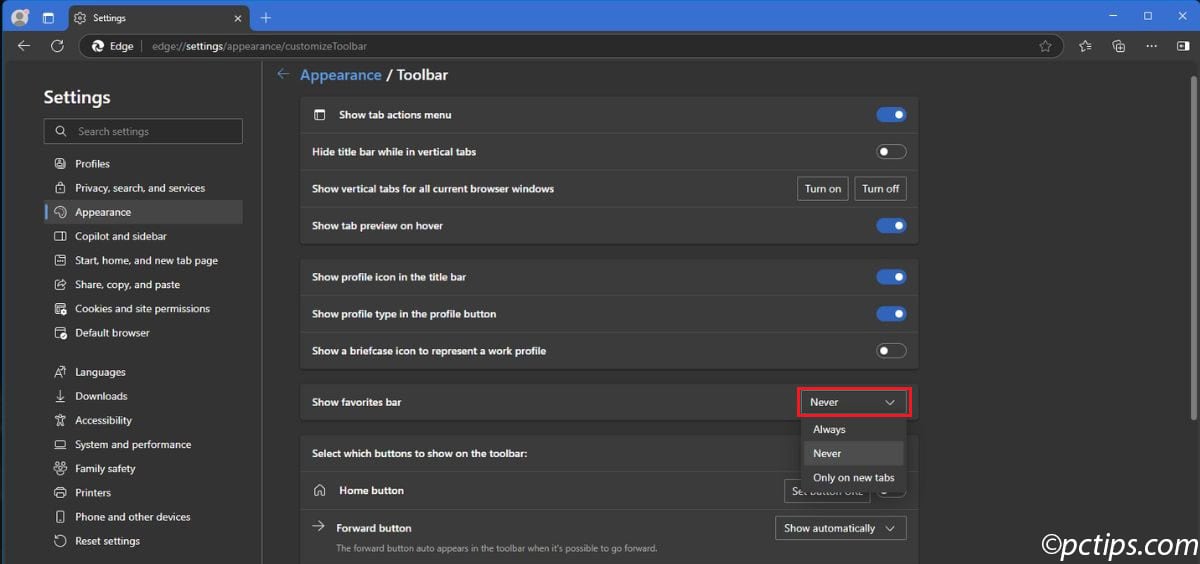
Your screen instantly feels more spacious!
You can still access all your favorites by clicking the three dots menu and selecting “Favorites.”
Or even faster, press Ctrl+Shift+O to open your favorites directly.
7. Block Third-Party Cookies
Even with strict tracking prevention enabled (our first tip), Edge still allows third-party cookies by default.
These are tiny files that websites store on your computer to track your activity across different sites.
Let’s put a stop to that:
- In Settings, click on “Cookies and site permissions” in the left sidebar
- Select “Cookies and site data”
- Toggle ON “Block third-party cookies”
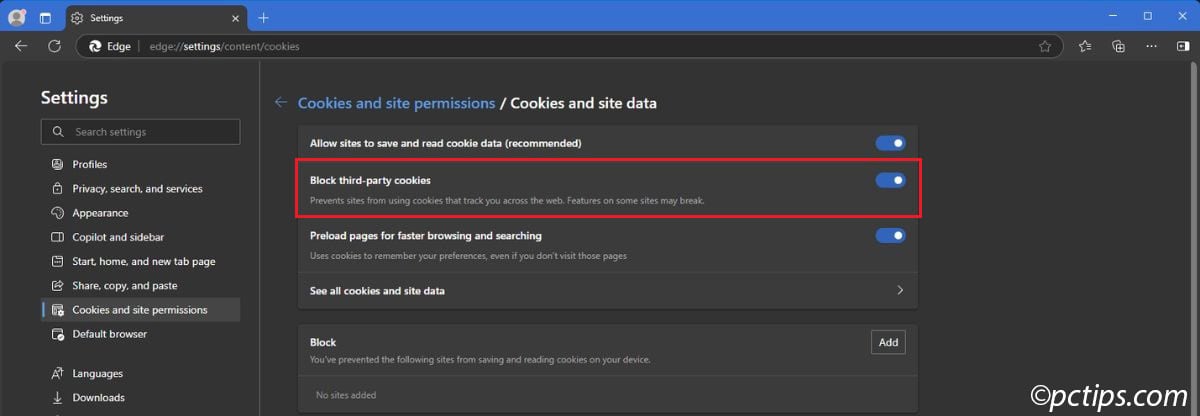
Edge will warn you that “features on some sites may break.”
In my experience, these are usually tracking and advertising features — not things you’ll actually miss.
The occasional website might have login issues, but it’s rare and usually fixable by temporarily allowing cookies for just that site.
What you gain is significant: websites can no longer track you as you move around the web, creating profiles of your browsing habits to sell to advertisers.
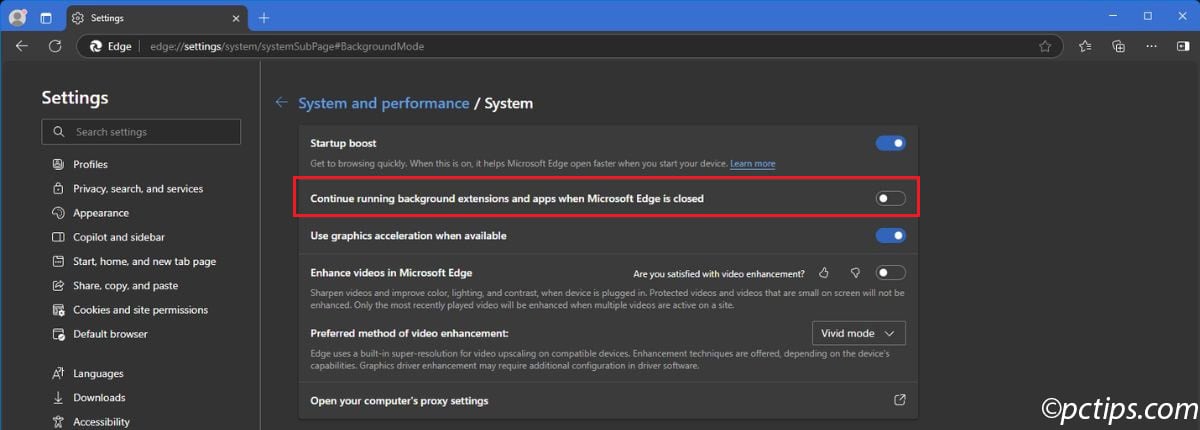
8. Disable Background Tasks When Edge Is Closed
Here’s something many people don’t realize: even when you close Edge, it might still be running in the background, using up your PC’s resources!
Various extensions and web apps can keep running, slowing down your system unnecessarily.
Let’s stop that:
- In Settings, go to “System and performance” in the left sidebar
- Click on “Background mode”
- Find “Continue running background extensions and apps when Microsoft Edge is closed”
- Toggle this OFF
This simple change can make your computer feel more responsive, especially if you’re working with limited RAM.
Your browser should work for you only when you’re actually using it!
9. Block Media Autoplay
Is there anything more annoying than a website that starts blasting audio or video the moment you open it?
Not only is it startling, but it also uses up bandwidth and system resources.
Let’s put an end to that:
- In Settings, click on “Cookies and site permissions”
- Scroll down and click on “All permissions”
- Scroll way down to find “Media autoplay”
- Change the setting from “Allow” to “Block”
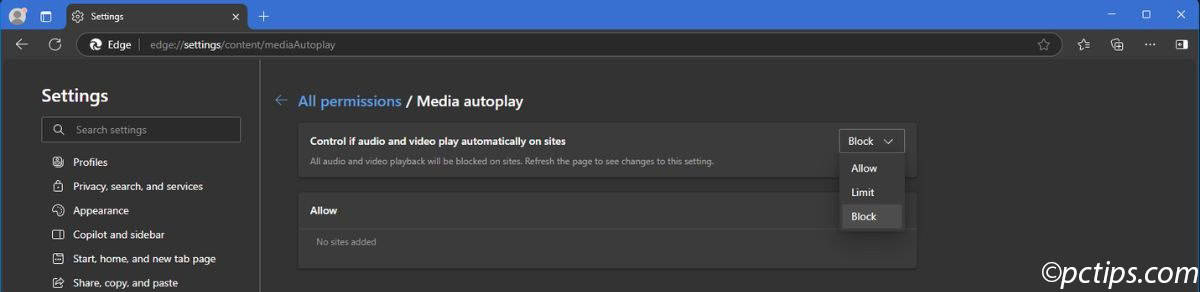
With this change, websites can no longer start playing videos or audio automatically when you visit them.
You’ll still be able to play media manually by clicking on it.
You can also allow specific sites to use autoplay by adding those sites to the “Allow” list.
10. Enable Scareware Blocker
Have you ever seen those pop-up warnings that claim your computer has a virus?
They often include a phone number to call for “technical support.”
That’s scareware — fake warnings designed to trick you into calling scammers or downloading actual malware.
Edge has a brilliant feature to combat this, but it’s turned OFF by default.
Let’s turn it ON:
- Stay in “Privacy, search, and services” from the previous step
- Scroll down to “Security”
- Find “Scareware blocker” (it’s near the top)
- Click the toggle to turn it ON
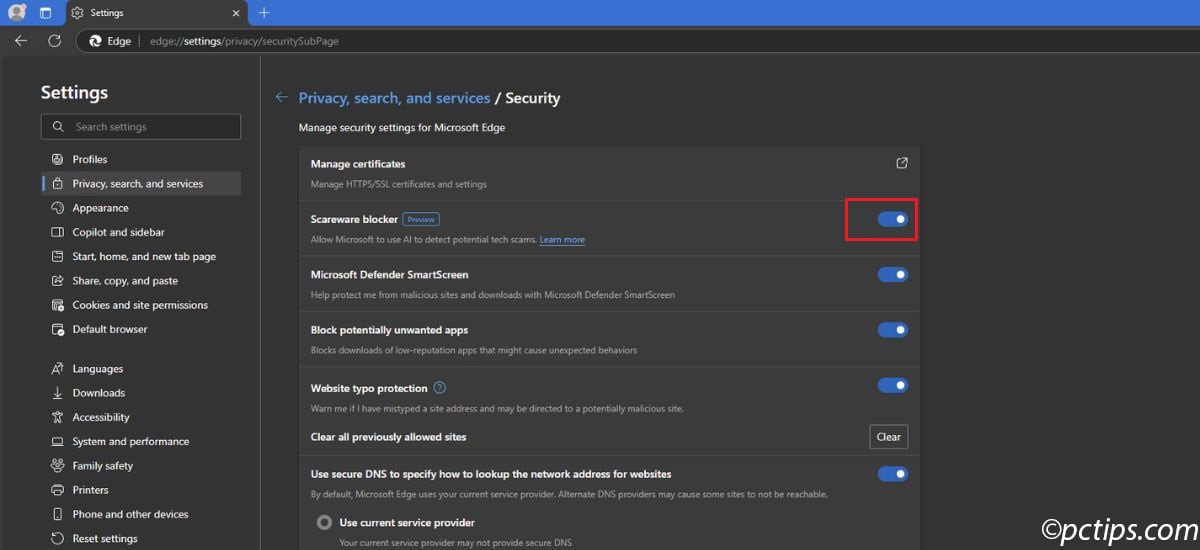
What makes this feature so great is that it uses AI and machine learning to identify these scam tactics.
When it detects a scareware attempt, it automatically exits full-screen mode and returns control to you.
No more panic-inducing takeovers!
This is especially important for less tech-savvy users who might not recognize these scams for what they are.
Trust me, enabling this one setting could save you or a loved one from a very expensive “computer repair” scam.
Your Edge, Your Way
There you have it — simple but powerful changes that transform Microsoft Edge from its default state to a faster, more private, and more enjoyable browser.
Each takes just seconds to implement, but the combined effect is dramatic.
I’ve tested all these settings extensively and they’ve made edge significantly better.
The beauty is that all these options are easily reversible, so you can experiment to find the perfect setup for your needs.
What settings have you changed in Edge to improve your experience?
Drop a comment below — I’d love to hear your thoughts!
And if you found this guide helpful, consider bookmarking it for future reference.
Browser updates sometimes reset settings, and you might want to come back to this list after a major Edge update.