How to Free Up RAM on Windows 11
Last Updated:
If your Windows 11 PC is slow, freezes, or struggles to switch between apps, your RAM might be full.
RAM stores the data your computer needs to run active programs.
When it runs out, your system slows down.
The good news? You can fix this without buying more hardware.
Most users don’t realize how simple it is to free up RAM.
A few small changes can make a big difference.
In this guide, I’ll show you the most effective methods I’ve tested.
Some are quick fixes you can try in minutes. Others offer long-term performance boosts.
Each method is easy to follow—step by step. Let’s get started.
Why Your RAM Is Always Full (and What’s Using It)
Before we dive into fixes, it helps to know what’s actually eating up your RAM.
In most systems, high memory usage comes from three main sources:
open programs (browsers with multiple tabs can use 1-2GB alone),
background processes that run without your knowledge, and
startup programs that launch automatically when you boot up.
When RAM fills up, Windows uses your storage drive as virtual memory, causing noticeable performance delays.
Programs take longer to respond, and switching between applications becomes sluggish.
Quick Methods to Free Up RAM
Close Unused Programs
Start with this technique when performance drops.
Heavy programs often use several gigabytes of RAM that becomes available once you close them.
Here’s how to identify the biggest culprits:
- Right-click your taskbar (that strip at the bottom of your screen)
- Select “Task Manager”
- Click “Processes” on the left side
- Look for the “Memory” column — click its header to sort by RAM usage
You’ll see your programs listed from highest to lowest memory usage.
The top few are your prime suspects.
To close these memory hogs, simply click the X button in their windows.
If a program refuses to close (we’ve all been there), right-click it in Task Manager and select “End Task” to force it to quit.
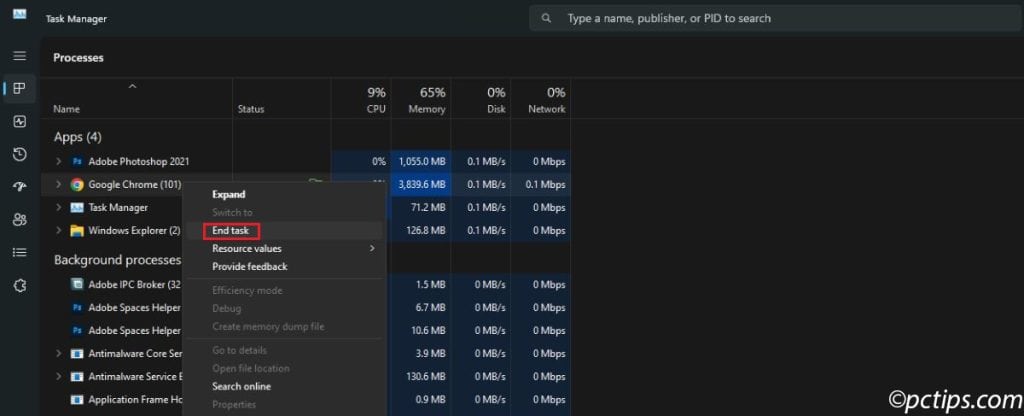
Web browsers like Chrome often top this list (no surprise there), followed by photo editors, video players, and sometimes programs you forgot were even running.
Restart Your Computer
Sometimes the simplest solution is the most effective.
Restarting your computer clears all RAM completely, giving you a clean slate.
Before you restart, save any work you have open.
Then click the Start button, select the power icon, and choose “Restart”.
This isn’t just folk wisdom — it genuinely works.
Over time, RAM can become fragmented, where available memory gets scattered and becomes less efficient.
A restart reorganizes everything efficiently.
Disable Startup Programs
Here’s something that drives me crazy: programs that automatically start when you boot up your computer without asking permission.
These startup programs begin consuming RAM the moment Windows loads, which explains why your computer sometimes feels slow right from the get-go.
To stop this:
- Open Task Manager (right-click the taskbar)
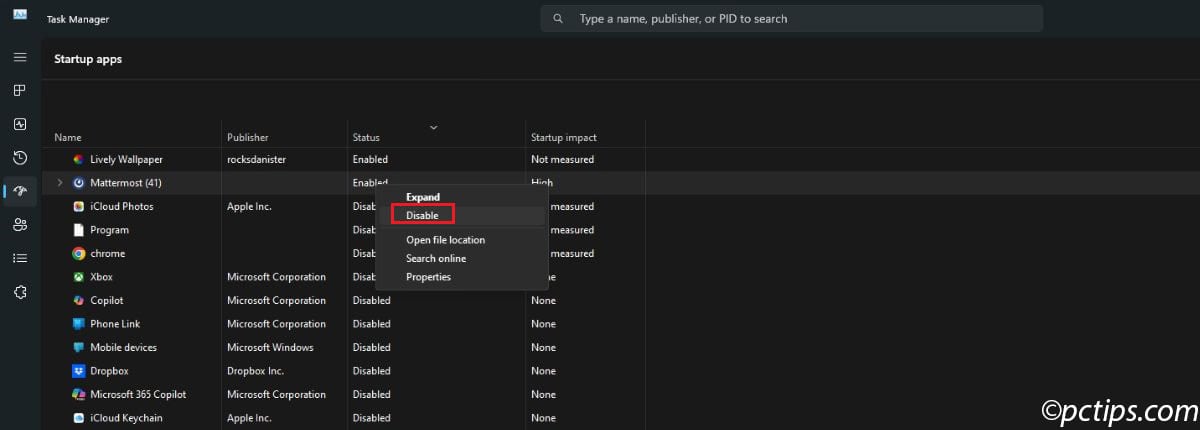
- Click “Startup Apps” on the left
- Look for programs marked “Enabled” — these launch automatically
- Right-click any program you don’t need immediately and select “Disable”
Which programs should you disable? Good candidates include:
- Music players (Spotify, iTunes)
- Chat applications (Discord, Slack)
- Photo organizers
- Gaming platforms (Steam, Epic Games)
Which should you keep enabled? Essential programs like:
- Your antivirus software
- Windows Security
- Audio drivers
- Touchpad software (for laptops)
Prevent Background Apps From Running
Windows 11 lets many apps run in the background even when you’re not actively using them.
These apps update themselves, sync data, and perform other tasks while hiding behind the scenes — all while munching on your RAM.
Windows 11 lets you control which apps are allowed to run in the background:
- Press Windows + I to open Settings
- Click “Apps” from the left sidebar
- Select “Installed Apps”
- Find an app you suspect is running in the background
- Click the three dots next to it and choose “Advanced Options”
- In the dropdown menu for “Let This App Run in Background,” select “Never”
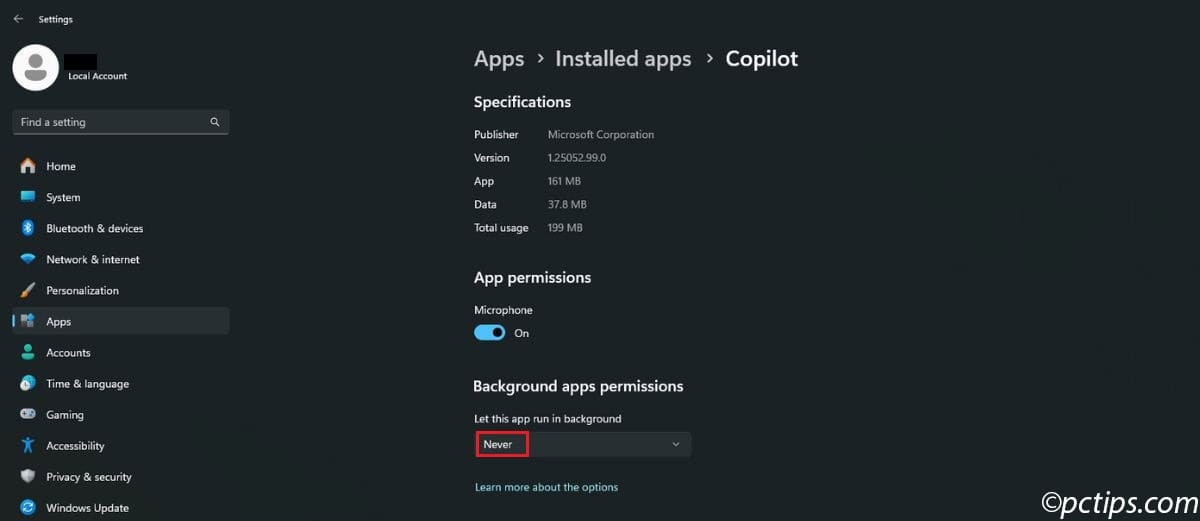
Which apps should you disable? Social media apps, news apps, weather apps, and entertainment apps rarely need to run in the background.
Use Efficiency Mode
This is one of my favorite Windows 11 features that most people don’t know exists.
Efficiency Mode tells Windows to give priority to your active programs while reducing memory usage for less important ones.
Here’s how to use it:
- Open Task Manager
- Go to the “Processes” tab
- Find a program you want to keep open but don’t need full performance from
- Right-click it and select “Efficiency Mode”
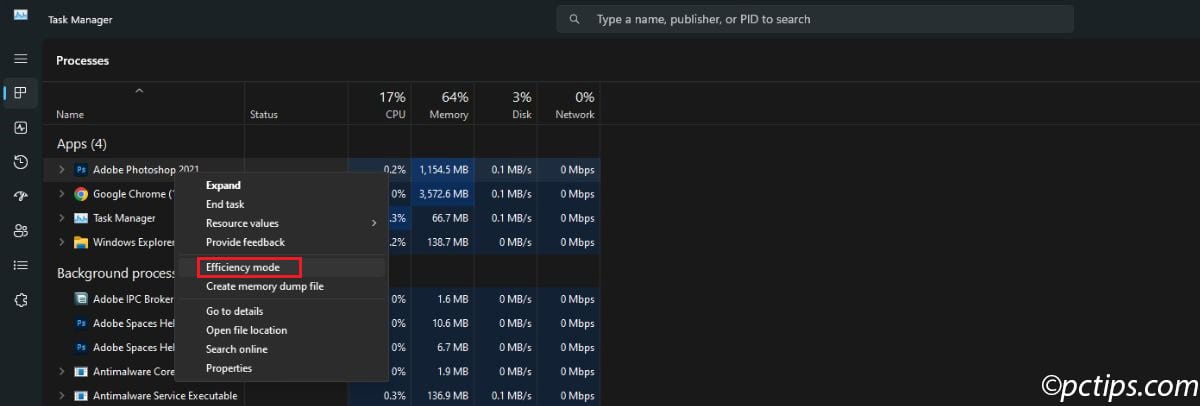
Use Efficiency Mode for programs like:
- Music streaming apps playing in the background
- Chat applications you check occasionally
- Reference documents you need open but aren’t actively editing
I’ve found this particularly useful for media applications like Spotify or video editors that I want to keep running but don’t need full performance from.
Check for Memory Leaks
Sometimes a program develops what we call a memory leak — it keeps requesting more and more RAM but never gives any back.
Memory leaks are sneaky because the affected program might seem to be working fine, but it’s slowly consuming more memory over time.
Eventually, it can eat up gigabytes of RAM.
Windows 11 includes a built-in tool for this:
- Press Windows + R to open the Run dialog
- Type perfmon and press Enter
- In the left sidebar, navigate to Monitoring Tools > Performance Monitor
- Click “Add” or press Ctrl + N
- Select Process > Private Bytes and click “Add” then click on “OK”
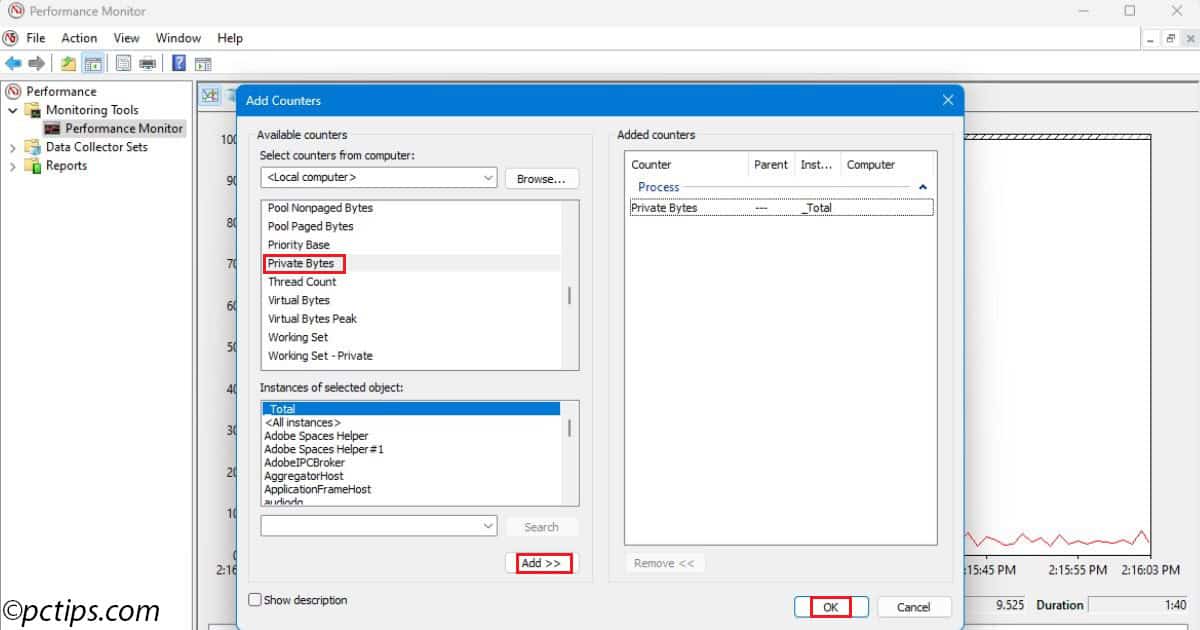
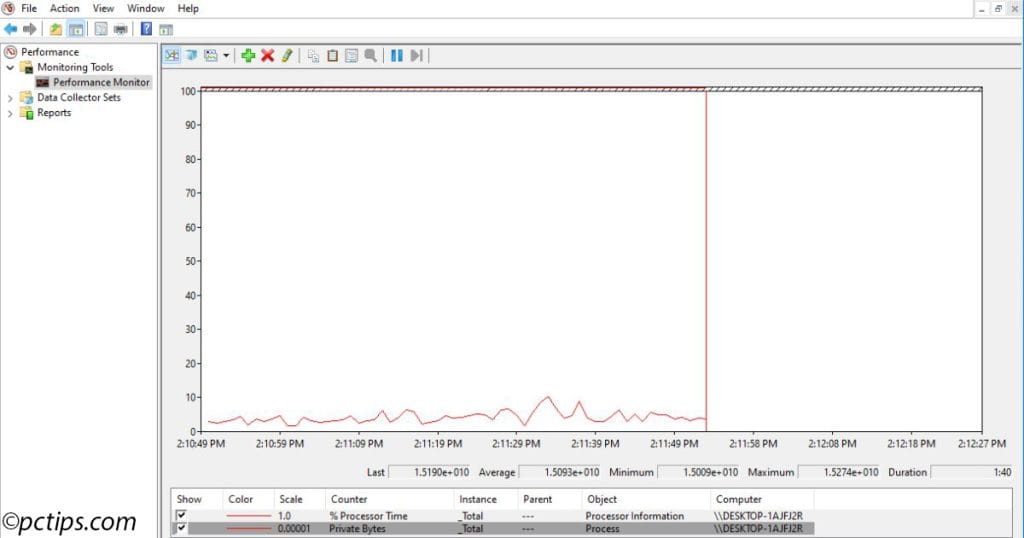
Now watch the graph.
A healthy program’s memory usage goes up and down like a normal heartbeat.
Watch for applications whose memory usage climbs steadily upward but never goes down — that’s your memory leak.
If you spot a memory leak, try these fixes in order:
- Update the program — newer versions often fix memory issues
- Restart just that program — sometimes this resets its memory usage
- Reinstall the program — a fresh installation can solve deeper problems
- Find an alternative — if the problem persists, consider switching to a different app
Scan for Malware
Malicious software doesn’t just threaten your security — it can also be a massive RAM drain.
Some malware deliberately uses excessive memory to slow down your system, while others consume resources through poor programming.
Windows 11’s built-in security tool can help you track down these malware and remove them:
- Press Windows + S to open search
- Type “Windows Security” and open the app
- Click “Virus & Threat Protection”
- Select “Scan Options”
- Choose “Full Scan” and click “Scan Now”
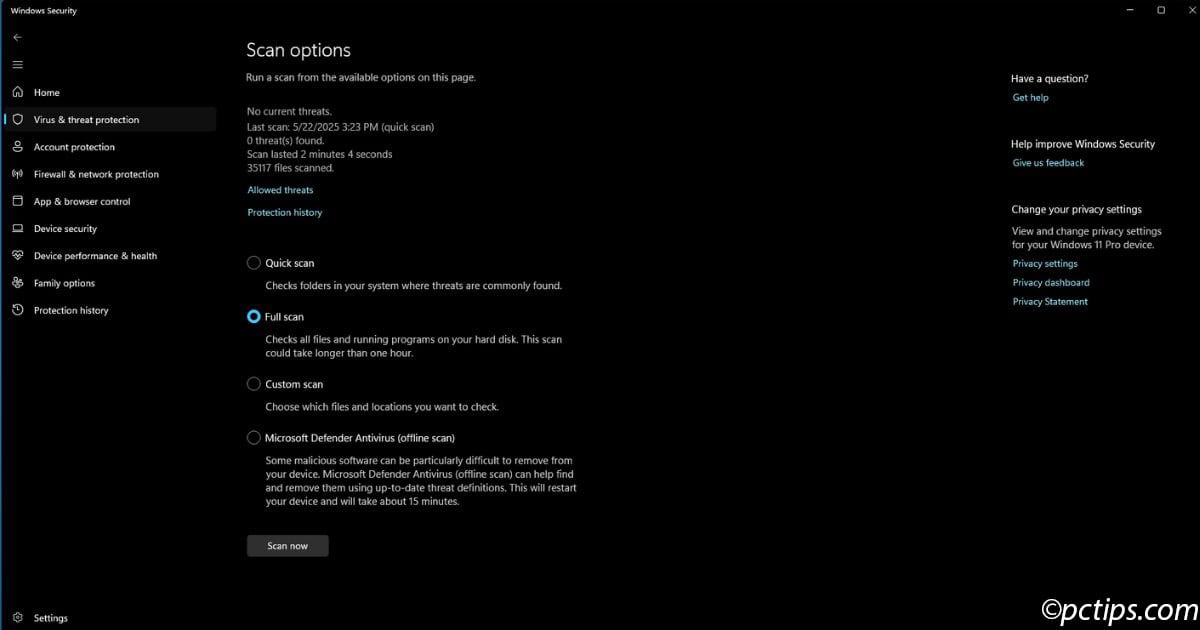
A full scan takes longer than a quick scan (usually 30-60 minutes), but it’s thorough.
Run this monthly or anytime you notice unexplained performance issues.
Pro tip: If you see unknown processes using lots of memory in Task Manager, Google their names before closing them. Some are legitimate Windows services, while others might be malware.
Use Lighter Software Alternatives
Some programs are just resource hogs by design.
Google Chrome, for example, is notorious for using massive amounts of RAM.
With 10 tabs open, it can easily consume 1-2 GB.
Adobe Photoshop is another heavyweight that can easily eat through 2-3GB of memory.
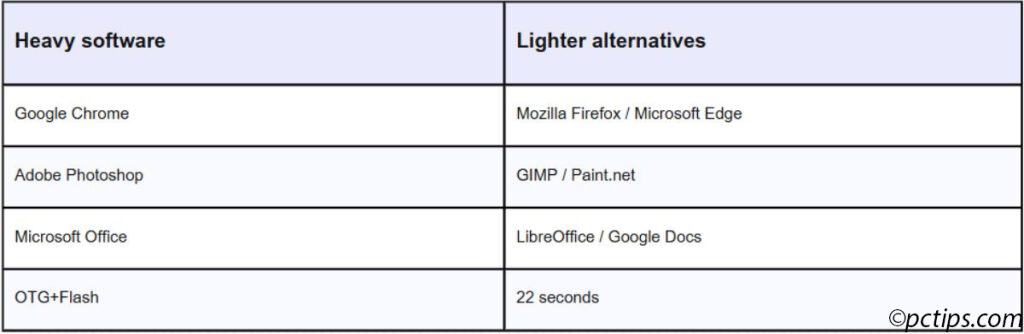
Here are some lighter alternatives that deliver similar functionality with much lower RAM usage:
Web Browsers:
- Mozilla Firefox instead of Chrome (uses 30-40% less RAM in my testing)
- Microsoft Edge (surprisingly efficient and comes pre-installed)
Photo Editing:
- Paint.NET instead of Photoshop for basic editing
- GIMP for more advanced features (still lighter than Adobe products)
Office Suites:
- LibreOffice instead of Microsoft Office
- Google Docs (browser-based, so RAM usage varies with your browser)
The key is matching the tool to the task. You don’t need a sledgehammer to hang a picture frame.
Increase Virtual Memory
When your physical RAM gets full, Windows uses something called virtual memory — basically, it borrows space from your storage drive to act like additional RAM.
The default virtual memory settings are often too conservative.
Here’s how to optimize them:
- Press Windows + S and search for “View Advanced System Settings”
- In the Performance section, click “Settings”
- Go to the “Advanced” tab
- In the Virtual Memory section, click “Change”
- Uncheck “Automatically manage paging file size for all drives”
- Select your main drive (usually C:)
- Choose “Custom Size”
For the size settings, use this formula:
- Initial Size: 1.5 × your RAM amount in MB
- Maximum Size: 3 × your RAM amount (in MB)
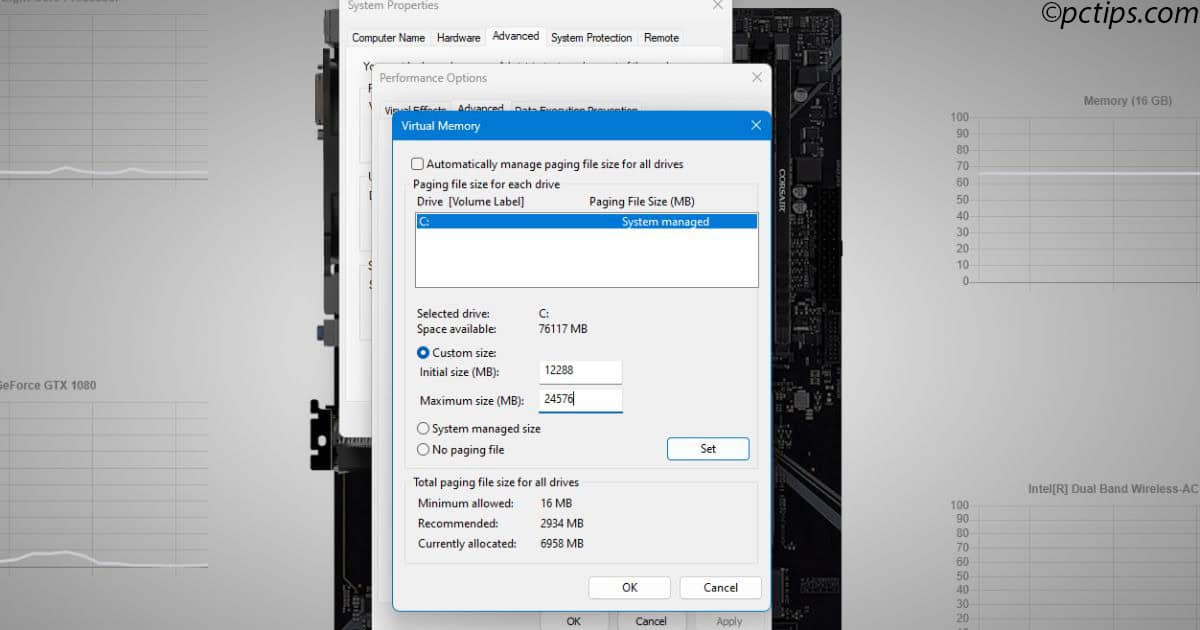
For example, if you have 8GB of RAM:
- Initial Size: 12,288 MB (8 × 1,024 × 1.5)
- Maximum Size: 24,576 MB (8 × 1,024 × 3)
Click “Set,” then “Apply” and “OK.”
Restart your computer for the changes to take effect.
Important note: Virtual memory is slower than physical RAM because it uses your storage drive. It’s a helpful backup, but adding actual RAM is always better if possible.
Upgrade Your RAM
Sometimes software solutions only go so far.
If you consistently run out of memory despite trying everything above, it might be time to upgrade your physical RAM.
First, check what you’re working with:
- Open Task Manager
- Click “Performance” on the left
- Select “Memory”
- Look at “Slots Used” to see if you have available slots
If you see “2 of 4 slots used,” you can add more RAM sticks.
If it shows “2 of 2 slots used,” you can still upgrade by replacing your existing RAM with higher-capacity modules.
RAM upgrade considerations:
- 8GB is the minimum for comfortable Windows 11 use
- 16GB is the sweet spot for most users
- 32GB or more is only necessary for heavy video editing, gaming, or running virtual machines
Quick compatibility check: Your computer’s manual or manufacturer website will tell you the maximum RAM capacity and what type you need (DDR4, DDR5, etc.).
Installing incompatible RAM won’t work and could potentially cause problems.
I upgraded my laptop from 8GB to 16GB last year, and the difference was night and day.
Programs that used to cause stuttering now run smoothly, and I can keep many more applications open simultaneously.
Wrapping It All Up
Here’s the thing about RAM management — it’s not a one-time fix.
Your memory usage changes as you install new programs, update existing ones, and change how you use your computer.
The good news?
Once you understand these techniques, maintaining good RAM hygiene becomes second nature.
I’ve seen 5-year-old computers feel as new again just from proper RAM management.
Your Windows 11 PC has more potential than you might think — it just needs some smart organization.
What’s been your biggest RAM-hogging culprit?
Have you discovered any memory-hungry apps that surprised you?
Drop a comment below and share your experience — I’m always curious to hear about the weird and wonderful ways different computers consume memory.
Try a few of these techniques this week and let me know how much of a difference they make.