12 Google Photos Features Most People Don’t Know About
Last Updated:
Still using Google Photos just for basic backups?
There’s so much more hiding beneath the surface.
Most users only tap into a fraction of what this app can actually do for them.
Google regularly adds useful features that don’t make headlines but can completely change how you organize, find, and share your photos.
I’ve gathered the best ones here.
Let’s dive into 12 killer features that fly under the radar but deserve your attention.
These features often save you time, simplify photo management, and help you get more value from your entire photo library.
1. Advanced Search That Finds Any Photo Instantly
Let’s start with something that’ll save you hours of mindless scrolling.
Google Photos has a search engine that that exceeds expectations.
Sure, you can search for basic stuff like “beach” or “car” and instantly find related photos.
But did you know you can get WAY more specific?
Try these search tricks:
- Search with emojis: Type “🐶” to find dog photos, “🏔️” for mountains, or “🍔” for burger photos
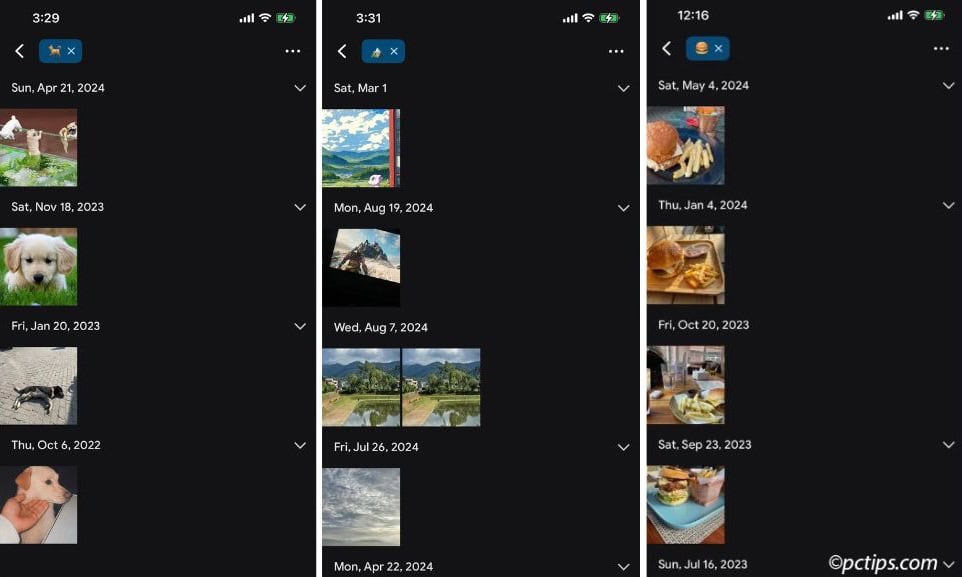
- Find by dates: Search “Christmas 2022” or “Summer 2023” to jump to exact time periods
- Find by face: Type “Mom” to see all her photos
- Find objects: Search “birthday cake” to find birthday celebrations
- Find by activity: Try “beach sunset” or “wedding” to find those moments
- Find text in photos: Search “receipt” to find expense pictures
- Find by location: Type “Paris” or “backyard” to find photos from specific places
But here’s the REAL magic—you can combine these!
Try “Ben at the beach 2023” or “pizza Chicago summer.”
It’ll find exactly what you’re looking for.
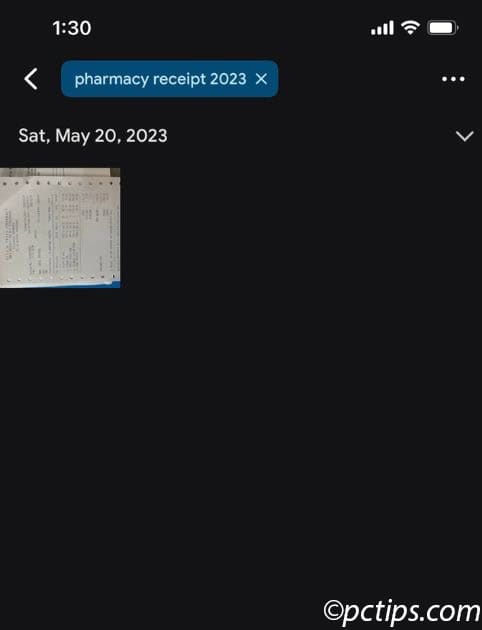
I recently needed to find a photo of a pharmacy receipt from 2023.
Instead of scrolling through thousands of pics, I typed “Pharmacy receipt 2023” and VIOLA—found it in seconds.
This isn’t just convenient; it’s a total game-changer for anyone with a large photo library.
Quick Tip: The more specific your search terms, the better your results will be.
Don’t be afraid to get detailed!
2. Magic Eraser and AI Editing Tools
Remember when these editing tools were just for Pixel phones or paid subscribers of Google One?
Not anymore!
As of April 2024, these powerful AI tools are available to EVERYONE using Google Photos.
That’s right—you don’t need a Pixel or a Google One subscription.
Here’s what you can now access on any Android 8.0+ or iOS 15+ device:
- Magic Eraser: Remove photobombers, power lines, or that random stranger in your vacation shot
- Camouflage Mode: Don’t want to remove something entirely? This tool makes distracting objects blend into the background
- Photo Unblur: Turn those slightly blurry photos into crisp, clear memories
- Portrait Blur: Add that professional-looking background blur to any photo—even ones not taken in portrait mode
- Sky Suggestions: Transform a dull sky into a dramatic sunset
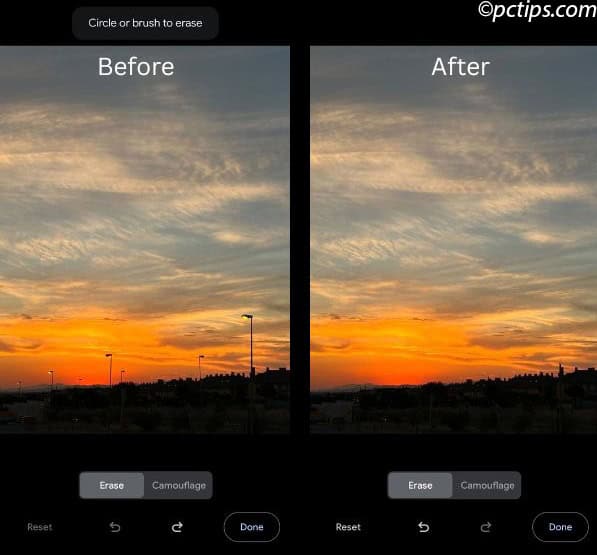
I tested Magic Eraser on an sunset photo with random street lamps in the background.
Two taps later
The street lamps are gone, and it looks good too.
Remember: These tools work best on high-resolution photos, so try to use original quality images whenever possible.
3. Google Lens: Identify Anything in Your Photos
Here’s a feature I wish I’d started using years ago: Google Lens integration.
This tool instantly analyzes and identifies almost anything in your photos.
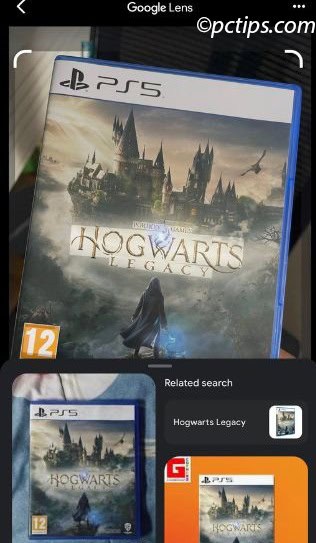
Tap the Lens icon on any photo, and it can:
- Identify products you want to buy
- Recognize landmarks and provide information
- Identify plants and animals
- Copy text from images
- Translate text in real-time
4. PhotoScan: Turn Physical Photos Digital in Seconds
Got shoeboxes full of old family photos?
The PhotoScan companion app is a hidden gem that deserves way more attention than it gets.
This free app (available for both iOS and Android) turns your phone into a high-quality photo scanner that:
- Automatically detects edges of photos
- Eliminates glare by taking multiple angles
- Straightens and crops the image perfectly
- Uploads directly to your Google Photos library
The process is brilliantly simple: take one overall shot, then four more guided shots from different angles.
The app stitches these together to remove glare and create a spotless copy.
I recently used PhotoScan to capture a page from my sister’s children book.
The app expertly handled the shiny paper and uneven lighting in my room.
The picture came out surprisingly clear.
Here’s how it looks side by side.
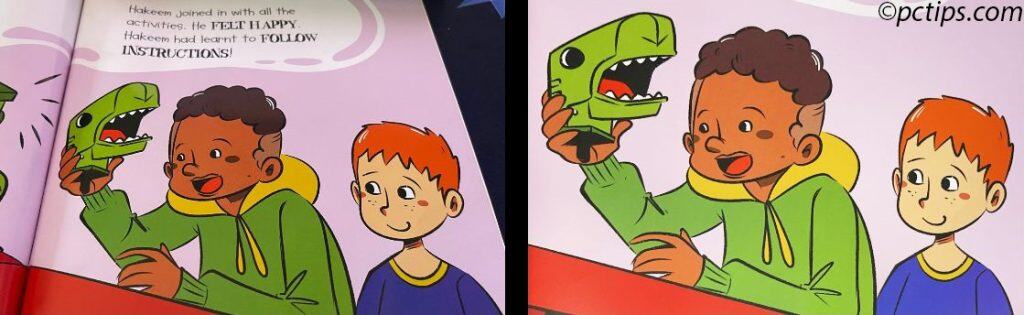
The final image looked professionally scanned rather than photographed.
The quality is remarkable—far better than simply taking a photo of a photo.
Once they’re in Google Photos, I can use all the editing tools to touch up colors or remove scratches.
5. Built-in Video Editor
This feature impressed me the first time I used it.
Google Photos has a surprisingly good video editor tucked away inside the app.
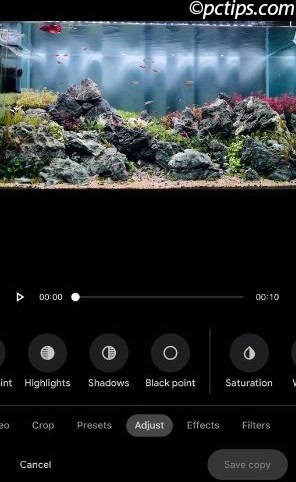
Beyond the basic trim and crop functions, check out the Adjustments menu for:
- Brightness, contrast, and white balance
- Saturation and vibrance controls
- Shadow and highlight adjustments
- HDR like effect enhancement
- Skin tone optimization
- Warmth and tint controls
You can preview changes in real-time by tapping and holding on the video while editing.
It’s incredibly intuitive.
Remember: You can save edited copies while keeping your original, so don’t worry about experimenting with different looks.
6. Auto-Share Albums With Family Members
If you’re constantly texting photos to family members, this feature will change your life.
Automatic album sharing lets you create albums that update automatically whenever you take new photos of specific people or pets.
Here’s how it works:
- Create a new album
- Tap or click “Select people & pets” and choose who the album should focus on (you’ll need face grouping enabled).
- After creating the album, tap the Share icon.
- Share the album with family members via email or a shareable link.
- Make sure auto adding is enabled
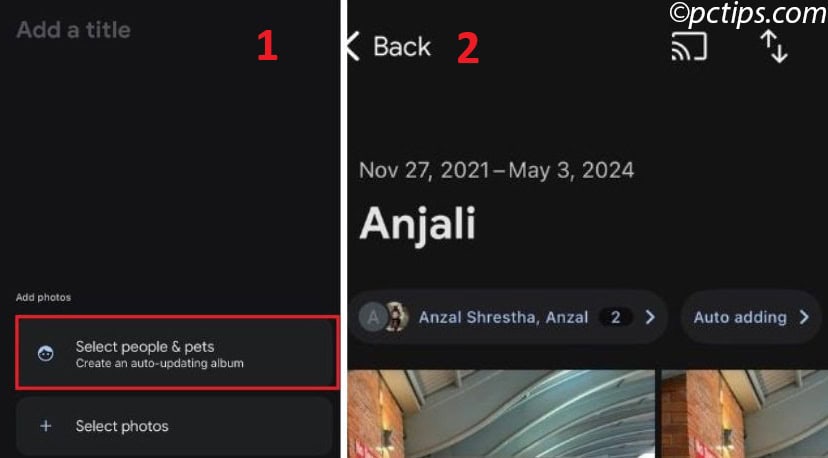
Google’s facial recognition will identify when you take new photos of the selected person/pet and add them to the shared album without you lifting a finger.
I set this up for my parents with photos of my sister.
Now, every time I take a new photo of her, my parents automatically get it in their shared album.
No more “Send me that photo!” texts.
It’s completely hands-off.
7. Partner Sharing
Here’s an underused feature that’s perfect for couples.
Partner sharing lets you automatically share photos with your significant other based on customizable rules.
You can set it to:
- Share all photos
- Share only photos of specific people
- Share from a certain date onward
- Share photos taken together
My favorite setting is “photos of you two together”—Google’s facial recognition identifies when you’re both in a photo and automatically shares it with your partner.
Now we both just have access to all the photos we’re in together, without any manual sharing.
How to Enable Partner Sharing:
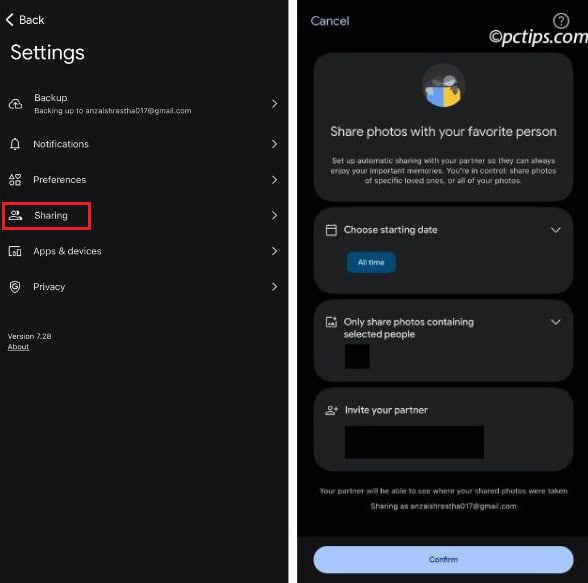
- Tap your profile picture (top right)
- Go to Google Photos settings
- Select Sharing and tap on Partner Sharing
- Tap on Select partner
- Choose your partner’s Google account (or enter their email address)
- Pick what you want to share:
- All photos
- Only share photos containing selected people
- Select starting date and press “Confirm“
Once your partner accepts the invite, the sharing will begin automatically based on the options you chose.
Quick Tip: This works best when both people have Google Photos installed and set up partner sharing in their accounts.
8. Free Up Device Storage With One Tap
Running out of phone storage but hate manually deleting photos?
Google Photos has a brilliant solution.
The “Free up space” tool:
- Identifies photos already backed up to the cloud
- Lets you delete them from your device with one tap
- Keeps them accessible in Google Photos
- Helps you quickly reclaim gigabytes of storage
I recently freed up 7GB of storage on my phone in less than a minute using this tool.
All my photos are still accessible in Google Photos, but my phone is no longer giving me those annoying “Storage Full” warnings.
How to Use It:
- Tap your profile picture (top right).
- Select “Apps and devices”
- Tap on Free up space
- Google photos will now find items that are already backed up
- Tap “Delete [X] items” and confirm.
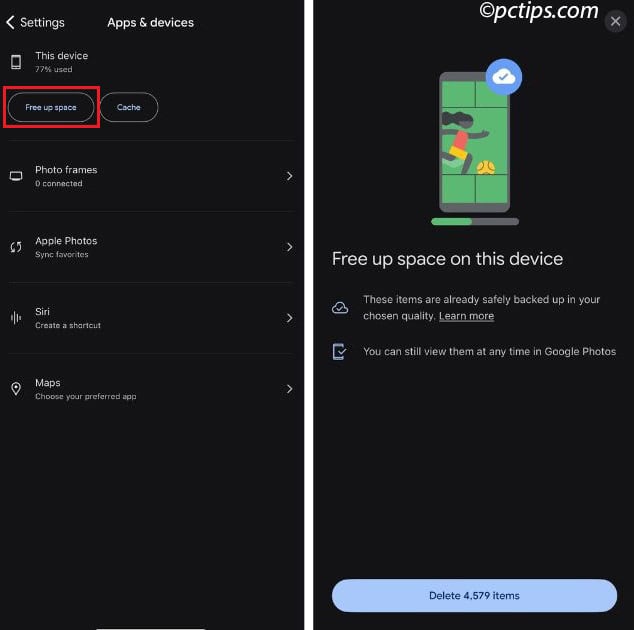
Your media will be removed from your device, but you can still view everything in the app, as long as you’re online.
Quick Tip: Run this tool before trips when you know you’ll be taking lots of photos!
9. Create Movies, Animations, and Collages
The ‘Create’ button in Google Photos lets you make more than just albums:
- Highlight video: Automatically edited videos with music and transitions
- Animation: Turn burst photos into short animations
- Collages: Artistic photo arrangements with various layouts
- Cinematic photos: Add 3D-like movement to still images
My favorite is the cinematic photos feature.
It adds subtle motion to still images, creating an effect where the photo seems to come alive.
It’s especially better with landscape photos or portraits.
Quick Tip: You can either let Google automatically create these for you or make your own by selecting specific photos.
10. Archive Photos Without Deleting
We all have photos we don’t want to delete but also don’t want cluttering up our main photo view?
Maybe receipts, screenshots, or personal photos you’d prefer to keep private.
This is exactly what the Archive feature does.
Just select any photo, tap the three-dot menu, and choose “Archive.”
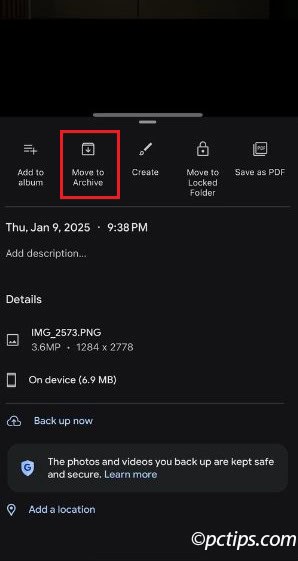
These photos:
- Disappear from your main photo grid
- Remain searchable
- Stay in albums they’re already in
- Can be unarchived anytime
I use this for all my screenshots, document scans, and reference photos.
My main photo stream stays clean with just actual memories, while everything else is tucked away but still accessible when I need it.
Remember: Archived photos are still backed up and synchronized—they’re just hidden from your main view.
11. Locked Folder Secures Private Photos
Sometimes archiving isn’t enough—some photos need actual privacy.
The Locked Folder feature is designed for these situations.
Photos in your Locked Folder:
- Are protected by your device’s screen lock (PIN, pattern, or biometric)
- Don’t appear in your main photo grid or shared albums
- Won’t show up in search results
- Can be set to either “Do not back up” or “Turn on backup”
This is perfect for sensitive documents like ID cards, insurance information, or any truly private photos you want to keep secure.
Here’s how to add photos to your Locked Folder:
- Open any photo in Google Photos
- Tap the three-dot menu in the top right
- Select “Move to Locked Folder”
- Verify with your PIN, face ID, or fingerprint
- Choose your backup preference when prompted
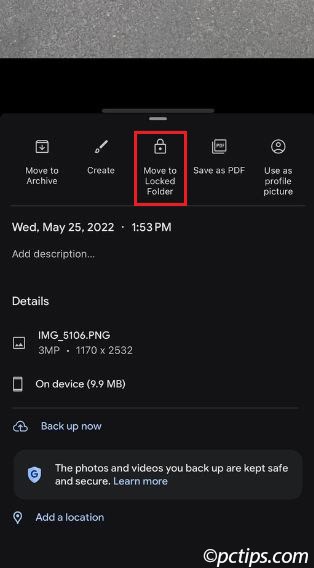
I use this for photos of my passport, driver’s license, and other important documents.
It gives me peace of mind knowing they’re accessible when I need them but completely private and secure from prying eyes or accidental sharing.
12. Order Physical Prints Directly From the App
The best family photos should live in albums and frames, not just cloud storage.
Google Photos makes it incredibly easy to order physical prints directly from the app.
You can order:
- Regular photo prints
- Photo books (hardcover or softcover)
- Canvas prints
- Photo prints with dates automatically added
The process is seamless—select your photos, choose your product, customize as needed, and check out.
To create a photo book:
- Open the Google Photos app
- Tap Library > Utilities > Photo book
- Choose Start a new book or pick a suggested one
- Select 20–100 photos (from albums, favorites, or search)
- Tap Next to customize:
- Rearrange photos
- Zoom or crop
- Add captions (optional)
- Pick softcover or hardcover
- Tap Checkout to place your order
Prices are competitive with other print services, and the quality is excellent.
Wrapping Up
Google Photos is so much more than a cloud backup—it’s a powerful tool for organizing, editing, and revisiting your memories.
And the best part? All these features work across both Android and iOS platforms.
Which of these features are you most excited to try?
Have you been using Google Photos for years without knowing about some of these hidden gems?
I’d love to hear which ones surprised you the most!
And if you’ve came across any other Google Photos tricks I haven’t mentioned, please share them in the comments.
Even after all these years, I’m still learning new ways to get more out of this incredible tool.