4 Ways to Block USB Devices on Windows
Last Updated:
USB ports are like open doors on your PC — convenient for you, but potentially risky if left unattended.
These seemingly innocent connections can become security vulnerabilities when unauthorized devices connect to your system.
Whether you’re worried about malware sneaking in or sensitive data sneaking out, blocking USB access might be exactly what you need.
I’ve personally tested every method in this article on both Windows 10 and Windows 11 systems.
Some work better than others depending on your situation, but all of them get the job done.
Let’s dive in!
Why Block USB Devices Anyway?
Let’s start with the obvious question: Why would anyone want to block a USB device?
There are actually several important reasons:
- Security from malware — USB drives are notorious for spreading viruses. Remember Stuxnet? That infamous computer worm spread primarily through USB drives.
- Data theft prevention — An unattended computer with open USB ports is an invitation for someone to plug in a drive and copy your sensitive files in minutes.
- Corporate policy compliance — Many organizations restrict USB access to protect confidential data and maintain security standards.
- Parental controls — Parents might want to prevent younger users from installing unauthorized software or accessing inappropriate content via USB.
Now that we know why, let’s look at HOW to block those USB ports.
I’m going to walk you through four different methods, starting with the simplest and moving to the most comprehensive.
Method 1: Group Policy Editor (For Windows Pro Users)
This is the most robust solution if you’re using Windows 10 or 11 Pro, Enterprise, or Education editions.
It lets you create system-wide rules that are difficult to bypass.
Quick note: The Group Policy Editor is NOT available on Home editions of Windows.
If you’re using Windows Home, skip ahead to Method 2.
Here’s how to block USB devices using Group Policy:
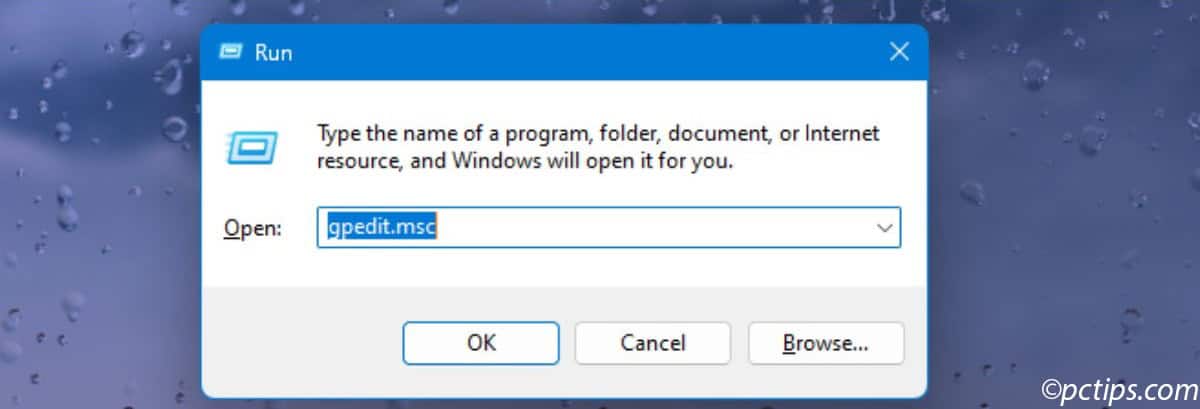
- Press the Windows key + R to open the Run dialog box
- Type gpedit.msc and press Enter
- Navigate through the following path:
- Computer Configuration
- Administrative Templates
- System
- Removable Storage Access
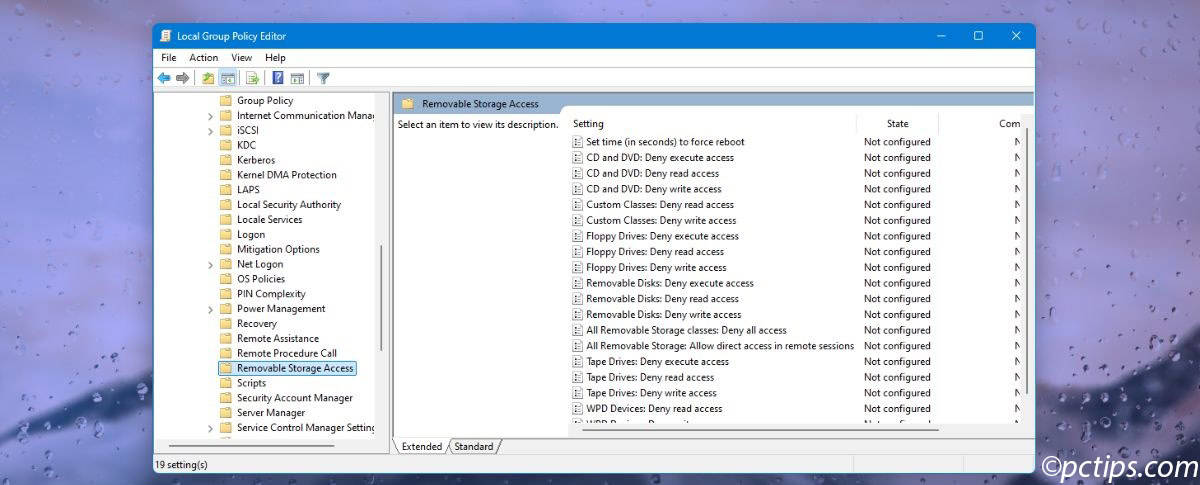
Inside the “Removable Storage Access” folder, you’ll find several options.
The two most useful ones are:
- Removable Disks: Deny execute access — This prevents programs on USB drives from running
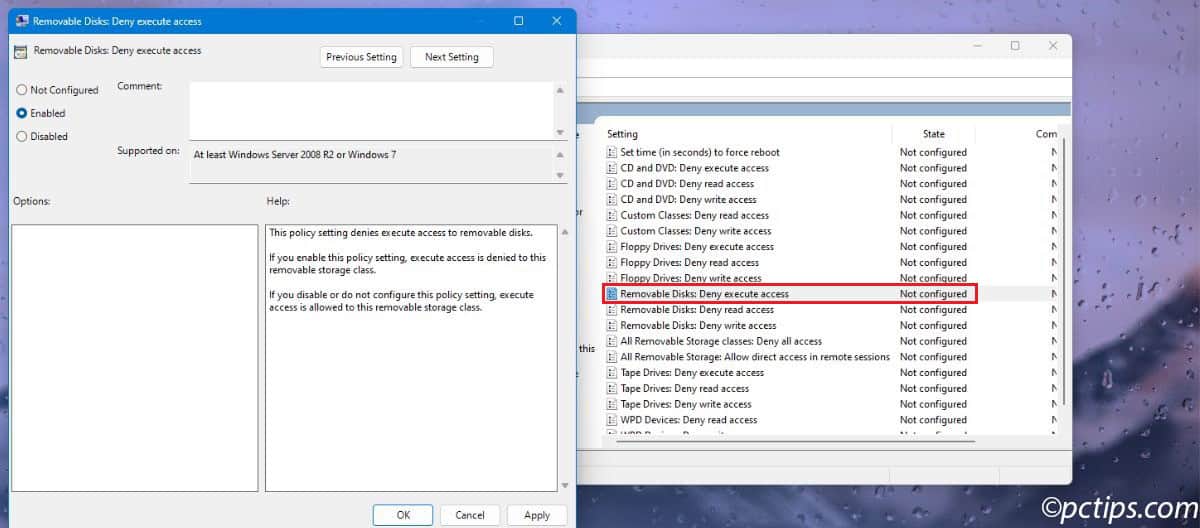
- All Removable Storage classes: Deny all access — This completely blocks all USB storage devices
For complete protection, I recommend the second option.
When I tested this setting, it immediately prevented access to all my USB drives — even ones that were already plugged in!
To enable this setting:
- Double-click on “All Removable Storage classes: Deny all access”
- Select “Enabled”
- Click “Apply” and then “OK”
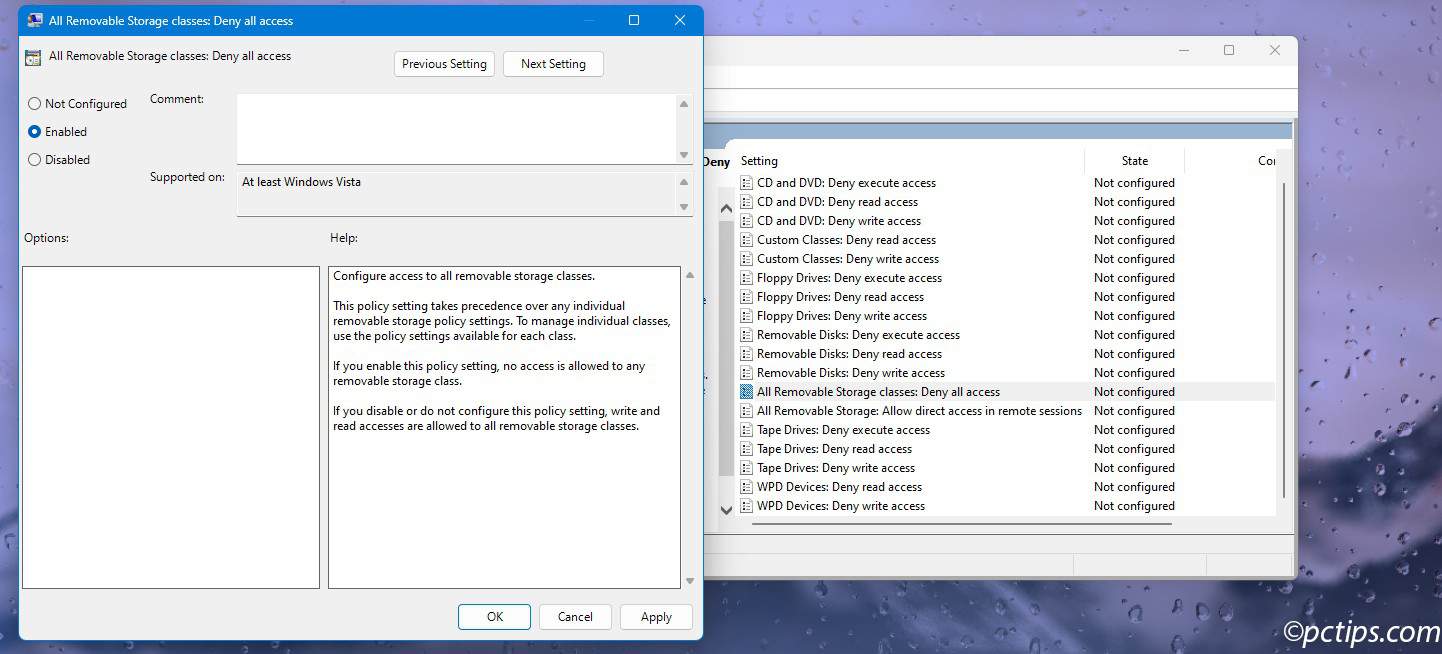
That’s it! Your system will now block USB storage devices.
When someone plugs in a USB drive, it won’t show up in File Explorer, and they’ll get a “Access Denied” message if they try to access it.
I tested this with five different USB drives and none of them appeared in File Explorer after enabling the policy.
What I love about this method is how thorough it is.
It applies to ALL removable storage — not just USB drives, but also external hard drives, memory cards, and even CD/DVD drives.
If you need total lockdown, this is your best bet.
Remember: This method affects the entire computer, not just specific users. Anyone using the PC will be unable to access USB storage devices.
Method 2: Registry Editor Method
Don’t have Windows Pro? No problem!
This method works on ANY version of Windows, including Home editions.
It’s a bit more technical, but I’ll walk you through it step by step.
CAUTION — Working in the registry can be risky if you’re not careful.
Before proceeding, create a System Restore point by searching for “Create a restore point” in the Start menu and following the prompts.
Ready? Let’s do this:
- Press Windows key + R to open the Run dialog
- Type regedit and press Enter (confirm the UAC prompt if it appears)
- Navigate to this location: HKEY_LOCAL_MACHINE\SYSTEM\CurrentControlSet\Services\USBSTOR
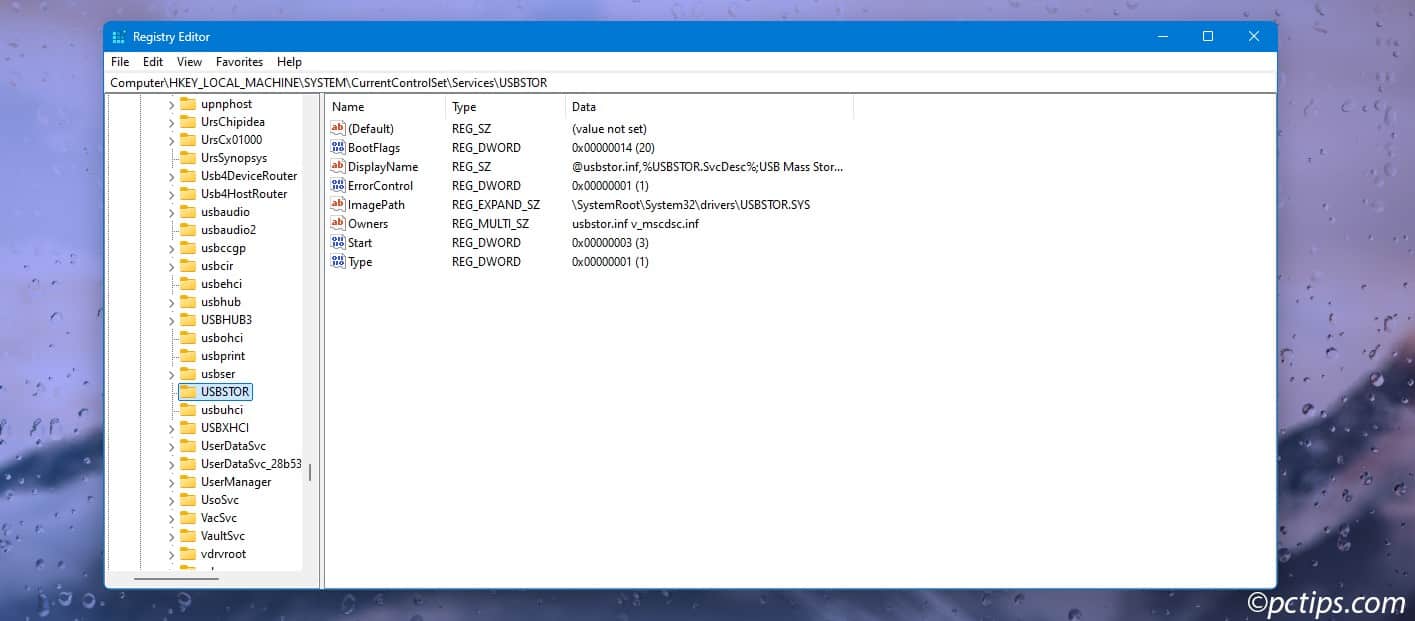
- In the right panel, find and double-click on Start
- Change the Value data from 3 to 4

- Click OK and close the Registry Editor
- Restart your computer for the changes to take effect
What does this do?
The value “3” means the service starts automatically, while “4” means disabled.
Changing that value from 3 to 4 disables the USB storage driver service.
When Windows can’t load the driver, it can’t recognize any USB storage devices.
Pretty slick, right?
I particularly like this method because it’s quick and works on ANY Windows version.
The downside?
It blocks ALL USB storage devices without discrimination.
What’s nice about this approach is that it’s easily reversible.
If you need to use USB devices again, simply change the value back to “3” and restart your computer.
I should mention that this method isn’t quite as robust as the Group Policy approach.
Users who know their way around the Registry might be able to change it back.
But for general home use or basic security, it works perfectly.
Method 3: Device Manager Method
Need a temporary solution or just want to block USB devices for a short time?
This method is perfect for that.
It’s less permanent than the previous methods and can be quickly reversed.
This approach is particularly useful when you:
- Need a temporary solution
- Want to block specific USB ports (not all of them)
- Don’t want to mess with system policies
Here’s how to do it:
- Right-click on the Start button
- Select Device Manager from the menu
- Expand the Universal Serial Bus controllers section
- Right-click on USB Root Hub (you might have several with names like “USB Root Hub (USB 3.0)”)
- Select Disable device
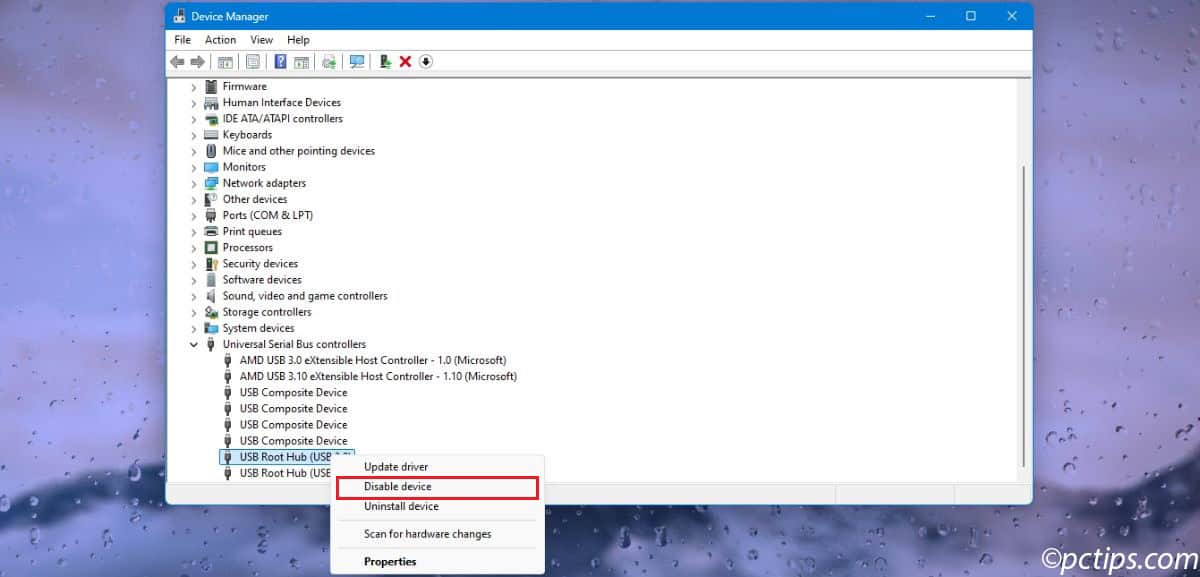
- Confirm when prompted
- Repeat for other USB Root Hubs if needed
When I tested this method, the USB ports connected to that particular root hub immediately stopped working.
Any devices already connected were disconnected, and new devices couldn’t be recognized.
Remember: Most computers have multiple USB controllers.
You may need to disable several “USB Root Hub” entries to block all USB ports.
After disabling the USB controllers, any devices connected to those ports will stop working immediately.
When I tested this, even my already-connected flash drive disappeared from File Explorer the moment I disabled the controller.
The big advantage here?
Super quick to turn on and off.
Need to use a USB drive briefly?
Just right-click the disabled controller and select Enable device.
When you’re done, disable it again.
But be warned — this can also affect other USB devices like your mouse or keyboard if they’re connected to the same USB controller! That’s why this method is best for temporary blocking.
Method 4: USB Block Software
The previous methods are great, but they’re all-or-nothing solutions.
What if you want more fine-grained control?
What if you want to allow some USB devices but block others?
Or what if you want to require password authentication before a USB device can be used?
That’s where specialized software comes in, and my testing shows it’s worth every penny if you need advanced features.
These programs offer more features and often a more user-friendly interface.
One excellent option is the aptly named “USB Block” software.
Here’s why I love it after testing:
- Password protection — Requires authorization before USB drives can be accessed
- Selective blocking — Can block specific types of devices while allowing others
- Logging — Keeps track of all attempted USB connections (great for security monitoring)
- Temporary access — Can grant time-limited access to USB devices
- Easy to manage — Simple interface for enabling/disabling protection
The basic version is free, but the premium version offers more comprehensive protection for a reasonable price.
Here’s how to set it up:
- Download and install USB Block
- Launch the program
- Set up a strong password when prompted (This is CRUCIAL — make it good!)
- Check the boxes for the types of devices you want to block (USB drives, network access, etc.)
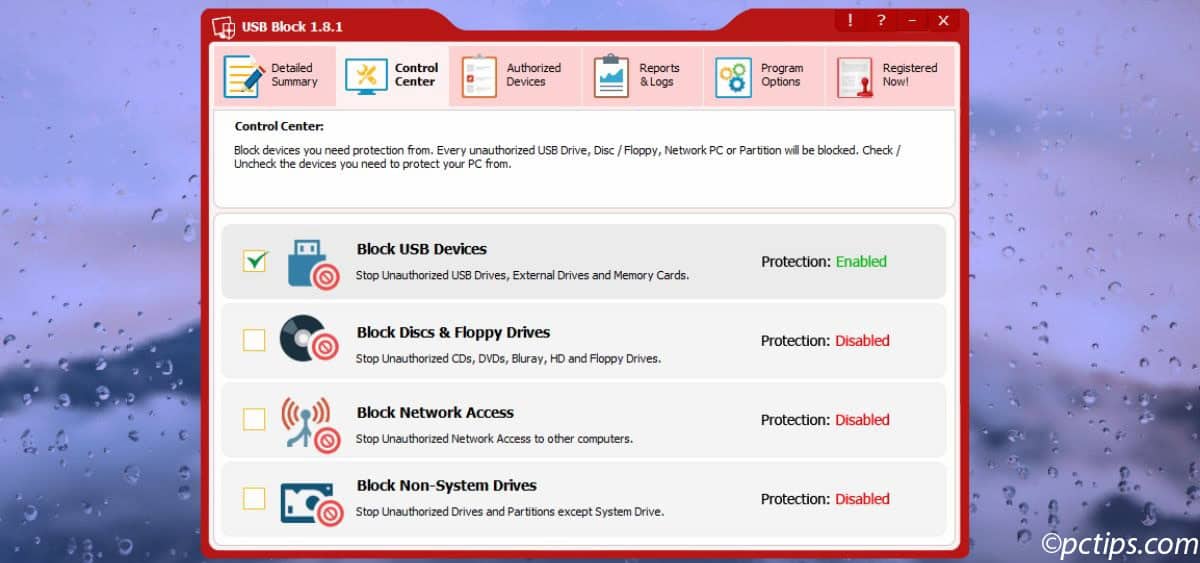
- Click Apply to enable protection
Now when someone connects a USB drive, they’ll see a password prompt instead of the drive appearing in File Explorer.
No password, no access — simple as that!
I particularly like how this software handles authorization.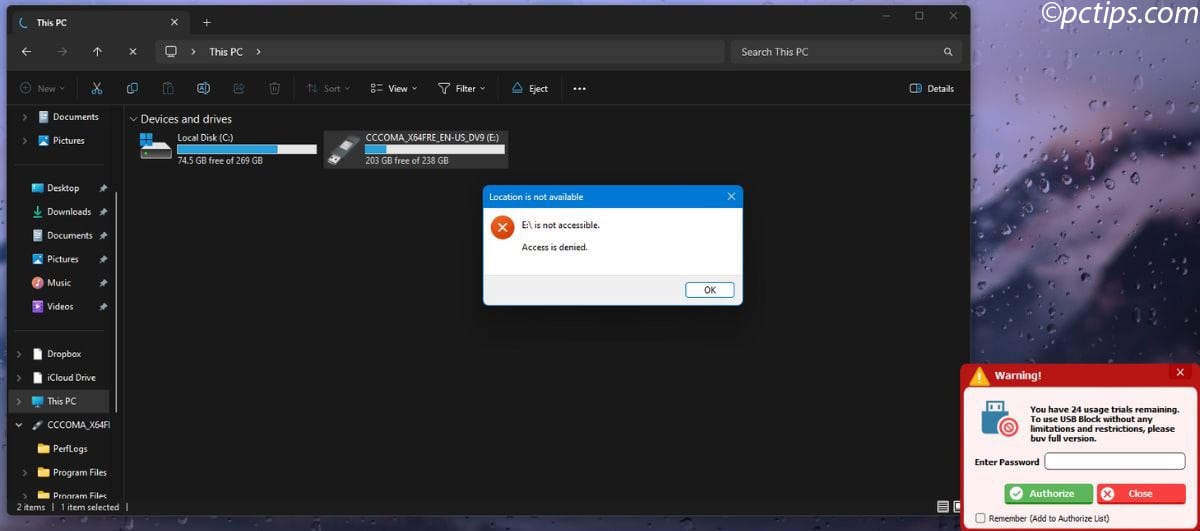
When you enter the password, you can choose to authorize a specific drive permanently, so trusted devices can be used without constant password prompts.
In my testing, I found this to be the most flexible solution.
It’s perfect for situations where you want to allow some USB access (like for your own drives) while blocking unauthorized devices.
The premium version adds even more features, like remote management and advanced logging, making it suitable for business environments.
Which Method Should YOU Choose?
After testing all four methods, here’s my practical advice on which one to use:
- Use Group Policy if you have Windows Pro and want a simple, built-in solution
- Use Registry Editor if you have Windows Home and want a free, system-wide solution
- Use Device Manager if you need a quick temporary block that you’ll switch on/off frequently
- Use USB Block Software if you need password protection or more granular control
My personal preference?
I use the Group Policy method on my work computer (running Windows 11 Pro) and USB Block on my home PC where I sometimes need more flexibility.
Quick Tips for Maximum USB Security
Beyond just blocking USB devices, here are some additional tips I’ve learned that can help keep your system secure:
- Encrypt sensitive data on your computer. That way, even if someone does manage to copy files, they can’t read them.
- Keep your antivirus updated to detect any malware that might try to sneak in through USB devices.
- Physically secure your computer when possible. Software protection is great, but a locked door is sometimes better!
- Create separate user accounts with limited permissions for other users who might need computer access.
- Use Windows Defender’s “Controlled folder access” feature to add another layer of protection against ransomware that might spread via USB.
Wrapping Up
There you have it — four solid methods to block USB devices on your Windows PC.
Each has its strengths and ideal use cases, but they all accomplish the core goal of preventing unauthorized USB access.
Have you had any close calls with USB security?
Which method are you leaning toward?
Remember, good security isn’t about paranoia — it’s about peace of mind.
Taking a few minutes to implement one of these methods could save you hours of heartache cleaning up after a security breach.
Drop me a comment below! I’d love to hear which method worked best for you.